Kid-Approved No-Bake Mummy Rice Krispie Treats
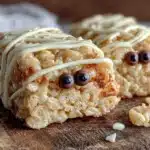
These adorable no-bake mummy Rice Krispie treats are perfect for Halloween parties and classroom celebrations. Made with simple ingredients and ready in under 20 minutes, they’re a fun and delicious treat that kids love to help make.
- Prep Time: 15 minutes
- Cook Time: 5 minutes
- Total Time: 20 minutes
- Yield: 12-15 servings 1x
- Category: Dessert
- Cuisine: American
Ingredients
- 3 tablespoons unsalted butter
- 10 ounces mini marshmallows (one standard bag)
- 6 cups Rice Krispies cereal
- 1 cup white chocolate chips
- 1 teaspoon coconut oil or vegetable shortening
- 1/2 cup mini chocolate chips
- Pinch of salt (optional)
Instructions
- Prep your workspace. Line your 9×13-inch baking dish with parchment paper, leaving some overhang on the sides. Spray the parchment lightly with non-stick cooking spray.
- Melt the butter. In your large pot, melt the 3 tablespoons of butter over medium-low heat. Don’t rush this—if the butter burns, the whole batch tastes off. Swirl the pot until it’s fully melted and just starting to bubble.
- Add the marshmallows. Pour in the entire 10-ounce bag of mini marshmallows. Stir constantly with your wooden spoon until they’re completely melted and smooth. This takes about 3-4 minutes. The mixture should be glossy and stretchy, like a warm cloud. Remove from heat immediately once smooth.
- Stir in the cereal. Add the 6 cups of Rice Krispies cereal all at once. Fold gently until every piece is coated in marshmallow. Don’t overmix or you’ll crush the cereal—you want those crispy bits intact. Work quickly before the mixture sets.
- Press into the pan. Scrape the mixture into your prepared baking dish. Press it down firmly and evenly. I use a piece of parchment paper on top and press with my hands—it keeps the sticky mess off your fingers. Aim for an even layer about 1/2 to 3/4 inch thick.
- Cool and cut. Let the treats cool at room temperature for about 15 minutes. Then use your sharp knife to cut them into rectangles—about 2 inches by 3 inches works well. You should get 12 to 15 pieces, depending on how you cut. Don’t worry if they’re not perfect; the mummy wrappings will hide the edges.
- Freeze briefly. Place the cut treats on a baking sheet and pop them in the freezer for exactly 10 minutes. This step is crucial—it firms up the marshmallow so the white chocolate doesn’t melt it when you start decorating.
- Melt the white chocolate. In a small microwave-safe bowl, combine the 1 cup of white chocolate chips with 1 teaspoon of coconut oil. Microwave in 20-second intervals, stirring between each, until smooth. Don’t overheat or the chocolate will seize. It should be pourable but not runny.
- Create the mummy wrappings. Transfer the melted white chocolate to your piping bag or zip-top bag. Snip a tiny corner off the tip. Working with one treat at a time, drizzle the white chocolate back and forth across the top to look like mummy bandages. Don’t cover the whole surface—leave gaps for the eyes. Let your lines be uneven and messy; that’s the charm.
- Add the eyes. While the white chocolate is still wet, press two mini chocolate chips into the gaps for eyes. Place them slightly off-center for a goofy mummy look.
- Set and serve. Let the treats sit at room temperature until the white chocolate is fully set, about 20 minutes. If you’re in a hurry, you can pop them back in the freezer for 5 minutes. Serve immediately or store for later.
Notes
Freezing the treats for 10 minutes before dipping in white chocolate makes the wrapping process cleaner. Work in batches when drizzling white chocolate to prevent it from setting. Use a light hand with the white chocolate—you want to see the treat peeking through the bandages. The treats can be stored in an airtight container at room temperature for up to 3 days. Undecorated treats can be frozen for up to a month.
Nutrition
- Serving Size: 1 mummy treat
- Calories: 220
- Sugar: 22
- Sodium: 180
- Fat: 8
- Saturated Fat: 5
- Carbohydrates: 36
- Protein: 2
Keywords: Halloween treats, no-bake desserts, Rice Krispie treats, mummy treats, kid-friendly recipes, easy Halloween recipes, party snacks