Love this? Save it for later!
Share the inspiration with your friends
My neighbor, Mrs. Kowalski, watched me trying to wrestle a sticky glob of melted marshmallow off my countertop last October, and she didn’t say anything at first. Then she just handed me a piece of wax paper with a quiet smile. She had been making these peanut butter bars for her grandkids every Halloween for over thirty years, and she figured I needed a recipe that wouldn’t fight back. Honestly, she was right. I was in the middle of a full-blown kitchen meltdown—my toddler had just dumped an entire container of sprinkles on the floor, and the dog was trying to help clean up. Mrs. Kowalski just stood there, calmly showing me how to press the mixture into the pan without it sticking to everything in sight.
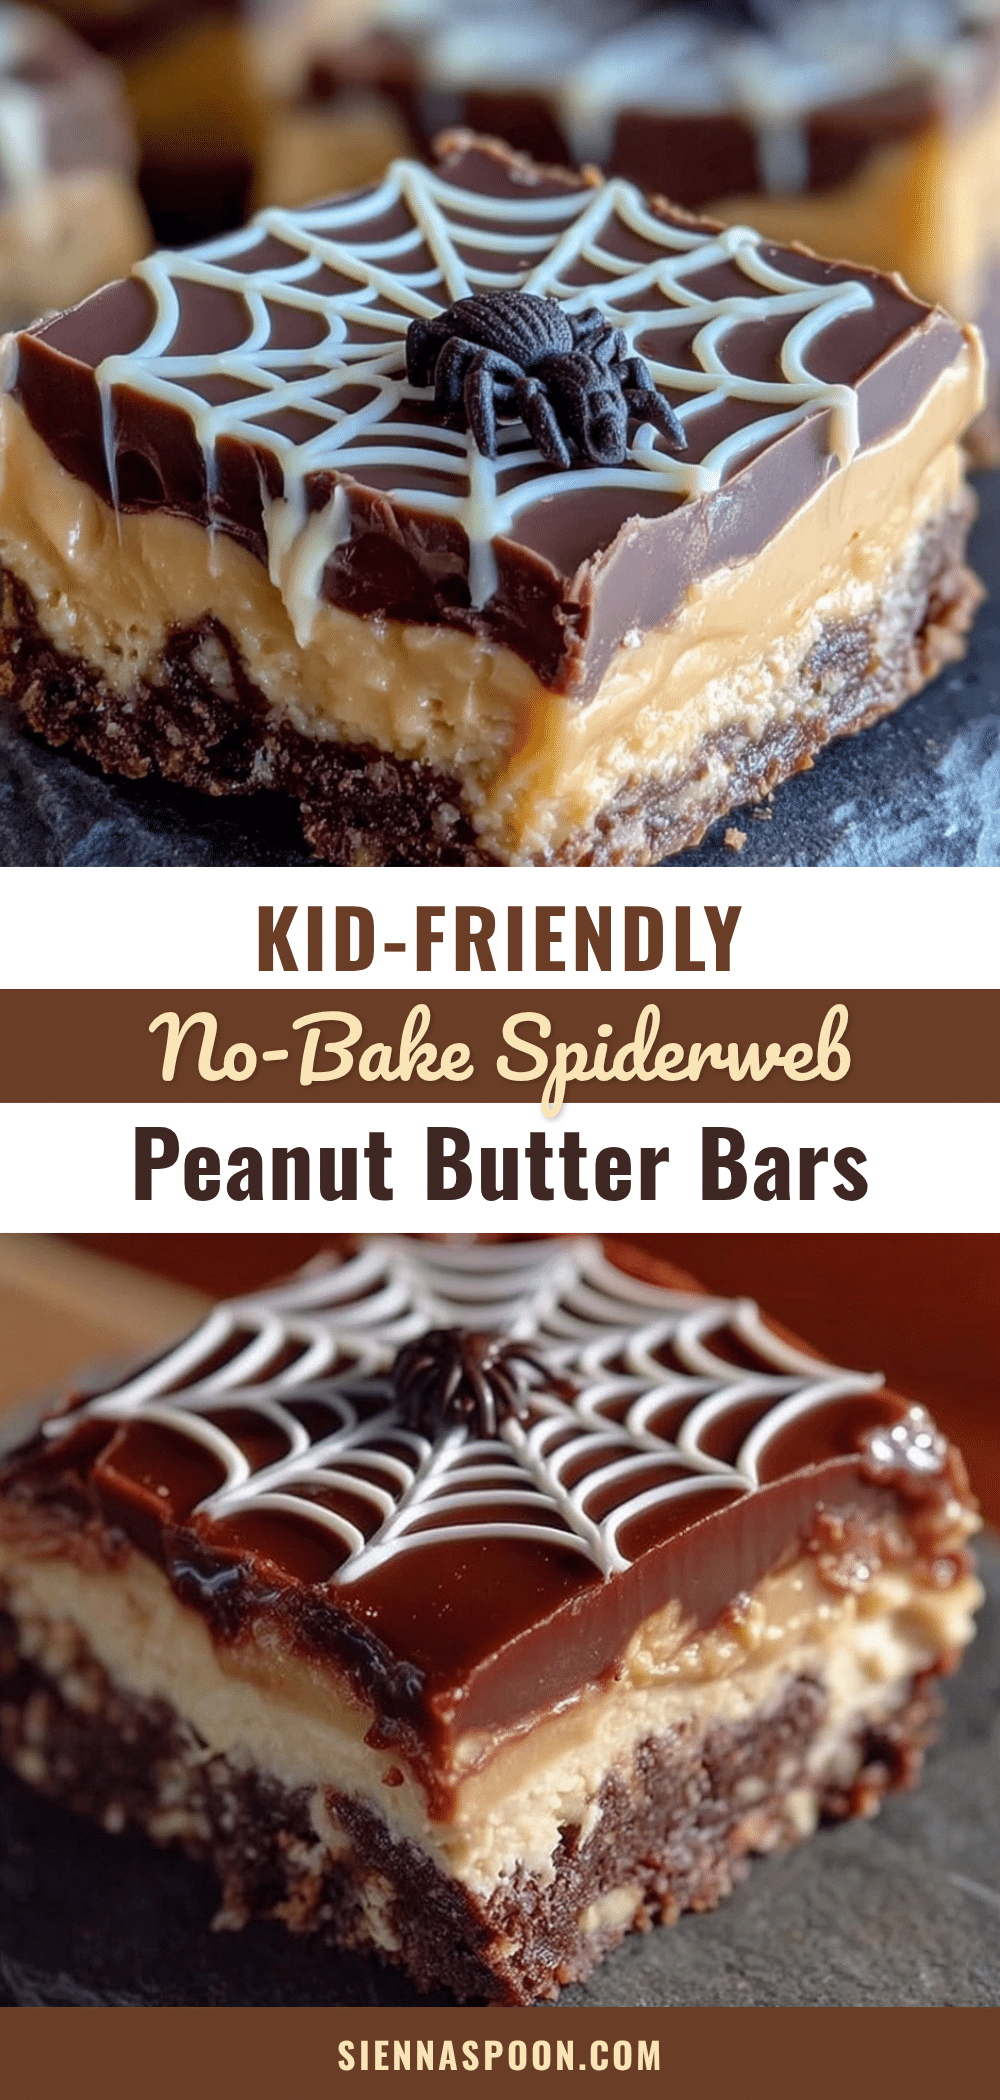
That conversation on my messy kitchen floor changed how I approach Halloween treats forever. She didn’t lecture me or make me feel like a failure. She just shared this simple, no-bake bar that her own kids had loved, and now her grandkids begged for every year. The spiderweb design on top? That was my own little addition, something fun to do with my daughter when she got old enough to hold a piping bag without squeezing it like a toothpaste tube. The bars themselves are pure comfort—creamy peanut butter, sweet graham cracker crunch, and a smooth chocolate topping that sets up perfectly in the fridge. Maybe you’ve been there, staring at a complicated Pinterest recipe with a mile-long ingredient list while your kids are bouncing off the walls. This recipe is the opposite of that. It is the kind of treat that brings everyone into the kitchen without causing more mess than it’s worth.
What I love most about these bars is how they’ve become our family’s Halloween tradition. Every year, my daughter and I make a batch together, and she gets to draw the spiderweb on top. It never looks perfect, and that is exactly the point. The cracks in the chocolate, the uneven web lines, the little fingerprints in the peanut butter layer—they all tell the story of a kitchen that is lived in. This recipe stayed with me because it is forgiving. It doesn’t demand precision. It just asks for a little patience and a willingness to get your hands a little sticky. And honestly, that is the kind of cooking I want to pass down.
Why You’ll Love This Recipe
These spiderweb peanut butter bars are the kind of treat that makes you look like a Halloween hero without actually working that hard. I have tested this recipe more times than I can count—through sticky summer days, humid fall afternoons, and even one particularly disastrous attempt where I forgot to chill the bars before cutting them (they were more of a peanut butter puddle situation). Every single time, the basics held up. Here is why this version is the one you will come back to year after year.
- Quick & Easy: From start to finish, these bars come together in about 20 minutes of active time. The hardest part is waiting for them to chill in the fridge. That is less time than it takes to argue with your kids about what costume they are wearing.
- Simple Ingredients: You probably already have most of these in your pantry. Graham crackers, peanut butter, butter, powdered sugar, and chocolate chips. No special trips to a fancy baking supply store. No obscure ingredients you will use once and forget about.
- Perfect for Halloween Parties: These bars travel well, they don’t melt at room temperature (unlike some other no-bake treats I have tried), and they look impressive on a dessert table. The spiderweb design is a guaranteed conversation starter.
- Crowd-Pleaser: I have brought these to school parties, neighborhood gatherings, and family dinners. Kids love them because they are sweet and fun. Adults love them because they taste like peanut butter cup nostalgia without the fuss.
- Unbelievably Delicious: The texture is what gets me every time. The peanut butter layer is creamy and slightly dense, the chocolate topping is smooth, and the graham crackers add just enough crunch. It is comfort food in bar form.
What makes this recipe different from all the other no-bake bars out there is the spiderweb technique. Instead of just drizzling chocolate on top and calling it a day, you actually create a web pattern that looks like it took hours. But here is the secret—it takes about two minutes. You just pipe concentric circles of white chocolate and drag a toothpick through them. That is it. No artistic talent required. My five-year-old can do it, and her webs look like happy little spiders built them.
This recipe is also budget-friendly, which matters a lot when you are feeding a family. A single batch uses simple, affordable ingredients and makes about 16 bars. That is way cheaper than buying pre-packaged Halloween treats, and honestly, they taste so much better. Plus, you control what goes in them. No weird preservatives or artificial flavors. Just real butter, real peanut butter, and real chocolate. The kind of treat that makes you feel good about what you are serving your kids.
What Ingredients You Will Need
This recipe uses simple, wholesome ingredients that come together to create something truly special. The magic is in how they work together—the salty peanut butter balances the sweet chocolate, and the graham crackers add structure without making the bars too heavy. Here is everything you need, along with a few notes from my own kitchen trials.
For the Peanut Butter Layer
- 1 cup (250 g) creamy peanut butter – I recommend using a standard brand like Jif or Skippy for the best texture. Natural peanut butter that separates can make the bars too oily and crumbly. If you only have natural, stir it very well and expect a slightly softer bar.
- 1/2 cup (115 g) unsalted butter, softened – Let it sit out for about 30 minutes before you start. Cold butter does not mix well with the other ingredients and can leave lumps. Salted butter works too, just skip the added salt later.
- 2 cups (240 g) powdered sugar – Sift it if you have the patience, but I rarely do. Just whisk it well to break up any clumps. Powdered sugar gives the bars that smooth, melt-in-your-mouth texture.
- 1 1/2 cups (150 g) graham cracker crumbs – You can buy pre-crushed crumbs or crush your own. I usually throw a few full sheets in a zip-top bag and smash them with a rolling pin. It is a great stress reliever. About 10 full sheets will give you the right amount.
- 1/2 teaspoon vanilla extract – Pure vanilla is nice, but imitation works perfectly fine here. The peanut butter and chocolate are the stars anyway.
For the Chocolate Topping
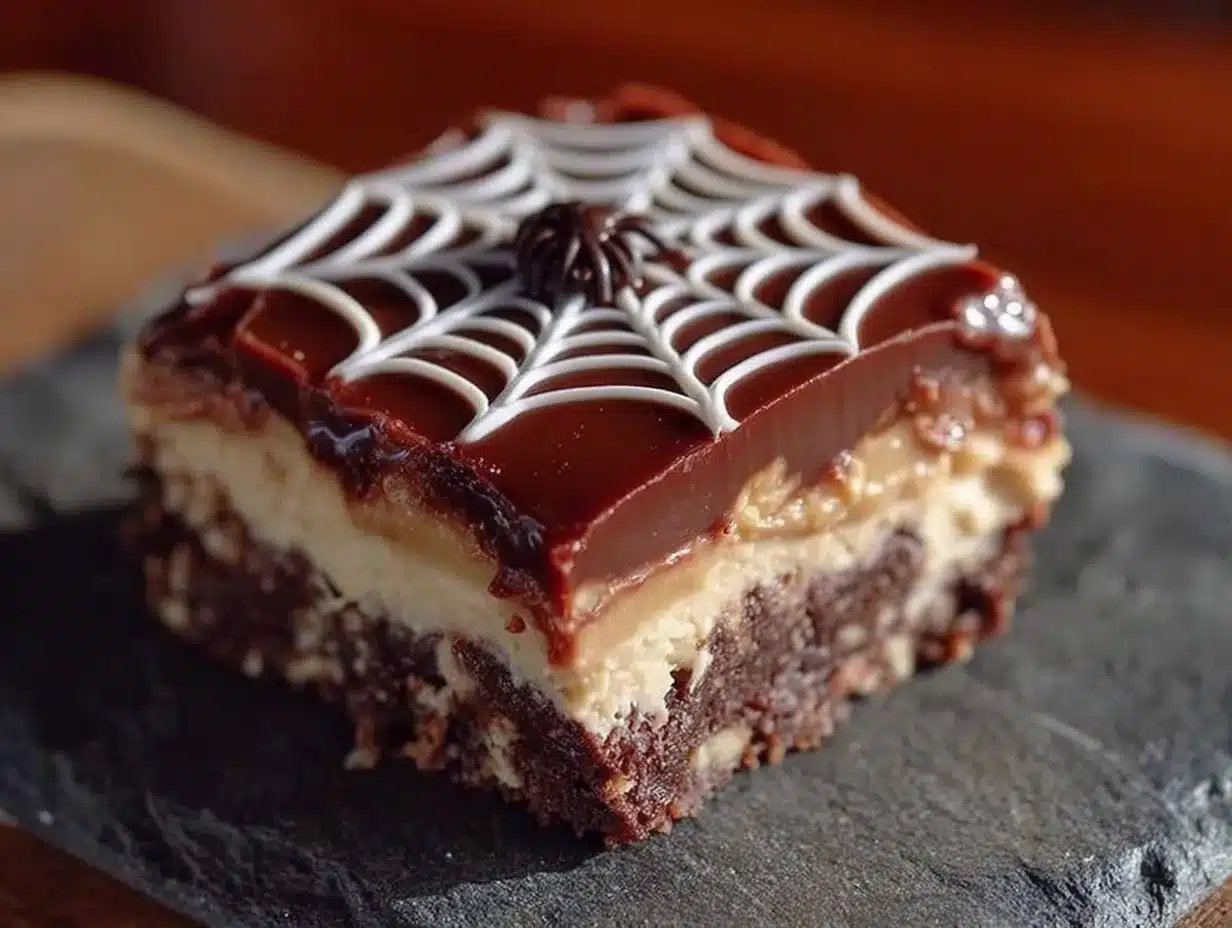
- 1 1/2 cups (260 g) semi-sweet chocolate chips – I prefer Ghirardelli or Toll House for consistent melting. Milk chocolate works too if you want a sweeter bar, but semi-sweet balances the peanut butter layer better.
- 2 tablespoons (30 g) coconut oil or vegetable shortening – This helps the chocolate melt smoothly and gives it a nice shine when it sets. Coconut oil adds a subtle flavor that pairs well with the chocolate. Shortening is neutral.
For the Spiderweb Decoration
- 1/4 cup (45 g) white chocolate chips or melting wafers – Melting wafers are easier to work with because they don’t seize as easily. If using white chocolate chips, add a tiny splash of coconut oil to help them melt smoothly.
- Optional: candy eyes or plastic spiders for garnish – These are purely for fun. My daughter insists on adding a plastic spider to every batch. She names them, and they live on our counter until someone accidentally knocks one off.
Substitution Guidance: If you need a dairy-free version, use vegan butter and dairy-free chocolate chips. The texture will be slightly different, but still delicious. For a gluten-free option, use gluten-free graham crackers or crushed gluten-free cookies. I have tested both, and they work well. Just make sure your graham cracker crumbs are certified gluten-free if that matters to your household.
Ingredient Selection Tip: When choosing peanut butter, look for one that is creamy and doesn’t have added chunks. Chunky peanut butter can make the bars difficult to cut cleanly. Also, check the expiration date on your graham crackers. Stale crumbs won’t hold the bars together as well.
Equipment Needed
You do not need a fancy kitchen to make these bars. Most of these tools are things you probably already have. Here is what you will need, along with some alternatives I have used in a pinch.
- 8×8-inch baking pan – This is the perfect size for these bars. A 9×9-inch pan works too, but the bars will be slightly thinner. Line it with parchment paper or aluminum foil for easy removal. I use binder clips to hold the parchment in place while I press the mixture in. Total game changer.
- Mixing bowls – You will need one large bowl for the peanut butter layer and one small bowl for melting the chocolate. Glass or stainless steel works best. Avoid plastic bowls for the chocolate because they can retain moisture.
- Electric mixer or sturdy spatula – An electric mixer makes the peanut butter layer smooth and creamy, but a strong arm and a good spatula work just fine. I have made these bars with both, and honestly, the spatula version has more character.
- Microwave or double boiler – For melting the chocolate. The microwave is faster, but you have to be careful not to overheat it. I microwave in 30-second bursts, stirring in between. A double boiler gives you more control and reduces the risk of burning.
- Piping bag or small zip-top bag – For the spiderweb design. A piping bag with a small round tip is ideal, but a zip-top bag with the corner snipped off works perfectly. I have even used a clean ketchup bottle in an emergency.
- Toothpick or skewer – This is your spiderweb tool. A toothpick creates thin, delicate lines. A skewer makes bolder lines. Both work. Just make sure it is clean and dry.
- Refrigerator space – The bars need at least 2 hours to set. Make sure you have a flat spot in your fridge where the pan can sit undisturbed. I learned this the hard way when I tried to squeeze the pan next to a jar of pickles and ended up with lopsided bars.
Preparation Method
Follow these steps carefully, and you will have perfect spiderweb bars every time. I have included sensory cues and troubleshooting tips so you know exactly what to look for at each stage.
- Prepare your pan. Line an 8×8-inch baking pan with parchment paper, leaving a few inches of overhang on two opposite sides. This will act as handles to lift the bars out later. If you do not have parchment, aluminum foil works too—just grease it lightly with butter or cooking spray. Press the paper into the corners firmly so it stays in place.
- Crush the graham crackers. If you are using whole sheets, place them in a zip-top bag and seal it, then roll over them with a rolling pin or smash them with the bottom of a measuring cup. You want fine crumbs, not big chunks. Aim for a texture similar to sand. About 10 full sheets should give you 1 1/2 cups of crumbs. If you have a food processor, you can pulse them in there for about 10 seconds. Just be careful not to over-process or you will get graham cracker dust, which changes the texture of the bars.
- Make the peanut butter layer. In a large mixing bowl, combine 1/2 cup softened unsalted butter and 1 cup creamy peanut butter. Beat with an electric mixer on medium speed until smooth and fully combined, about 2 minutes. Scrape down the sides of the bowl with a spatula. Add 2 cups powdered sugar and beat on low speed until incorporated, then increase to medium and beat for another minute. The mixture will look thick and slightly crumbly at first, but keep going. Add 1 1/2 cups graham cracker crumbs and 1/2 teaspoon vanilla extract. Mix on low until everything comes together. The dough should hold together when pressed between your fingers. If it feels too dry, add 1 tablespoon of softened butter. If it feels too sticky, add a tablespoon more graham cracker crumbs.
- Press the mixture into the pan. Transfer the peanut butter mixture to your prepared pan. Use your hands or the back of a spatula to press it evenly into the bottom. This is important—if the layer is uneven, the bars will have thin spots that break easily. Take your time and really press it down firmly. I like to use a piece of wax paper over the top and press with a flat-bottomed glass to get a perfectly even surface. Place the pan in the refrigerator while you prepare the chocolate layer. This helps the bars hold their shape.
- Melt the chocolate. In a microwave-safe bowl, combine 1 1/2 cups semi-sweet chocolate chips and 2 tablespoons coconut oil. Microwave in 30-second bursts, stirring after each, until the chocolate is fully melted and smooth. This usually takes about 90 seconds total. Do not overheat or the chocolate will seize and become grainy. If you are using a double boiler, fill the bottom pot with about an inch of water, bring it to a simmer, and place the bowl on top. Stir until melted. Remove from heat.
- Pour the chocolate over the peanut butter layer. Take the pan out of the refrigerator. Pour the melted chocolate over the peanut butter layer and spread it evenly with a spatula. Tilt the pan gently to help the chocolate reach the edges. Tap the pan on the counter a few times to release any air bubbles. Return the pan to the refrigerator for about 15 minutes, or until the chocolate is just set but still slightly soft to the touch. You want it firm enough to hold the spiderweb, but soft enough for the toothpick to drag through.
- Make the spiderweb. While the chocolate sets, melt the white chocolate. Place 1/4 cup white chocolate chips in a small microwave-safe bowl. Microwave in 20-second bursts, stirring after each, until melted. Transfer the melted white chocolate to a small piping bag or a zip-top bag with the corner snipped off. Remove the pan from the refrigerator. Pipe a small circle of white chocolate in the center of the chocolate layer. Then pipe concentric circles around it, spacing them about 1/2 inch apart. Work quickly—the chocolate will start to set as you go. Once you have piped all the circles, take a toothpick and drag it from the center outward through all the circles. Then drag another line from the center outward at a different angle. Repeat until you have created a web pattern. Wipe the toothpick clean between lines to keep them sharp. The whole process takes about 2 minutes.
- Chill until fully set. Place the pan back in the refrigerator for at least 2 hours, or until the chocolate is completely firm. If you are in a hurry, you can put it in the freezer for about 45 minutes. Just do not forget about it—frozen bars are harder to cut cleanly.
- Cut and serve. Once the bars are fully set, use the parchment overhang to lift the entire block out of the pan. Place it on a cutting board. Use a sharp knife to cut the bars into squares. I cut mine into 16 squares (4 rows by 4 rows). For cleaner cuts, wipe the knife clean between each slice. If the chocolate cracks a little, do not worry. That is part of the homemade charm.
Troubleshooting Tip: If your chocolate layer cracks when you cut the bars, the chocolate was too cold. Let the bars sit at room temperature for about 10 minutes before cutting. If the peanut butter layer is too crumbly, you may have used natural peanut butter or not enough butter. Next time, add an extra tablespoon of softened butter to the mixture.
Cooking Tips & Techniques
Over the years, I have made plenty of mistakes with these bars. Here are the lessons I learned so you do not have to repeat them.
Room temperature ingredients matter. I once tried to make these bars with cold butter straight from the fridge. The peanut butter layer came out lumpy and refused to press evenly into the pan. Let your butter sit out for at least 30 minutes before you start. Same goes for the peanut butter—if it has been sitting in the pantry, give it a good stir before measuring.
Press the peanut butter layer firmly. This is the most common mistake I see. If you do not press the mixture down firmly enough, the bars will fall apart when you cut them. Use the back of a measuring cup or a flat-bottomed glass to really compact it. You want it dense and even. Think of it like packing a sandcastle.
Do not overheat the chocolate. Burnt chocolate is a tragedy. It becomes grainy, bitter, and completely unusable. Always melt chocolate in short bursts and stir frequently. If you are nervous, use the double boiler method. It takes a little longer, but it is almost impossible to burn the chocolate that way.
Let the chocolate set partially before piping the web. If you pipe the white chocolate onto fully liquid chocolate, the lines will bleed and blur. You want the chocolate to be just set—firm enough to hold the white chocolate on top, but soft enough for the toothpick to drag through. About 15 minutes in the fridge is usually perfect. Test it by touching the surface gently. It should feel cool and slightly tacky, but not wet.
Clean your toothpick between lines. This makes a huge difference in how sharp your spiderweb looks. If you drag a dirty toothpick through the white chocolate, the lines will smudge and blend together. I keep a paper towel next to me and wipe the toothpick after every line. It takes two extra seconds and makes the web look professional.
Multitasking strategy: While the peanut butter layer is chilling in the fridge, melt your chocolate and prepare your piping bag. This way, everything is ready to go when you pull the pan out. I also like to set up my toothpick and paper towel station ahead of time. It feels silly, but it keeps me from scrambling when the chocolate starts to set.
Variations & Adaptations
One of the best things about this recipe is how easy it is to customize. Here are a few variations I have tried over the years, each with its own personality.
Chocolate Peanut Butter Cup Bars: Before pouring the chocolate layer on top, press mini peanut butter cups into the peanut butter layer. Space them evenly, about 1 inch apart. Then pour the chocolate over the top. When you cut the bars, each piece will have a hidden peanut butter cup inside. My kids go crazy for this version. Just make sure the peanut butter cups are pushed down slightly so they are fully covered by the chocolate.
Crunchy Spiderweb Bars: Add 1/2 cup of crispy rice cereal to the peanut butter layer along with the graham cracker crumbs. This gives the bars a delightful crunch that contrasts with the smooth chocolate topping. I discovered this variation when I ran out of graham crackers and had to improvise. It turned out so well that it is now my go-to version for potlucks.
White Chocolate Spiderweb: Swap the semi-sweet chocolate for white chocolate and use dark chocolate for the spiderweb design. This creates a striking black-and-white look that is perfect for Halloween. The flavor is sweeter, so I recommend using a pinch of salt in the peanut butter layer to balance it out.
Peanut-Free Version: For nut-free classrooms or parties, substitute the peanut butter with sunflower seed butter or WowButter. The texture will be slightly different, and the color will be darker, but the bars will still hold together well. Just make sure to check the labels on your graham crackers and chocolate chips for allergen warnings.
Spiderweb Cupcakes: Instead of making bars, press the peanut butter mixture into a muffin tin lined with paper cups. Top with chocolate and pipe the spiderweb on each individual cup. These are great for individual servings at parties. Just reduce the chilling time to about 1 hour since the portions are smaller.
Serving & Storage Suggestions
These bars are versatile enough to serve at any Halloween gathering, but here are my favorite ways to enjoy them.
Serving Temperature: I prefer these bars straight from the refrigerator. The chocolate is snappy, and the peanut butter layer is firm but creamy. If you let them sit at room temperature for too long, the chocolate can get soft and sticky. For a special treat, serve them slightly chilled with a glass of cold milk. The contrast is perfect.
Presentation Ideas: Arrange the bars on a black or orange platter for a festive look. Add a few plastic spiders or candy eyes on top for extra Halloween flair. I like to dust the platter with a little powdered sugar to look like spiderwebs. For a party, cut the bars into smaller bite-sized pieces and serve them on skewers. They look adorable and are easy for kids to grab.
Complementary Dishes: These bars pair beautifully with a warm apple cider or a pumpkin spice latte. If you are serving them at a Halloween party, they also go well with salty snacks like popcorn or pretzels. The sweet and salty combination is irresistible. For a full dessert table, add some candy corn popcorn balls and pumpkin spice Rice Krispie treats for a complete spread.
Storage Instructions: Store the bars in an airtight container in the refrigerator for up to 1 week. Layer them between sheets of wax paper to prevent sticking. If you are stacking them, make sure the chocolate is fully set before stacking. I have made the mistake of stacking slightly soft bars, and they ended up looking like a chocolate mess.
Freezer Instructions: These bars freeze beautifully. Place them in a single layer on a baking sheet and freeze until solid, about 1 hour. Then transfer them to a freezer-safe container or zip-top bag, separating layers with wax paper. They will keep for up to 3 months. To thaw, transfer them to the refrigerator overnight. Do not thaw at room temperature, or the chocolate may sweat.
Flavor Development: These bars actually taste better the next day. The flavors meld together as they chill, and the texture becomes more uniform. I always try to make them a day ahead of any party. It saves me stress on the day of, and the bars are at their peak.
Nutritional Information & Benefits
Let’s be honest—these are a treat, not a health food. But that does not mean they are without merit. Here is a rough breakdown of what you are getting in each bar, based on cutting the pan into 16 pieces.
| Nutrient | Amount Per Bar |
|---|---|
| Calories | 285 |
| Total Fat | 17 g |
| Saturated Fat | 8 g |
| Carbohydrates | 31 g |
| Sugar | 23 g |
| Protein | 5 g |
| Fiber | 2 g |
| Sodium | 135 mg |
Health Benefits of Key Ingredients: Peanut butter is a good source of protein and healthy fats, which help keep you full and satisfied. Graham crackers provide a small amount of fiber, and dark chocolate contains antioxidants. The coconut oil in the chocolate layer adds medium-chain triglycerides, which are a type of fat that your body can use for quick energy. Of course, these benefits are modest, but every little bit counts when you are feeding a family.
Dietary Considerations: This recipe is naturally vegetarian. For a vegan version, use vegan butter, dairy-free chocolate chips, and a plant-based white chocolate alternative. For a gluten-free version, use certified gluten-free graham crackers. This recipe is not suitable for those with peanut allergies unless you use a seed butter substitute.
Potential Allergens: This recipe contains peanuts, dairy, and gluten. It may also contain traces of soy, depending on the chocolate you use. Always check labels if you are serving these to someone with food allergies.
Personal Wellness Perspective: I believe in balance. These bars are not something we eat every day, but they are a wonderful part of our Halloween traditions. When I serve them, I make sure we also have plenty of fruits and vegetables throughout the day. That way, the treat feels special instead of excessive. It is about enjoying the moment without guilt.
Conclusion
These spiderweb peanut butter bars have become a staple in our home for a reason. They are simple enough to make on a busy weekday, but special enough to serve at a Halloween party. The no-bake method means you do not have to heat up your kitchen or monitor an oven. The spiderweb design adds a touch of whimsy that kids love to help with. And the flavor? It is pure nostalgia—the kind of treat that reminds you of childhood Halloweens spent running through neighborhoods with a pillowcase full of candy.
I encourage you to make these bars your own. Let your kids draw the spiderweb. Experiment with different chocolate toppings. Add sprinkles or candy eyes or whatever makes you smile. The recipe is forgiving, and the memories you create in the kitchen are worth more than a perfect batch. Honestly, some of my favorite batches have been the ones where the web looked more like a tangled mess than a spiderweb. Those are the bars we laughed about the most.
If you try this recipe, I would love to hear about it. Leave a comment below and tell me how your spiderweb turned out. Did your kids help? Did you add your own twist? Share a photo if you have one. And if you are looking for more easy Halloween treats, check out our collection of no-bake Halloween desserts for more inspiration. Happy Halloween, and happy baking—or should I say, happy no-baking!
Frequently Asked Questions
Can I use natural peanut butter for these bars?
You can, but the texture will be different. Natural peanut butter tends to be oilier and less stable, which can make the bars softer and more prone to crumbling. If you use natural peanut butter, make sure to stir it very well before measuring, and expect a slightly looser texture. You may need to add an extra 1/4 cup of graham cracker crumbs to help the mixture hold together.
How long do these bars need to chill before cutting?
At least 2 hours in the refrigerator. If you are in a hurry, you can put them in the freezer for about 45 minutes. Just check them before cutting—the chocolate should be firm and the peanut butter layer should feel solid. If the knife drags or the chocolate smears, they need more time.
Can I make these bars ahead of time?
Absolutely. In fact, they taste better the next day. You can make them up to 3 days ahead and store them in the refrigerator. For longer storage, freeze them for up to 3 months. Just thaw them in the refrigerator overnight before serving.
My chocolate layer cracked when I cut the bars. What went wrong?
This usually happens when the chocolate is too cold. Let the bars sit at room temperature for about 10 minutes before cutting. Use a sharp knife and wipe it clean between each slice. If the chocolate still cracks, try scoring the bars lightly with a knife first, then pressing down firmly to cut through.
Can I double this recipe?
Yes, just use a 9×13-inch pan instead of an 8×8-inch pan. Double all the ingredients and press the mixture evenly into the larger pan. The chilling time may need to increase by about 30 minutes since the bars are thicker. Cut into 24 to 32 pieces, depending on how large you want them.
Pin This Recipe!
Halloween Spiderweb Peanut Butter Bars: Easy No-Bake Treat
These no-bake peanut butter bars feature a creamy peanut butter and graham cracker layer topped with smooth chocolate and a fun spiderweb design. They are quick, easy, and perfect for Halloween parties or family traditions.
- Prep Time: 20 minutes
- Cook Time: 0 minutes
- Total Time: 2 hours 20 minutes (includes chilling)
- Yield: 16 bars 1x
- Category: Dessert
- Cuisine: American
Ingredients
- 1 cup (250 g) creamy peanut butter
- 1/2 cup (115 g) unsalted butter, softened
- 2 cups (240 g) powdered sugar
- 1 1/2 cups (150 g) graham cracker crumbs
- 1/2 teaspoon vanilla extract
- 1 1/2 cups (260 g) semi-sweet chocolate chips
- 2 tablespoons (30 g) coconut oil or vegetable shortening
- 1/4 cup (45 g) white chocolate chips or melting wafers
- Optional: candy eyes or plastic spiders for garnish
Instructions
- Line an 8×8-inch baking pan with parchment paper, leaving overhang on two opposite sides.
- If using whole graham crackers, crush them into fine crumbs (about 10 sheets for 1 1/2 cups).
- In a large bowl, beat softened butter and peanut butter with an electric mixer until smooth, about 2 minutes.
- Add powdered sugar and beat on low until incorporated, then increase to medium for 1 minute.
- Mix in graham cracker crumbs and vanilla extract until dough holds together when pressed.
- Press the mixture evenly into the prepared pan using your hands or a flat-bottomed glass. Refrigerate while preparing chocolate.
- In a microwave-safe bowl, combine chocolate chips and coconut oil. Microwave in 30-second bursts, stirring after each, until melted and smooth.
- Pour melted chocolate over the peanut butter layer and spread evenly. Tap the pan to release air bubbles. Refrigerate for 15 minutes until just set.
- Melt white chocolate chips in 20-second bursts in the microwave. Transfer to a piping bag or zip-top bag with a snipped corner.
- Pipe a small circle of white chocolate in the center of the chocolate layer, then pipe concentric circles around it, spacing about 1/2 inch apart.
- Drag a toothpick from the center outward through all the circles to create a web pattern. Wipe the toothpick clean between lines.
- Refrigerate for at least 2 hours (or freeze for 45 minutes) until fully set.
- Use parchment overhang to lift the block out of the pan. Cut into 16 squares with a sharp knife, wiping the blade clean between cuts.
Notes
For cleaner cuts, let bars sit at room temperature for 10 minutes before cutting. If the peanut butter layer is too crumbly, add an extra tablespoon of softened butter. For a dairy-free version, use vegan butter and dairy-free chocolate chips. For gluten-free, use certified gluten-free graham crackers.
Nutrition
- Serving Size: 1 bar
- Calories: 285
- Sugar: 23
- Sodium: 135
- Fat: 17
- Saturated Fat: 8
- Carbohydrates: 31
- Fiber: 2
- Protein: 5
Keywords: Halloween, no-bake, peanut butter bars, spiderweb, easy dessert, kid-friendly, fall treat


