Love this? Save it for later!
Share the inspiration with your friends
I was supposed to be making a proper pumpkin pie from scratch. That was the plan, anyway. I had the sugar pumpkins roasted, the evaporated milk measured, and my grandmother’s rolling pin dusted with flour. But somewhere between answering the door for the Amazon delivery and wiping sticky fingers off my cabinets, I grabbed the wrong canister. Instead of pumpkin pie spice, I dumped a heaping tablespoon of pumpkin spice latte powder into my sugar cookie dough. Honestly, my heart sank. I stood there staring at the speckled dough, thinking I had just ruined three perfectly good sticks of butter. You know that feeling when you are already running late and everything goes sideways? That was me.
My four-year-old, Leo, peeked over the counter and said, “Mommy, it smells like a ghost.” I had no idea what that meant, but he was grinning. So I figured, what the heck. I scooped the dough onto the baking sheet anyway, crossed my fingers, and slid it into the oven. When those cookies came out golden at the edges with that warm, cozy aroma filling the whole kitchen, I nearly cried. They were soft, buttery, and had this gentle pumpkin spice warmth without being overwhelming. My neighbor, Carol from apartment 3B, knocked on my door asking what smelled so good. I told her it was a happy little kitchen disaster. She asked for the recipe before she even tried one.
These cookies became our Halloween tradition that very day. We ditched the pie entirely and spent the afternoon cutting out ghost shapes and bat shapes with Leo’s little cookie cutters. They are not fancy. They are not fussy. But they are the kind of cookie that makes you close your eyes after the first bite, even if you are standing over the kitchen sink in your pajamas. Maybe you have been there too — staring at a baking mishap wondering if you should just order pizza instead. Trust me, keep going. This one is worth it.
Why You Will Love This Recipe
These cookies have been through the wringer in my kitchen. I have made them at least thirty times since that first accidental batch, and I have tweaked the ratios until they are just right. They are the kind of recipe you can hand to a babysitter or a tired parent and know they will turn out perfectly. Here is why they work so well for real families on a budget.
- Quick and Easy : From start to finish, these cookies take about 25 minutes. No chilling required, no complicated techniques. Just mix, roll, cut, and bake. Perfect for when the kids are already asking “are they done yet?” before you even turn on the oven.
- Simple Ingredients : You probably have everything in your pantry right now. Butter, sugar, flour, eggs, vanilla. The pumpkin spice mix is just a blend of cinnamon, nutmeg, ginger, and cloves — spices most of us already own. No fancy grocery store trips needed.
- Perfect for Halloween Fun : These cookies are sturdy enough for little hands to decorate without crumbling. You can use store-bought frosting, sprinkles, or even just a dusting of powdered sugar. They hold their shape beautifully whether you use ghost, bat, or pumpkin cookie cutters.
- Crowd-Pleaser : I have brought these to three different classroom parties, two neighbor get-togethers, and one very skeptical husband who “does not like pumpkin stuff.” Every single time, the plate came back empty. Kids love the mild sweetness, and adults appreciate that the spice is warm but not overpowering.
- Unbelievably Delicious : The texture is what gets me every time. These cookies are soft in the center with just a hint of crispness at the edges. The pumpkin spice flavor is present but gentle — it does not scream “fall” in your face. It is more like a cozy whisper.
What makes this recipe different from all the other pumpkin sugar cookies out there? It is the balance. Most recipes either go heavy on the spice or end up tasting like plain sugar cookies with a sad sprinkle of cinnamon. I tested this version with my neighbor Carol’s family, my sister-in-law’s picky toddler, and even my own skeptical husband. The secret is using just enough pumpkin spice to feel festive without overwhelming the buttery sugar cookie base. It is comfort food reimagined — faster, simpler, but with the same soul-soothing satisfaction.
What Ingredients You Will Need
This recipe uses simple, wholesome ingredients that come together to deliver that perfect soft-yet-slightly-crisp texture and warm pumpkin spice flavor. Most of these are pantry staples, which means you can whip up a batch on a whim without a special grocery run.
For the Cookie Dough
- 1 cup (226g) unsalted butter, softened (I prefer Land O Lakes for consistent texture, but any brand works fine)
- 1 cup (200g) granulated sugar (adds sweetness and helps create that tender crumb)
- 1 large egg, room temperature (cold eggs can make the dough stiff and harder to mix)
- 1 teaspoon vanilla extract (pure vanilla makes a difference, but imitation works in a pinch)
- 2 ½ cups (312g) all-purpose flour (spoon and level it — do not scoop directly from the bag)
- ½ teaspoon baking powder (helps the cookies spread just enough)
- ¼ teaspoon salt (balances the sweetness and enhances the spice)
- 2 teaspoons pumpkin spice blend (store-bought or homemade — recipe below)
For the Homemade Pumpkin Spice Blend
- 1 tablespoon ground cinnamon
- 1 teaspoon ground nutmeg
- 1 teaspoon ground ginger
- ½ teaspoon ground cloves
- ¼ teaspoon allspice (optional, but I love the depth it adds)
Mix these together in a small jar and you will have enough for several batches. I keep a little jar of this on my counter all fall long. It is also wonderful stirred into oatmeal or coffee.
For the Simple Glaze (Optional but Recommended)
- 1 cup (120g) powdered sugar
- 2 tablespoons milk (whole milk gives a creamier glaze, but any milk works)
- ½ teaspoon vanilla extract
- Orange food coloring (optional, for Halloween fun)
- Halloween sprinkles or sanding sugar (the kids love these)
Ingredient Selection Tips
For the butter, make sure it is truly softened — not melted, not rock hard. You want it to give slightly when you press your finger into it. If you forgot to take it out of the fridge, cut it into small cubes and let it sit on the counter for about 15 minutes. Do not microwave it, or you will end up with greasy cookies that spread too thin.
For the flour, I have tested this with both all-purpose and a 50-50 blend of whole wheat pastry flour and all-purpose. The whole wheat version is slightly denser but still delicious. If you are gluten-free, use a good 1-to-1 gluten-free flour blend like Bob’s Red Mill. I have not tested it with almond or coconut flour, so I cannot vouch for those.
The pumpkin spice blend is where you can really customize. If you prefer a milder spice, use 1 ½ teaspoons instead of 2. If you love ginger, add an extra ¼ teaspoon. I once accidentally doubled the cloves and the cookies tasted like holiday potpourri — do not recommend that.
Equipment Needed
You do not need a fancy kitchen to make these cookies. Here is what I use every time.
- Large mixing bowl — Any big bowl works. I use a glass Pyrex bowl because I can see when the butter and sugar are fully creamed.
- Electric hand mixer or stand mixer — You can mix by hand with a wooden spoon, but your arm will get tired. I have done both. The hand mixer is faster and gives a fluffier dough.
- Measuring cups and spoons — Please use dry measuring cups for flour and sugar. Liquid measuring cups for milk. It matters more than you think.
- Rolling pin — I have a basic wooden one that cost eight dollars. It works perfectly. If you do not have one, a clean wine bottle works in a pinch — I have done that more times than I care to admit.
- Cookie cutters — Halloween shapes are fun, but round works too. I got a set of six plastic Halloween cutters at the dollar store. They have lasted three seasons so far.
- Baking sheets — Two standard half-sheet pans work well. I line mine with parchment paper for easy cleanup. Silicone baking mats also work great.
- Cooling rack — Not strictly necessary, but it helps the cookies cool evenly so the glaze does not melt off.
- Piping bag or small zip-top bag — For the glaze. Snip a tiny corner off the bag and you have a makeshift piping bag.
One tip I learned the hard way: if you are using dark non-stick baking sheets, reduce the oven temperature by 25 degrees. Dark pans absorb more heat and can burn the bottoms of your cookies. I ruined my first batch that way — the tops looked perfect but the bottoms were almost black.
Preparation Method
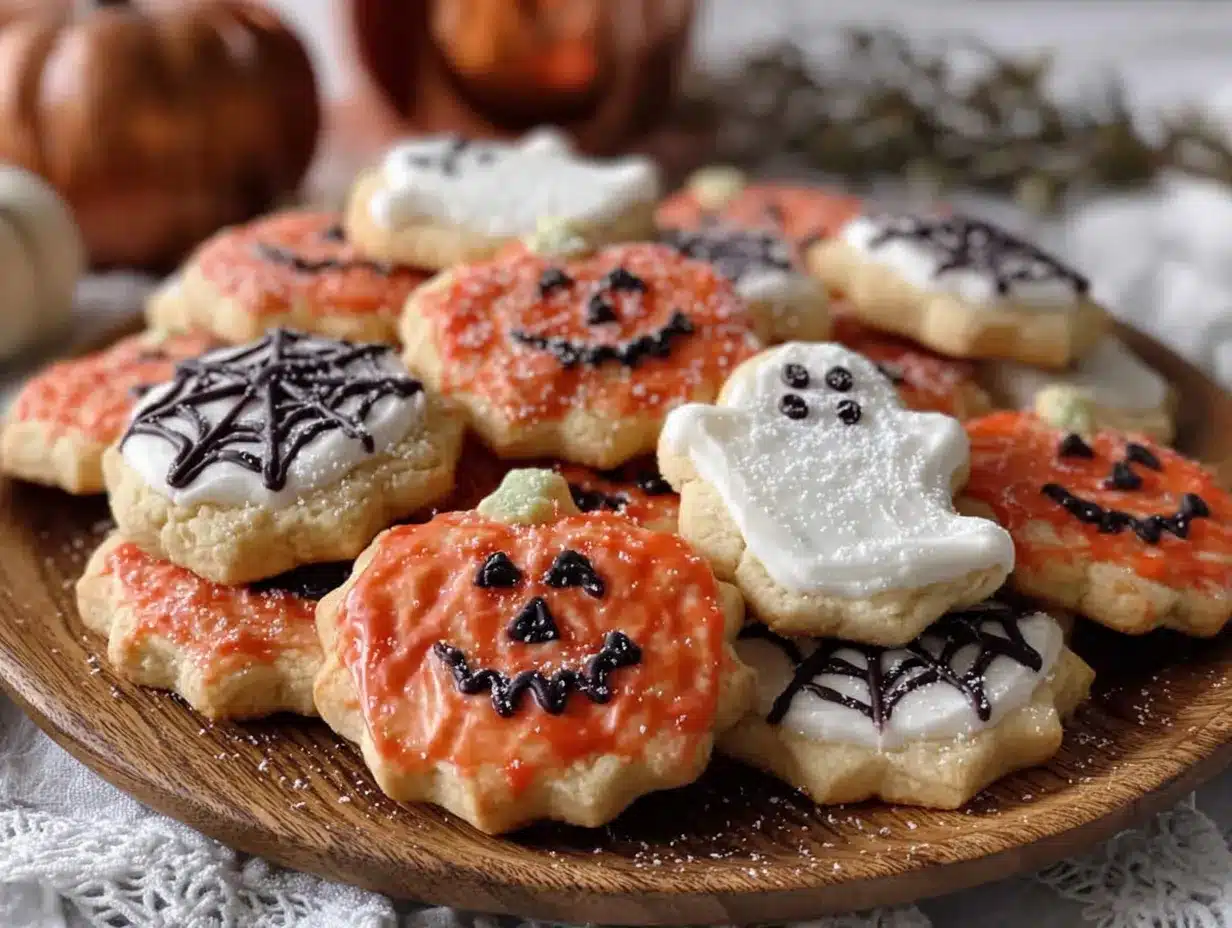
Let me walk you through this step by step. I have made these cookies so many times that I could do it in my sleep, but I still follow these steps every time. They work.
Step 1: Preheat and Prepare
Preheat your oven to 350°F (175°C). Line two baking sheets with parchment paper or silicone baking mats. This is not just for easy cleanup — it also prevents the cookies from spreading too much. Set those aside while you make the dough.
Step 2: Cream the Butter and Sugar
In your large mixing bowl, beat the softened butter and granulated sugar together until light and fluffy. This takes about 2 to 3 minutes with a hand mixer on medium speed. You are looking for a pale, creamy texture. Scrape down the sides of the bowl halfway through. Do not rush this step — proper creaming incorporates air into the dough, which gives you softer cookies.
Step 3: Add the Wet Ingredients
Add the egg and vanilla extract to the butter-sugar mixture. Beat on low speed until just combined. The mixture might look slightly curdled at this point — that is okay. It will come together when you add the dry ingredients.
Step 4: Mix the Dry Ingredients
In a separate medium bowl, whisk together the flour, baking powder, salt, and pumpkin spice blend. Whisking ensures the baking powder and spices are evenly distributed. Nobody wants a bite with a pocket of pure cloves.
Step 5: Combine Wet and Dry
Gradually add the dry ingredients to the wet mixture, mixing on low speed. I add about one-third of the flour mixture at a time, mixing just until it disappears. Stop as soon as the dough comes together. Overmixing develops gluten, which makes cookies tough. The dough should be soft but not sticky. If it feels too sticky, add one tablespoon of flour at a time until it is manageable.
Step 6: Roll Out the Dough
Lightly flour your work surface and your rolling pin. Place the dough on the floured surface and roll it to about ¼-inch thickness. I like my cookies on the thicker side — they stay softer in the center. If the dough cracks at the edges, just press it back together with your fingers. It is very forgiving.
Step 7: Cut the Shapes
Dip your cookie cutters in flour before each cut — this prevents sticking. Press straight down and lift straight up. Do not twist the cutter, or the edges will seal together and the cookies will not hold their shape as well. Place the cut cookies about 1 inch apart on your prepared baking sheets. Gather the scraps, gently re-roll them, and cut more cookies. You can re-roll the dough two or three times before it gets tough.
Step 8: Bake
Bake for 8 to 10 minutes, or until the edges are just barely golden. The centers will look slightly underdone — that is exactly what you want. They will continue to set as they cool. If you overbake them, they will be crisp all the way through instead of soft. I usually start checking at 8 minutes. Every oven runs a little differently.
Step 9: Cool
Let the cookies cool on the baking sheet for 2 minutes. This allows them to firm up enough to transfer without breaking. Then move them to a wire cooling rack to cool completely. Do not glaze them while they are still warm, or the glaze will slide right off.
Step 10: Make the Glaze
While the cookies cool, whisk together the powdered sugar, milk, and vanilla extract in a small bowl. If you want orange glaze for Halloween, add a few drops of orange food coloring. The glaze should be thick but pourable — if it is too thick, add milk one teaspoon at a time. If it is too thin, add more powdered sugar.
Step 11: Decorate
Once the cookies are completely cool, drizzle the glaze over them using a spoon or a piping bag. Add sprinkles immediately before the glaze sets. Let the glazed cookies sit at room temperature for about 30 minutes until the glaze hardens. Then they are ready to serve — or hide from your kids.
Cooking Tips and Techniques
I have learned a few things the hard way over the years. Here are the tips that will save you from my mistakes.
Do not skip the parchment paper. I tried baking these directly on a greased baking sheet once because I was out of parchment. The cookies spread into weird, thin blobs that looked nothing like ghosts. Parchment paper gives them a non-stick surface that helps them hold their shape.
Chill the dough if your kitchen is warm. If you are baking on a hot summer day or your kitchen is toasty from the oven, the dough can get too soft and sticky. Pop it in the fridge for 15 minutes before rolling. I learned this the hard way when my dough turned into a sticky mess that stuck to everything — including my rolling pin, my counter, and my toddler’s hair.
Use a light hand with the flour when rolling. Too much flour on your work surface will dry out the dough. I sprinkle just a light dusting and add more only if the dough starts sticking. You can also roll the dough between two sheets of parchment paper — that is my favorite method now. No mess, no sticking, and no extra flour.
Bake one sheet at a time. I know it takes longer, but baking two sheets at once can lead to uneven baking. The top sheet browns faster while the bottom sheet stays pale. If you must bake two sheets, swap their positions halfway through and rotate them front to back.
Let the kids help with the decorating. This is not really a cooking tip, but it is a sanity tip. Set up a little decorating station with glaze, sprinkles, and a few cookies. Let them go wild. The cookies will look messy and wonderful, and you will get ten minutes of quiet. Worth it.
Variations and Adaptations
This recipe is flexible. Here are some ways I have changed it up depending on what I had on hand or who I was feeding.
Dairy-Free Version : Swap the butter for a good vegan butter stick like Earth Balance. Use oat milk or almond milk in the glaze. The texture is slightly less tender but still very good. I made these for a classroom party where one child had a dairy allergy, and nobody could tell the difference.
Gluten-Free Version : Use a 1-to-1 gluten-free flour blend. I have tested this with Bob’s Red Mill and King Arthur Measure for Measure. Both worked well. The cookies are a bit more crumbly, so handle them gently. Let them cool completely on the baking sheet before moving them.
Extra Pumpkin Flavor : If you want a stronger pumpkin taste, add ¼ cup of pumpkin puree to the wet ingredients. The dough will be softer, so you will need to add an extra ¼ cup of flour to compensate. Chill the dough for 30 minutes before rolling. These cookies are more cake-like in texture but still delicious.
Spice Level Adjustments : For a milder cookie, use just 1 teaspoon of pumpkin spice. For a bolder spice kick, add an extra ½ teaspoon of cinnamon and a pinch of cayenne pepper. I tried the cayenne version once on a dare from my brother-in-law. It was surprisingly good — warm and slightly spicy in a way that paired well with the sweetness.
Different Shapes and Occasions : These cookies are not just for Halloween. Use Christmas tree cutters in December, heart shapes for Valentine’s Day, or simple circles for an everyday treat. The pumpkin spice flavor works year-round if you ask me, but I know some people are strict about seasonal baking. Your kitchen, your rules.
Serving and Storage Suggestions
These cookies are best served at room temperature with a cold glass of milk or a warm cup of apple cider. The combination of the soft, spiced cookie with a cold drink is pure comfort. I like to arrange them on a platter with some candy corn and little cups of frosting for dipping. Kids go crazy for that.
Storage : Store undecorated cookies in an airtight container at room temperature for up to 5 days. I layer them between sheets of wax paper to prevent sticking. Glazed cookies should be stored in a single layer, or the glaze can get smudged. If you stack them, put a piece of parchment between each layer.
Freezing : These cookies freeze beautifully. Freeze the unglazed baked cookies in a single layer on a baking sheet, then transfer them to a freezer-safe bag or container. They keep for up to 3 months. When you are ready to serve, thaw them at room temperature for about 30 minutes, then glaze and decorate. I do this every October — I make a double batch, freeze half, and pull them out for last-minute Halloween parties.
Reheating : If you like your cookies slightly warm, pop them in a 300°F oven for 3 to 4 minutes. Do not microwave them — that makes the glaze sticky and the cookies chewy in a weird way. Trust me, I tried it once when I was impatient.
Flavor Development : Honestly, these cookies taste even better the next day. The spices have time to mellow and blend together. If you can resist eating them all on day one, you will be rewarded on day two. I usually hide a few in the back of the pantry just for myself.
Nutritional Information and Benefits
These are cookies, so let’s be real — they are a treat. But here is what you are working with per cookie (based on 24 cookies without glaze).
- Calories: 145
- Total Fat: 7g
- Saturated Fat: 4g
- Carbohydrates: 19g
- Sugar: 9g
- Protein: 2g
- Sodium: 55mg
The pumpkin spice blend actually has some health benefits. Cinnamon is known for its anti-inflammatory properties and can help regulate blood sugar. Ginger is great for digestion — which is helpful after Halloween candy overload. Nutmeg has compounds that may help with relaxation. I am not saying these cookies are health food, but they are not empty calories either. They use real butter and real spices, which is more than you can say for most packaged Halloween treats.
If you are watching your sugar intake, you can reduce the granulated sugar to ¾ cup. The cookies will be less sweet but still tasty. I have done this for my own family, and nobody complained. The glaze adds extra sugar, so you can skip it if you prefer a less sweet cookie.
These cookies are not gluten-free, dairy-free, or vegan as written, but I have included substitutions above for those who need them. They do contain eggs and wheat, so keep that in mind for allergy-friendly gatherings.
Conclusion
These pumpkin spice sugar cookies started as a complete accident, but they have become one of my most-requested recipes. They are the kind of cookie that makes people smile — partly because of the fun Halloween shapes, but mostly because they taste like a warm hug. The soft, buttery texture and gentle spice are comforting without being overwhelming. They are simple enough to make with kids, sturdy enough to decorate, and affordable enough to make a big batch without breaking the bank.
I hope you give them a try, whether you are making them for a classroom party, a Halloween gathering, or just a quiet afternoon at home. Feel free to customize the shapes, the glaze color, or the spice level to make them your own. That is the beauty of a simple recipe like this — it is a blank canvas for your creativity.
I would love to hear how yours turn out. Drop a comment below and let me know what shapes you used, how the kids liked them, or if you discovered a new variation I should try. Happy baking, and may your kitchen smell like ghosts and cinnamon.
Frequently Asked Questions
Can I use store-bought pumpkin pie spice instead of making my own?
Absolutely. Store-bought pumpkin pie spice works perfectly. Use 2 teaspoons in the dough. Just check the label to make sure it does not have added sugar or salt.
Why did my cookies spread too much?
This usually happens if the butter was too soft or melted, or if the dough was not chilled. Next time, make sure your butter is softened but not greasy, and chill the dough for 15 to 20 minutes before rolling and cutting.
Can I freeze the cookie dough instead of the baked cookies?
Yes. Shape the dough into a disc, wrap it tightly in plastic wrap, and freeze for up to 2 months. Thaw it in the refrigerator overnight before rolling and cutting. This is a great time-saver for busy weeks.
My cookies turned out dry. What went wrong?
The most common culprit is overbaking. These cookies need only 8 to 10 minutes. The second possibility is too much flour — make sure you are spooning and leveling it, not scooping directly from the bag. A dry dough can also result from overmixing.
Can I make these cookies without a rolling pin?
Yes. Press the dough into a 9×13 inch baking pan lined with parchment paper, then chill until firm. Lift the dough out using the parchment, cut it into squares or rectangles, and bake. They will not be as cute as cut-out shapes, but they taste the same.
Pin This Recipe!

Best Kid-Approved Pumpkin Spice Halloween Sugar Cookies
These soft, buttery pumpkin spice sugar cookies are a happy kitchen accident turned Halloween tradition. They are quick, easy, and perfect for decorating with kids.
- Prep Time: 15 minutes
- Cook Time: 10 minutes
- Total Time: 25 minutes
- Yield: 24 servings 1x
- Category: Dessert
- Cuisine: American
Ingredients
- 1 cup (226g) unsalted butter, softened
- 1 cup (200g) granulated sugar
- 1 large egg, room temperature
- 1 teaspoon vanilla extract
- 2 ½ cups (312g) all-purpose flour
- ½ teaspoon baking powder
- ¼ teaspoon salt
- 2 teaspoons pumpkin spice blend
- For the Homemade Pumpkin Spice Blend: 1 tablespoon ground cinnamon, 1 teaspoon ground nutmeg, 1 teaspoon ground ginger, ½ teaspoon ground cloves, ¼ teaspoon allspice (optional)
- For the Simple Glaze (Optional): 1 cup (120g) powdered sugar, 2 tablespoons milk, ½ teaspoon vanilla extract, orange food coloring (optional), Halloween sprinkles or sanding sugar
Instructions
- Preheat oven to 350°F (175°C). Line two baking sheets with parchment paper or silicone baking mats.
- In a large mixing bowl, beat softened butter and granulated sugar together until light and fluffy, about 2-3 minutes with a hand mixer on medium speed.
- Add egg and vanilla extract; beat on low speed until just combined.
- In a separate medium bowl, whisk together flour, baking powder, salt, and pumpkin spice blend.
- Gradually add dry ingredients to wet mixture, mixing on low speed until just combined. Do not overmix.
- Lightly flour your work surface and rolling pin. Roll dough to about ¼-inch thickness.
- Dip cookie cutters in flour and cut shapes. Place cut cookies about 1 inch apart on prepared baking sheets. Gather scraps, re-roll, and cut more cookies.
- Bake for 8-10 minutes, until edges are just barely golden. Centers will look slightly underdone.
- Let cookies cool on baking sheet for 2 minutes, then transfer to a wire cooling rack to cool completely.
- For glaze: whisk together powdered sugar, milk, and vanilla extract. Add orange food coloring if desired. Drizzle over cooled cookies and add sprinkles immediately. Let set for 30 minutes.
Notes
Do not skip parchment paper; it helps cookies hold their shape. If kitchen is warm, chill dough for 15 minutes before rolling. Use a light hand with flour when rolling. Bake one sheet at a time for even baking. Cookies taste even better the next day.
Nutrition
- Serving Size: 1 cookie
- Calories: 145
- Sugar: 9
- Sodium: 55
- Fat: 7
- Saturated Fat: 4
- Carbohydrates: 19
- Protein: 2
Keywords: pumpkin spice, sugar cookies, Halloween cookies, kid-friendly, easy cookies, fall baking


