Love this? Save it for later!
Share the inspiration with your friends
“You know that moment when the power flickers just as you’re about to start a big batch of Jello? Yeah, that happened to me last summer right before the Fourth of July barbecue. I was halfway through layering this vibrant patriotic jello recipe, and the kitchen went dark. Honestly, I thought the whole thing was doomed. But after a bit of scrambling with flashlights and a minor mess involving a toppled bowl (classic me), I ended up with the brightest, most festive dessert that stole the show.
This easy vibrant patriotic jello recipe isn’t just about the colors—though the reds, whites, and blues do pop like fireworks on the plate. It’s about creating something joyful and nostalgic that brings everyone together without fuss or fancy ingredients. I mean, let’s face it, not everyone has hours or a dozen complicated steps to whip up a festive treat, right?
Maybe you’ve been there, scrambling last minute for a dish that says “party” without stressing you out. That’s exactly why this recipe stuck with me—and why I keep making it every year. It’s simple, bright, and honestly, a little bit fun to mess up and still make look amazing. So whether you’re hosting your own celebration or just want a sweet slice of summer cheer, this recipe has got your back.
Why You’ll Love This Recipe
- Quick & Easy: Comes together in under 30 minutes, perfect for busy weekends or last-minute gatherings.
- Simple Ingredients: No need for specialty stores; you likely have all the essentials in your pantry or local market.
- Perfect for 4th of July and Other Festive Occasions: Brings instant patriotic vibes to any summer cookout or picnic.
- Crowd-Pleaser: Loved by kids and adults alike for its fun colors and refreshing, fruity flavors.
- Unbelievably Delicious: The balance of sweet and tart flavors with a smooth, jiggly texture that feels like summer on a plate.
What sets this easy vibrant patriotic jello recipe apart is the layering technique paired with just the right flavors. I’ve tried many versions, but this one has that perfect set—not too firm, not too wobbly—and the colors stay bright and distinct after chilling. Plus, the addition of real fruit chunks (if you want) adds a little surprise bite that takes it beyond your run-of-the-mill jello.
Honestly, it’s the kind of recipe that makes you close your eyes after the first bite and smile. It’s fun, nostalgic, and just a little nostalgic—like catching the fireworks on a warm summer night with friends and family. And hey, if you want to impress without the stress, this recipe is your secret weapon.
What Ingredients You Will Need
This recipe uses simple, wholesome ingredients to deliver bold flavor and that satisfying, wobbly texture without any fuss. Most of these are pantry staples or easily found at any grocery store during summer. Feel free to swap in fresh fruits when in season to add a personal touch!
- Red Layer:
- 1 package (3 oz / 85 g) red flavored gelatin (like strawberry or cherry)
- 1 cup (240 ml) boiling water
- 1 cup (240 ml) cold water
- White Layer:
- 1 package (3 oz / 85 g) unflavored gelatin
- 1 cup (240 ml) boiling water
- 1 cup (240 ml) cold milk (whole or 2%)
- 2 tablespoons (30 g) sugar (adjust to taste)
- 1 teaspoon (5 ml) vanilla extract
- Blue Layer:
- 1 package (3 oz / 85 g) blue flavored gelatin (blueberry or raspberry)
- 1 cup (240 ml) boiling water
- 1 cup (240 ml) cold water
- Optional Fruit Add-ins:
- Fresh blueberries (adds freshness and texture)
- Strawberry slices (for extra red color and natural sweetness)
I usually pick the Jell-O brand for best texture and flavor consistency, but any trusted gelatin brand will do. If you prefer a dairy-free option, swap the milk in the white layer with coconut milk—it still sets beautifully and adds a subtle richness. For a fun twist, try using sparkling water instead of cold water in the colored layers for a slight fizz.
Equipment Needed
- Large mixing bowls (at least three, one for each layer)
- Measuring cups and spoons for precise liquid and dry ingredients
- Whisk or spoon for stirring gelatin thoroughly
- Loaf pan or clear glass dish to show off the layers (a 9×5 inch loaf pan works great)
- Refrigerator space for chilling between layers
- Optional: Rubber spatula to help pour layers evenly
Honestly, you don’t need any fancy tools. I’ve made this in everything from a simple Pyrex dish to a vintage Tupperware pan I found at a thrift store. If you don’t have a loaf pan, any clear, rectangular dish will do so you can see those beautiful stripes. Pro tip: using a glass dish makes the colors pop even more.
Preparation Method

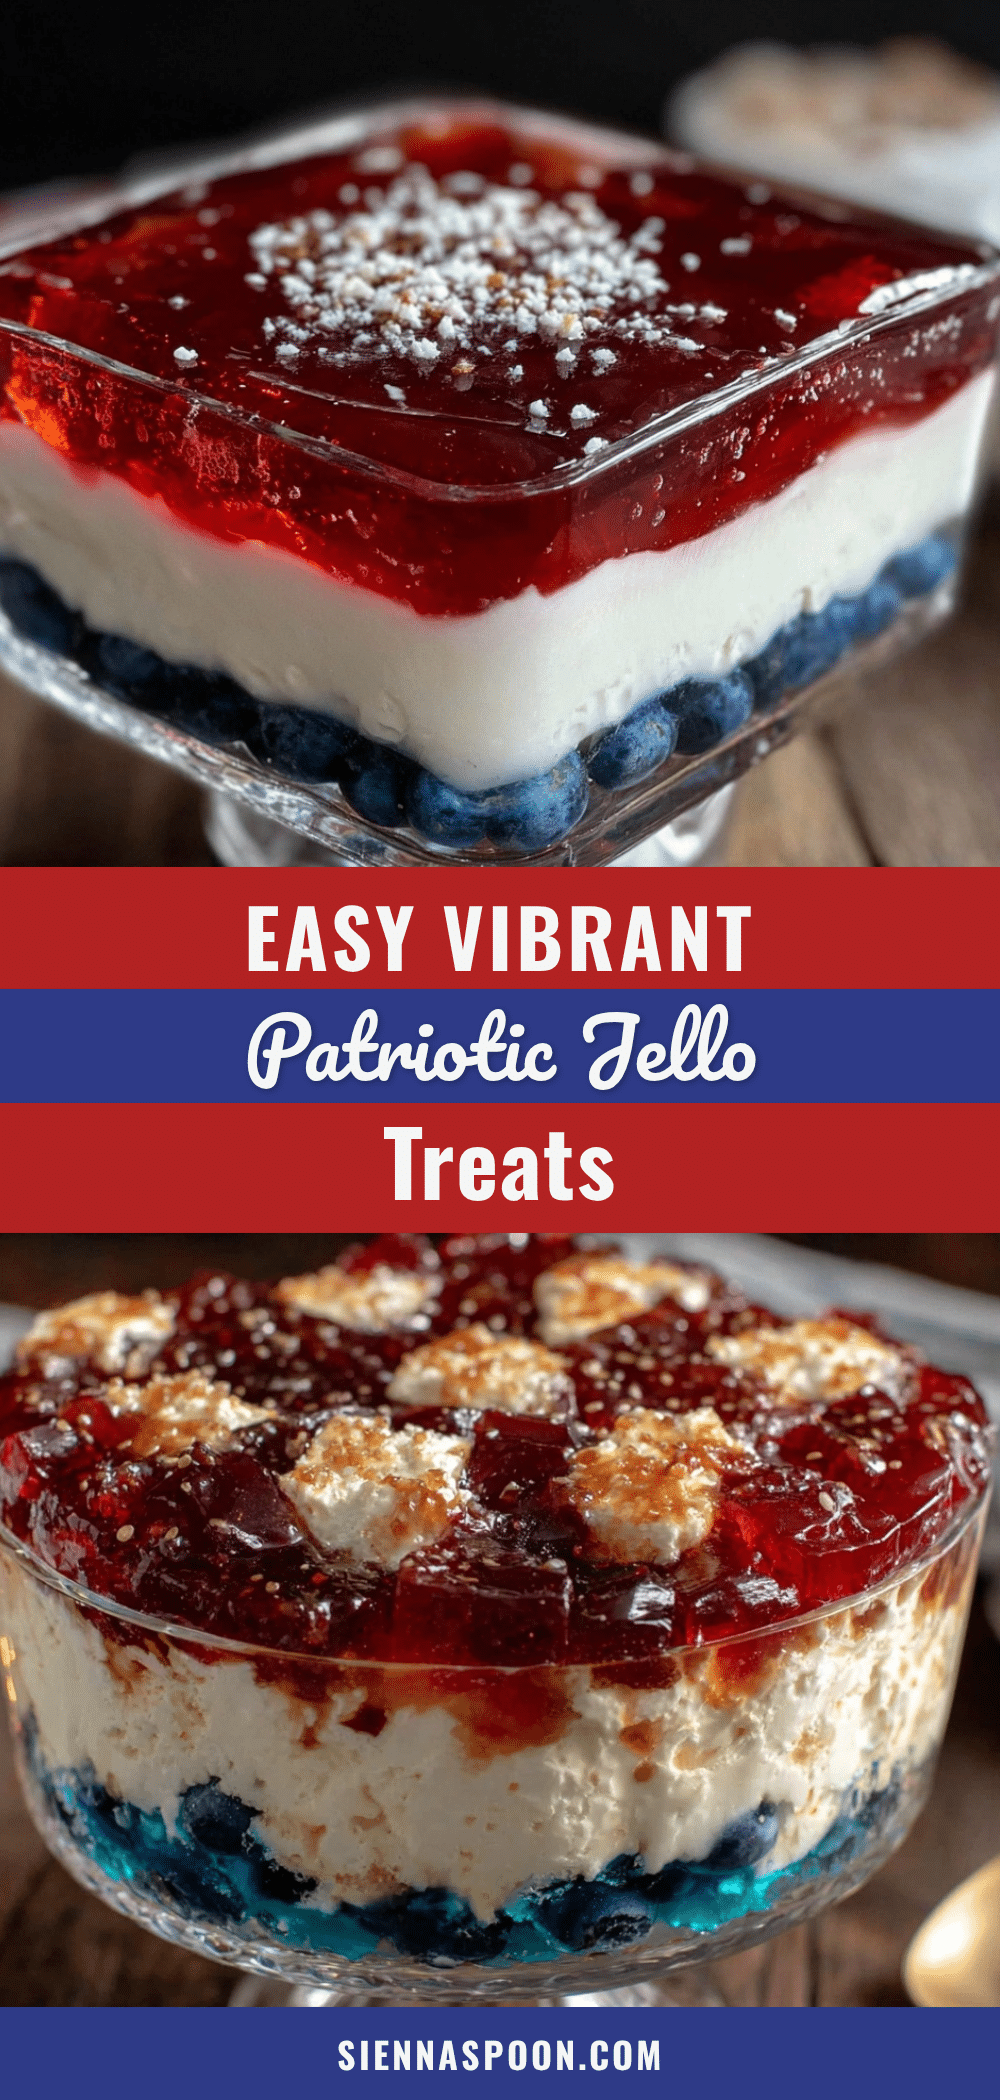
- Prepare the red layer: In a large bowl, dissolve 1 package of red gelatin in 1 cup (240 ml) boiling water. Stir well until fully dissolved (about 2 minutes). Add 1 cup (240 ml) cold water and stir gently. Pour this mixture into your loaf pan or dish. Refrigerate for at least 45 minutes, or until firm but not hard. (You want it set enough to hold the next layer but still a little sticky.)
- Mix the white layer: While the red layer chills, dissolve 1 package of unflavored gelatin in 1 cup (240 ml) boiling water. Stir in 1 cup (240 ml) cold milk, 2 tablespoons sugar, and 1 teaspoon vanilla extract. Whisk until combined. Let it cool to room temperature (about 15 minutes) but don’t let it set.
- Add the white layer: Once the red layer is set, gently pour the white mixture over it. Pour slowly over the back of a spoon to avoid mixing the layers. Return to the fridge for 45 minutes to 1 hour until firm.
- Prepare the blue layer: Dissolve 1 package of blue gelatin in 1 cup (240 ml) boiling water. Stir until dissolved, then add 1 cup (240 ml) cold water. Let the mixture cool to room temperature.
- Add the blue layer: Pour the blue gelatin gently over the set white layer using the spoon trick again. Refrigerate for at least 2 hours, or overnight for best results.
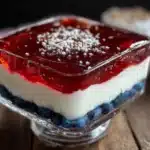
- Optional fruit addition: If you want to add fresh fruit, scatter blueberries between the layers after they’ve partially set but before fully firm. This gives a nice surprise burst of flavor and texture.
- Serving: To serve, run a knife around the edges and invert onto a platter, or slice directly in the dish. The vibrant red, white, and blue layers should be distinct and eye-catching.
Be patient during the chilling times—that’s key to keeping the layers neat. If you rush, the colors might bleed. Remember, if your kitchen gets busy or the power flickers (been there!), just laugh it off—sometimes those little hiccups make the best stories later.
Cooking Tips & Techniques
One trick I’ve learned is to let the gelatin mixtures cool slightly before pouring. Hot gelatin can melt the layer beneath and ruin the sharp lines you’re aiming for. Using the back of a spoon to pour helps too—trust me, it’s a game-changer for neat layers.
Don’t skip the chill times! I know it’s tempting to rush, but a firm-ish set between layers prevents mixing and keeps the colors vibrant. You want a texture that jiggles just right, not a mushy mess. If you’re impatient (guilty as charged), placing the dish in the freezer for 15-20 minutes can speed up setting—but watch closely so it doesn’t freeze.
Also, be mindful of the liquid temperatures, especially for the white layer with milk. Too hot and it might curdle slightly, too cold and the gelatin won’t dissolve properly. Room temperature is your friend here.
If you’ve ever tried making a layered dessert and had the colors run together, this method will feel like a relief. A little patience and these tips go a long way to making an impressive, festive treat that tastes as good as it looks.
Variations & Adaptations
- Dietary Variation: For a vegan alternative, use agar-agar powder instead of gelatin and swap milk with coconut or almond milk. Keep in mind agar sets differently, so follow package instructions carefully.
- Seasonal Twist: In late summer, swap the red and blue gelatin flavors for fresh berry purees mixed with gelatin for a more natural taste and texture.
- Flavor Boost: Add a teaspoon of citrus zest (lemon or lime) to the white layer for a subtle zing that brightens the dessert.
- Cooking Method Adjustment: For individual servings, make this recipe in clear glasses or mason jars, layering carefully for a fun single-serve presentation.
- Personal Favorite: I’ve tried adding rainbow sprinkles between the layers for a surprise crunch, especially for kids’ parties—it’s a hit every time, though it changes the classic look a bit!
Serving & Storage Suggestions
This patriotic jello is best served chilled, right out of the fridge, to keep that perfect jiggly texture. Serve it on a bright white or clear glass plate to really make the red, white, and blue pop. It pairs wonderfully with light whipped cream or a scoop of vanilla ice cream for extra indulgence.
If you’re planning a big celebration, this dessert holds up well in the fridge for up to 3 days. Just cover it with plastic wrap to prevent drying out or absorbing other fridge odors. Avoid freezing, as it changes the texture and can make it watery upon thawing.
For best presentation, slice just before serving. The layers may firm up a bit more in the fridge, making clean slices easier. Over time, the flavors meld slightly, meaning the tartness softens and the dessert tastes even more harmonious the next day.
Nutritional Information & Benefits
This easy vibrant patriotic jello recipe is relatively low in calories—each serving clocks in around 120 calories, depending on portion size and if you add fruit or cream. It’s fat-free (unless you add cream), low in sodium, and contains a modest amount of sugar.
The unflavored gelatin in the white layer contains collagen, which can be a bonus for skin and joint health. Using real fruit adds vitamins and antioxidants, especially if you go for fresh blueberries or strawberries. For those watching carbs, this dessert is a lighter sweet option compared to cakes or pies.
It’s naturally gluten-free, and with simple substitutions, can be made dairy-free or vegan. Just keep an eye out if you have gelatin allergies or dietary restrictions.
Conclusion
All in all, this easy vibrant patriotic jello recipe is a no-fuss way to bring some summer sparkle to your table. It’s colorful, fun, and flexible enough to match your taste and dietary needs. I love it because it reminds me of those imperfect but joyful moments—like that blackout mishap—that make celebrations memorable.
I hope you’ll give this recipe a try, tweak it to your liking, and share your own festive versions with friends and family. Let me know how it goes in the comments—I’m always curious about your takes and little kitchen stories!
Here’s to simple, sweet, and spirited summer treats that bring smiles all around.
FAQs
Can I make this patriotic jello recipe ahead of time?
Yes! You can prepare the layers a day in advance and keep the dessert refrigerated. Just cover it well to maintain moisture and freshness.
What can I use instead of gelatin for a vegetarian or vegan option?
Agar-agar powder is a popular plant-based substitute. Use according to package instructions, as it sets differently than gelatin.
How do I prevent the layers from mixing together?
Chill each layer until it’s firm but still slightly sticky before adding the next. Pour the new layer slowly over the back of a spoon to avoid disturbing the set layer beneath.
Can I add fresh fruit to the layers?
Absolutely! Fresh blueberries or sliced strawberries work great, especially if added between layers when they’re partially set.
What if my jello doesn’t set properly?
Check that you dissolved the gelatin completely in boiling water and used the correct liquid amounts. Also, ensure your refrigerator is cold enough. If it still doesn’t set, you might need a fresh gelatin packet.
By the way, if you’re interested in other quick and fun summer recipes, you might enjoy my crispy garlic chicken for a savory twist or the fresh berry summer salad for a cool, refreshing side. Both have been big hits at my summer gatherings!
Pin This Recipe!
Easy Vibrant Patriotic Jello Recipe for Perfect 4th of July Treats
A quick and easy layered patriotic jello dessert featuring red, white, and blue layers with optional fresh fruit, perfect for 4th of July celebrations and other festive occasions.
- Prep Time: 15 minutes
- Cook Time: 2 hours 45 minutes
- Total Time: 3 hours
- Yield: 8 servings 1x
- Category: Dessert
- Cuisine: American
Ingredients
- 1 package (3 oz / 85 g) red flavored gelatin (like strawberry or cherry)
- 1 cup (240 ml) boiling water
- 1 cup (240 ml) cold water
- 1 package (3 oz / 85 g) unflavored gelatin
- 1 cup (240 ml) boiling water
- 1 cup (240 ml) cold milk (whole or 2%)
- 2 tablespoons (30 g) sugar (adjust to taste)
- 1 teaspoon (5 ml) vanilla extract
- 1 package (3 oz / 85 g) blue flavored gelatin (blueberry or raspberry)
- 1 cup (240 ml) boiling water
- 1 cup (240 ml) cold water
- Optional: Fresh blueberries
- Optional: Strawberry slices
Instructions
- Prepare the red layer: In a large bowl, dissolve 1 package of red gelatin in 1 cup boiling water. Stir well until fully dissolved (about 2 minutes). Add 1 cup cold water and stir gently. Pour this mixture into your loaf pan or dish. Refrigerate for at least 45 minutes, or until firm but not hard.
- Mix the white layer: While the red layer chills, dissolve 1 package of unflavored gelatin in 1 cup boiling water. Stir in 1 cup cold milk, 2 tablespoons sugar, and 1 teaspoon vanilla extract. Whisk until combined. Let it cool to room temperature (about 15 minutes) but don’t let it set.
- Add the white layer: Once the red layer is set, gently pour the white mixture over it using the back of a spoon to avoid mixing the layers. Return to the fridge for 45 minutes to 1 hour until firm.
- Prepare the blue layer: Dissolve 1 package of blue gelatin in 1 cup boiling water. Stir until dissolved, then add 1 cup cold water. Let the mixture cool to room temperature.
- Add the blue layer: Pour the blue gelatin gently over the set white layer using the spoon trick again. Refrigerate for at least 2 hours, or overnight for best results.
- Optional fruit addition: If desired, scatter fresh blueberries or strawberry slices between the layers after they’ve partially set but before fully firm.
- To serve: Run a knife around the edges and invert onto a platter, or slice directly in the dish. Serve chilled.
Notes
Let gelatin mixtures cool slightly before pouring to prevent melting the layer beneath. Use the back of a spoon to pour layers slowly for neat lines. Chill each layer until firm but still slightly sticky before adding the next to avoid mixing. For faster setting, place dish in freezer for 15-20 minutes but watch closely to avoid freezing. Dairy-free option: substitute milk with coconut milk. Vegan option: use agar-agar powder instead of gelatin and plant-based milk. Avoid freezing the finished dessert as it changes texture.
Nutrition
- Serving Size: 1 slice (approximate
- Calories: 120
- Sugar: 24
- Sodium: 40
- Carbohydrates: 28
- Protein: 1
Keywords: patriotic jello, 4th of July dessert, layered jello, red white and blue dessert, easy jello recipe, summer dessert, festive jello