Love this? Save it for later!
Share the inspiration with your friends
“I wasn’t planning on baking anything fancy that Saturday morning,” I confessed to myself, juggling last-minute plans for my niece’s graduation party. You know that feeling when everything piles up, and suddenly you realize the centerpiece dessert hasn’t been sorted? Well, that was me—standing in the kitchen with a cracked mixing bowl in one hand and a slightly smudged recipe card in the other. The funny part? My neighbor, Mrs. Lillian, who’s always been more into gardening than baking, popped over with the most unexpected advice about a simple one-layer graduation sheet cake with buttercream writing.
She swore by this very recipe—said it was her go-to for any celebration that needed something sweet but fuss-free. Honestly, I wasn’t sold at first. A single-layer cake for a graduation? I thought it might look too plain or be too small for the crowd. But, as the clock ticked away and the mess on my counter grew, I gave it a shot. The result? A soft, moist cake crowned with smooth, creamy buttercream that spelled out “Congrats Grad” in the friendliest handwriting you can imagine (despite my shaky piping skills). That day, the cake was the star of the party—simple, classic, and heartfelt without a hint of stress.
Maybe you’ve been there too, scrambling for a dessert that’s both impressive and achievable. This easy one-layer graduation sheet cake recipe with buttercream writing isn’t just about the cake itself; it’s about those moments when you pull something lovely together against the odds. Let me tell you, it stuck with me because it’s reliable, approachable, and honestly, it tastes like a warm hug after a long day.
Why You’ll Love This Recipe
Having tested countless cake recipes over the years, this one-layer graduation sheet cake stands out for all the right reasons. It’s a dependable classic that’s never intimidating, yet always delicious. Here’s why you’ll want to keep this recipe in your back pocket:
- Quick & Easy: Ready in under an hour, making it perfect for last-minute celebrations or spontaneous bake-offs.
- Simple Ingredients: Uses pantry staples—flour, sugar, eggs, butter—you likely already have on hand, no special trips required.
- Perfect for Graduations and More: Whether you’re throwing a small gathering or a casual party, this cake fits the occasion beautifully.
- Crowd-Pleaser: Kids and adults alike rave about its moist crumb and buttery frosting, guaranteed to disappear fast.
- Unbelievably Delicious: The buttercream writing adds a sweet personal touch that feels both nostalgic and celebratory.
This recipe isn’t just another sheet cake—it’s the one that I’ve adapted from my neighbor’s little secret, making the buttercream extra smooth for easy piping and balancing the sweetness perfectly. It’s the kind of cake that makes you pause after the first bite and smile, knowing you nailed it without the fuss. And honestly, isn’t that the dream for any home baker?
What Ingredients You Will Need
This recipe uses simple, wholesome ingredients that come together to create a moist, tender cake topped with silky buttercream. Most are pantry staples, and substitutions are easy if needed.
- For the Cake:
- All-purpose flour (2 cups / 240g) – I recommend Gold Medal for consistent results
- Baking powder (2 ½ teaspoons) – ensures a nice rise
- Salt (½ teaspoon) – balances the sweetness
- Unsalted butter (½ cup / 115g), softened – use Land O’Lakes if available for richer flavor
- Granulated sugar (1 ½ cups / 300g) – standard white sugar works perfectly
- Large eggs (3), room temperature – helps with batter consistency
- Whole milk (1 cup / 240ml), room temperature – you can swap with almond milk for a dairy-free option
- Pure vanilla extract (2 teaspoons) – fresh vanilla makes a world of difference
- For the Buttercream Writing:
- Unsalted butter (1 cup / 230g), softened – use a quality brand like Kerrygold for creaminess
- Powdered sugar (4 cups / 480g), sifted – ensures a smooth texture
- Milk or heavy cream (2-3 tablespoons / 30-45ml) – adjust for desired consistency
- Pure vanilla extract (1 teaspoon)
- Food coloring (optional) – gel-based colors work best for vibrant writing
When selecting ingredients, it’s worth noting that fresh eggs and high-quality butter really impact the final taste and texture. Also, if you’re baking in summer, consider swapping the whole milk for buttermilk to add a slight tang that pairs beautifully with the buttercream. For those with allergies, coconut yogurt and gluten-free flour blends can be great alternatives without compromising taste.
Equipment Needed
- 9×13-inch (23×33 cm) sheet pan – a standard size perfect for one-layer cakes; a non-stick pan makes cleanup easier.
- Mixing bowls – ideally one large for batter and one for the buttercream.
- Electric hand mixer or stand mixer – essential for creaming butter and sugar smoothly.
- Spatula – for scraping down the bowl and folding ingredients gently.
- Offset spatula or butter knife – handy for spreading the frosting evenly.
- Pastry bag with a small round tip or a zip-top bag with the corner snipped – for piping the buttercream writing.
If you don’t have a stand mixer, an electric hand mixer works just fine. I’ve even mixed by hand in a pinch, but it does take extra elbow grease! For the piping bag, a DIY zip-top bag is a budget-friendly alternative that still gives you control over your writing. Keeping your butter softened but not melting is key for smooth piping, so sometimes a quick chill in the fridge after mixing helps maintain the perfect consistency.
Preparation Method
- Preheat your oven to 350°F (175°C). Grease your 9×13-inch sheet pan with butter or non-stick spray, then lightly dust with flour to help the cake release easily.
- Mix dry ingredients: In a medium bowl, whisk together 2 cups (240g) of all-purpose flour, 2 ½ teaspoons baking powder, and ½ teaspoon salt. Set aside.
- Cream butter and sugar: In a large bowl, beat ½ cup (115g) softened unsalted butter with 1 ½ cups (300g) granulated sugar using an electric mixer on medium speed. This should take about 3-4 minutes until light and fluffy—don’t rush this step; it makes a difference in the cake’s texture.
- Add eggs: Crack in 3 large eggs one at a time, mixing well after each addition. The batter might look a little curdled here, but keep going.
- Incorporate vanilla and milk: Stir in 2 teaspoons pure vanilla extract. Then alternate adding the dry ingredients and 1 cup (240ml) whole milk in three parts, beginning and ending with the dry mix. Mix on low speed until just combined—overmixing can toughen the cake.
- Pour and spread batter: Transfer the batter to your prepared sheet pan, smoothing the top with a spatula for an even surface.
- Bake: Place the pan in the oven and bake for 30-35 minutes. Check doneness with a toothpick inserted in the center—it should come out clean or with a few moist crumbs.
- Cool: Let the cake cool completely in the pan on a wire rack before frosting—this usually takes about 1 hour. Attempting to frost a warm cake will cause the buttercream to melt.
- Make the buttercream: Beat 1 cup (230g) softened unsalted butter on medium speed until creamy (about 2 minutes). Gradually add 4 cups (480g) sifted powdered sugar, mixing on low speed to avoid a sugar cloud. Add 2-3 tablespoons (30-45ml) milk or cream and 1 teaspoon vanilla extract. Beat on high for 3-4 minutes until fluffy and spreadable. Adjust consistency with more milk or sugar if needed.
- Color and pipe: If desired, tint a small portion of buttercream with gel food coloring for writing. Fill a pastry bag fitted with a small round tip or a zip-top bag corner with colored buttercream. Practice your message on parchment paper first if you need to.
- Frost the cake: Spread the plain buttercream evenly over the cooled cake using an offset spatula. Then carefully pipe your graduation message or decorations on top.
Pro tip: If you find your piping shaky, try chilling the colored buttercream for 10 minutes to firm it up slightly. Also, don’t stress perfect lettering—graduations are about celebration, not calligraphy contests!
Cooking Tips & Techniques
Let me share some lessons I learned the hard way with this easy one-layer graduation sheet cake recipe with buttercream writing:
- Don’t skip creaming the butter and sugar: It might feel like an extra step, but it traps air that helps the cake rise and stay tender.
- Room temperature ingredients matter: Cold eggs or milk can cause the batter to curdle. Let them sit out for about 30 minutes before mixing.
- Use sifted powdered sugar: For buttercream, this prevents lumps and keeps the frosting silky smooth.
- Chill your buttercream if piping is tricky: Slightly firm frosting is easier to control, especially if your kitchen is warm.
- Practice your lettering: Even if you’re not an expert, practicing on parchment calms the nerves and improves your confidence.
- Timing your bake: Ovens vary, so start checking your cake at 28 minutes to avoid overbaking, which dries out the crumb.
- Multitasking tip: While the cake bakes, prepare your frosting to save time and keep momentum going.
Honestly, I once forgot to grease the pan and spent a good 10 minutes carefully loosening the cake edges with a butter knife! So don’t be like me—grease and flour your pan well. This recipe is forgiving, but attention to these small details makes your baking experience smoother and more enjoyable.
Variations & Adaptations
One of the best things about this easy one-layer graduation sheet cake is how flexible it is. Here are some ways to tweak it depending on your needs or mood:
- Flavor twists: Add ½ cup (120ml) brewed coffee instead of milk for a mocha hint, or fold in ½ cup (75g) fresh blueberries for a fruity surprise.
- Dietary adaptations: Use almond or oat flour for a gluten-free version (adjust baking powder slightly), and swap milk for coconut or soy milk to keep it dairy-free.
- Cooking methods: This batter also works for cupcakes—just reduce baking time to 18-22 minutes.
- Frosting swaps: Try cream cheese frosting for a tangy contrast or whipped coconut cream for a lighter, dairy-free topping.
- Personal favorite: I once added lemon zest to the buttercream and it gave the whole cake a fresh, unexpected zing that guests loved.
Serving & Storage Suggestions
This cake is best served at room temperature, allowing the buttercream to be soft and luscious. For presentation, I like to add a few fresh berries or edible flowers around the edges for a simple but elegant touch.
Pair it with a cold glass of milk, a cup of tea, or even sparkling lemonade for a festive vibe. If you’re hosting a larger party, it complements salads or finger sandwiches perfectly—turning your meal into a casual celebration.
To store, cover the cake loosely with plastic wrap or place it in an airtight container. It keeps well in the refrigerator for up to 3 days but remember to bring it to room temperature before serving to get the best texture. For longer storage, you can freeze the unfrosted cake tightly wrapped for up to 2 months; thaw overnight in the fridge, then frost and decorate.
Flavors often deepen after a day, so if you can resist, letting the cake sit overnight can make it even more delightful. Just don’t wait too long or the buttercream might lose its fresh whipped texture.
Nutritional Information & Benefits
Each slice (about 1/12th of the cake) contains approximately 350 calories, 18g fat, 45g carbohydrates, and 4g protein. Using unsalted butter and controlling sugar quantities keeps the recipe balanced.
Key ingredients like eggs provide essential protein and vitamins, while vanilla extract adds flavor without calories. For a lighter option, swapping whole milk with almond milk reduces fat content, and using a sugar substitute in the buttercream can lower sugars.
This cake is gluten-containing but can be adapted for gluten-free diets. It’s not suitable for those with dairy allergies unless substitutions are used. From a wellness standpoint, it’s a treat meant to bring joy on special occasions, so I always recommend enjoying it mindfully and savoring each bite.
Conclusion
In the end, this easy one-layer graduation sheet cake with buttercream writing is more than just a dessert—it’s a reliable friend for those moments when you want to celebrate without stress. Whether you’re a novice baker or someone who loves simple, homey recipes, this cake delivers on taste, ease, and charm.
Feel free to personalize the message, play with flavors, or adapt it to your dietary needs. I love this recipe because it’s approachable, forgiving, and always welcomed at the table—just like a good friend.
Give it a try, and let me know how your graduation cake turns out! Share your piping triumphs, flavor twists, or even your funniest baking mishaps in the comments below. Happy baking and congrats to your grad!
FAQs
Can I make this cake ahead of time?
Yes! You can bake the cake a day ahead and store it wrapped tightly at room temperature. Frost and decorate the day of your event for the freshest look and taste.
How do I fix buttercream that’s too runny for writing?
Pop it in the fridge for 10-15 minutes to firm up, then stir gently before refilling your piping bag. You can also add a little more powdered sugar to thicken it.
What if I don’t have a pastry bag?
No worries! Use a zip-top plastic bag and snip a tiny corner off to pipe your message. It’s an easy substitute that works well.
Can I substitute the buttercream with another frosting?
Absolutely! Cream cheese frosting or whipped coconut cream are tasty alternatives, though they might be trickier to pipe neatly.
How do I prevent the cake from sticking to the pan?
Grease the pan thoroughly with butter or non-stick spray, then dust with flour. Let excess flour tap out before adding the batter. This simple step helps your cake release cleanly.
By the way, if you enjoy this recipe, you might appreciate the classic vanilla cupcakes I shared recently—they’re a fantastic companion for any celebration. Also, for a savory snack to pair with your cake, the crispy garlic chicken is always a crowd-pleaser at parties!
Pin This Recipe!

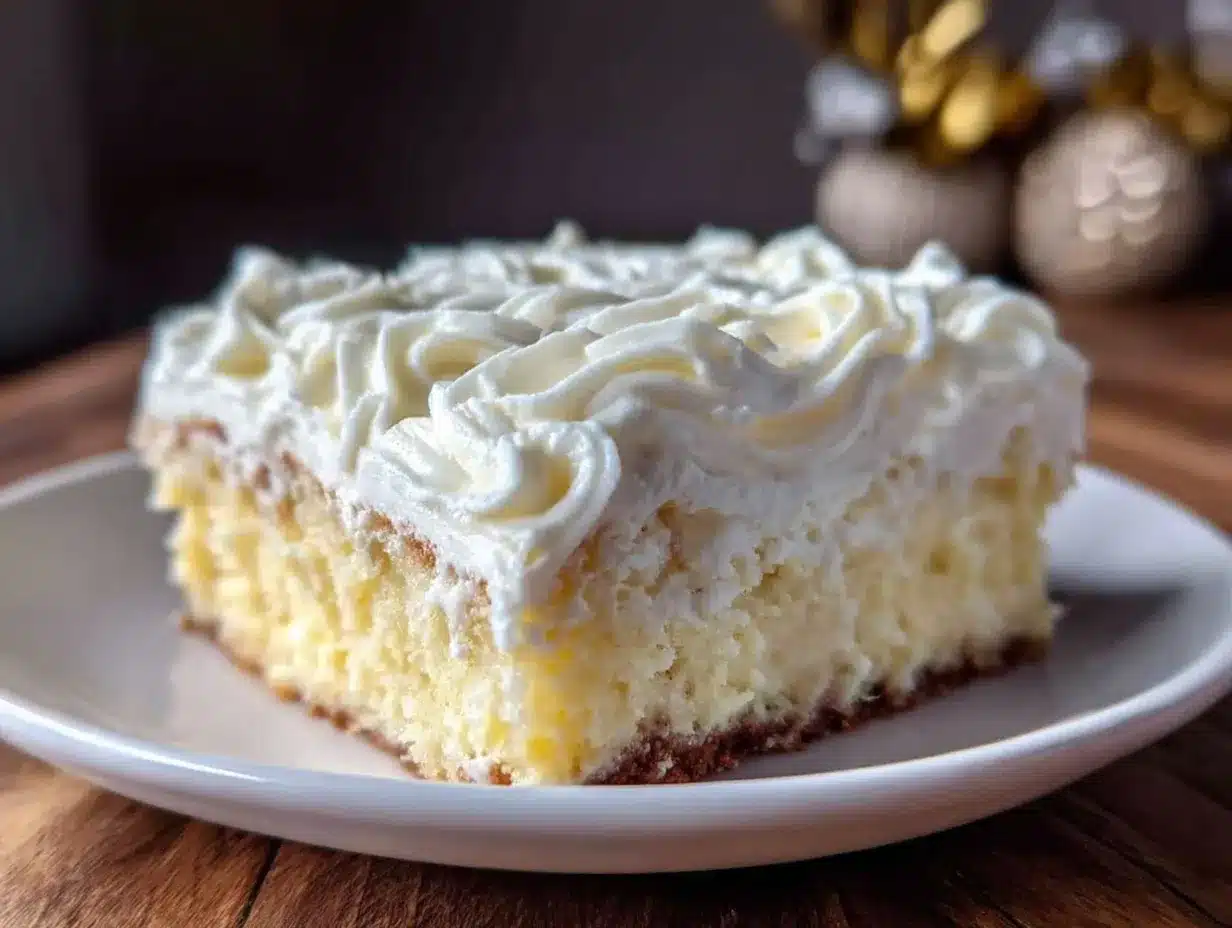
Easy One-Layer Graduation Sheet Cake Recipe with Buttercream Writing Tutorial
A simple, moist one-layer sheet cake topped with smooth buttercream perfect for graduation celebrations. Quick and easy to make with pantry staples and a personal touch of piped congratulations.
- Prep Time: 15 minutes
- Cook Time: 35 minutes
- Total Time: 1 hour 50 minutes
- Yield: 12 servings 1x
- Category: Dessert
- Cuisine: American
Ingredients
- 2 cups (240g) all-purpose flour
- 2 ½ teaspoons baking powder
- ½ teaspoon salt
- ½ cup (115g) unsalted butter, softened
- 1 ½ cups (300g) granulated sugar
- 3 large eggs, room temperature
- 1 cup (240ml) whole milk, room temperature
- 2 teaspoons pure vanilla extract
- 1 cup (230g) unsalted butter, softened (for buttercream)
- 4 cups (480g) powdered sugar, sifted
- 2–3 tablespoons (30-45ml) milk or heavy cream
- 1 teaspoon pure vanilla extract (for buttercream)
- Food coloring (optional)
Instructions
- Preheat your oven to 350°F (175°C). Grease a 9×13-inch sheet pan with butter or non-stick spray and lightly dust with flour.
- In a medium bowl, whisk together the flour, baking powder, and salt. Set aside.
- In a large bowl, beat ½ cup softened unsalted butter with 1 ½ cups granulated sugar using an electric mixer on medium speed until light and fluffy, about 3-4 minutes.
- Add eggs one at a time, mixing well after each addition.
- Stir in vanilla extract. Alternate adding the dry ingredients and milk in three parts, beginning and ending with the dry ingredients. Mix on low speed until just combined.
- Pour batter into the prepared pan and smooth the top with a spatula.
- Bake for 30-35 minutes, or until a toothpick inserted in the center comes out clean or with a few moist crumbs.
- Cool the cake completely in the pan on a wire rack, about 1 hour.
- To make the buttercream, beat 1 cup softened unsalted butter on medium speed until creamy, about 2 minutes.
- Gradually add sifted powdered sugar, mixing on low speed to avoid a sugar cloud.
- Add milk or cream and vanilla extract, then beat on high for 3-4 minutes until fluffy and spreadable. Adjust consistency as needed.
- If desired, tint a small portion of buttercream with gel food coloring for writing.
- Spread plain buttercream evenly over the cooled cake using an offset spatula.
- Pipe your graduation message or decorations on top using a pastry bag with a small round tip or a zip-top bag with a corner snipped.
Notes
Use room temperature ingredients for best results. Chill colored buttercream for 10 minutes if piping is difficult. Grease and flour pan well to prevent sticking. Practice piping on parchment paper before decorating the cake. You can substitute milk with almond milk for dairy-free option and use gluten-free flour blends for gluten-free adaptation.
Nutrition
- Serving Size: 1 slice (1/12th of c
- Calories: 350
- Sugar: 35
- Sodium: 180
- Fat: 18
- Saturated Fat: 11
- Carbohydrates: 45
- Fiber: 1
- Protein: 4
Keywords: graduation cake, sheet cake, buttercream writing, easy cake recipe, one-layer cake, celebration dessert