Love this? Save it for later!
Share the inspiration with your friends
“You’ve got to be kidding me,” I muttered as I stared down at a bowl of eggs with shells clinging like stubborn barnacles. It was the Saturday before Easter, and my kitchen looked like a battlefield. I was prepping for a brunch potluck, and honestly, I thought peeling hard-boiled eggs was supposed to be simple. Spoiler alert: it wasn’t. That’s when my neighbor, Mrs. Delgado, popped her head in, saw my eggy mess, and shared her secret for perfect peeling every time. I wasn’t expecting an impromptu lesson on deviled eggs from the lady who usually just waves hello from across the street, but there I was, scribbling notes while she demonstrated the technique that changed my egg game forever.
Fast forward a few weeks, and I’ve perfected my foolproof deviled eggs recipe—a recipe that not only guarantees that the shells slip off smoothly but also results in velvety, flavorful filling every single time. You know that feeling when a recipe just clicks and suddenly you’re the one everyone asks for at gatherings? That’s what happened here. Between the perfectly peeled eggs and the creamy, tangy filling, these deviled eggs quickly became my go-to for potlucks, family dinners, and even lazy weekend snacks.
Maybe you’ve been there—ready to whip up classic deviled eggs only to wrestle with shell fragments or a crumbly yolk. Let me tell you, this recipe is the kind of comfort food that makes you close your eyes after the first bite and smile, knowing you nailed it. And trust me, once you get the peeling technique down, you’ll never look back.
Why You’ll Love This Recipe
Having tested this recipe dozens of times (including that chaotic Easter morning), I can say with confidence it’s a lifesaver in the kitchen. Here’s why it stands out:
- Quick & Easy: Ready in about 30 minutes, making it perfect for last-minute gatherings or weeknight snacks.
- Simple Ingredients: No need for fancy or hard-to-find items. It’s all staples you probably have on hand already.
- Perfect for Entertaining: Whether it’s a casual brunch, a picnic, or a holiday potluck, these deviled eggs always impress.
- Crowd-Pleaser: Kids and adults alike rave about the creamy texture and balanced flavors.
- Unbelievably Delicious: The secret blend of mustard, mayo, and a hint of vinegar takes the flavor to the next level.
What makes this recipe different? It’s all about the technique—starting with the perfect boil that makes peeling effortless. Plus, I add just the right amount of seasoning to keep it classic but never boring. Honestly, this isn’t just another deviled eggs recipe; it’s the one I trust when I want to impress without sweating it.
This recipe isn’t just food—it’s a little moment of joy on a plate. Whether you’re a seasoned pro or a nervous newbie in the kitchen, these deviled eggs will make you look like a star.
What Ingredients You Will Need
This recipe uses simple, wholesome ingredients to deliver bold flavor and that creamy, irresistible filling. Most are pantry staples, and if you don’t have one or two, substitutions are easy.
- Large eggs (preferably organic or free-range for best taste)
- Mayonnaise (I recommend Hellmann’s for its creamy texture)
- Dijon mustard (adds tang and depth)
- White vinegar (helps with peeling and adds subtle acidity)
- Salt (fine sea salt works well)
- Black pepper (freshly ground for best flavor)
- Paprika (for garnish and a mild smoky note)
- Optional garnish: finely chopped fresh chives or dill (adds a fresh pop of color and flavor)
For those wanting to tweak the flavor, you can swap mayo for Greek yogurt to lighten it up, or use apple cider vinegar instead of white vinegar for a slightly fruitier tang. If you’re avoiding mustard, a small pinch of garlic powder can add a nice twist. In summer, I sometimes add a tiny bit of finely diced roasted red pepper for a sweet crunch.
Equipment Needed
- Medium-sized pot for boiling eggs – I use a sturdy stainless steel one that distributes heat evenly.
- Slotted spoon to transfer eggs from hot water to ice bath without cracking.
- Large bowl filled with ice water – this stops cooking instantly and makes peeling easier.
- Mixing bowl for combining yolk filling ingredients.
- Spoon or piping bag for filling the egg whites – I prefer a piping bag for neat presentation, but a small spoon works fine too.
- Knife for halving eggs cleanly.
If you don’t have a piping bag, a resealable plastic bag with a corner snipped off works just as well. Also, I keep a small bowl of warm water handy to dip my spoon or piping tip between fillings to keep the mixture smooth and easy to work with.
Preparation Method
- Place eggs in a single layer in the bottom of a medium pot. Add cold water to cover the eggs by about an inch (2.5 cm).
- Add 1 tablespoon (15 ml) of white vinegar to the water—this helps with peeling later. Sprinkle in a teaspoon (5 ml) of salt as well.
- Bring water to a rolling boil over medium-high heat. Once boiling, cover the pot with a lid and remove from heat.
- Let eggs sit, covered, for exactly 12 minutes (for large eggs). If your eggs are extra-large or jumbo, add 1-2 minutes.
- Prepare an ice bath in a large bowl with cold water and plenty of ice cubes while the eggs cook.
- After 12 minutes, use a slotted spoon to transfer eggs to the ice bath. Let them chill for at least 10 minutes—this stops the cooking and firms up the whites.
- Gently tap each egg on a hard surface, then roll it lightly to crack the shell all around.
- Peel eggs under running cool water or submerged in water—the water helps get under that membrane and releases the shell smoothly.
- Slice eggs in half lengthwise with a sharp knife. Carefully scoop out the yolks and place in a mixing bowl.
- Mash yolks with a fork until smooth. Add 3 tablespoons (45 ml) mayonnaise, 1 teaspoon (5 ml) Dijon mustard, a pinch of salt, and a few grinds of black pepper.
- Mix thoroughly until creamy and well combined. Taste and adjust seasoning if needed.
- Fill egg whites by spooning or piping the yolk mixture evenly into each half.
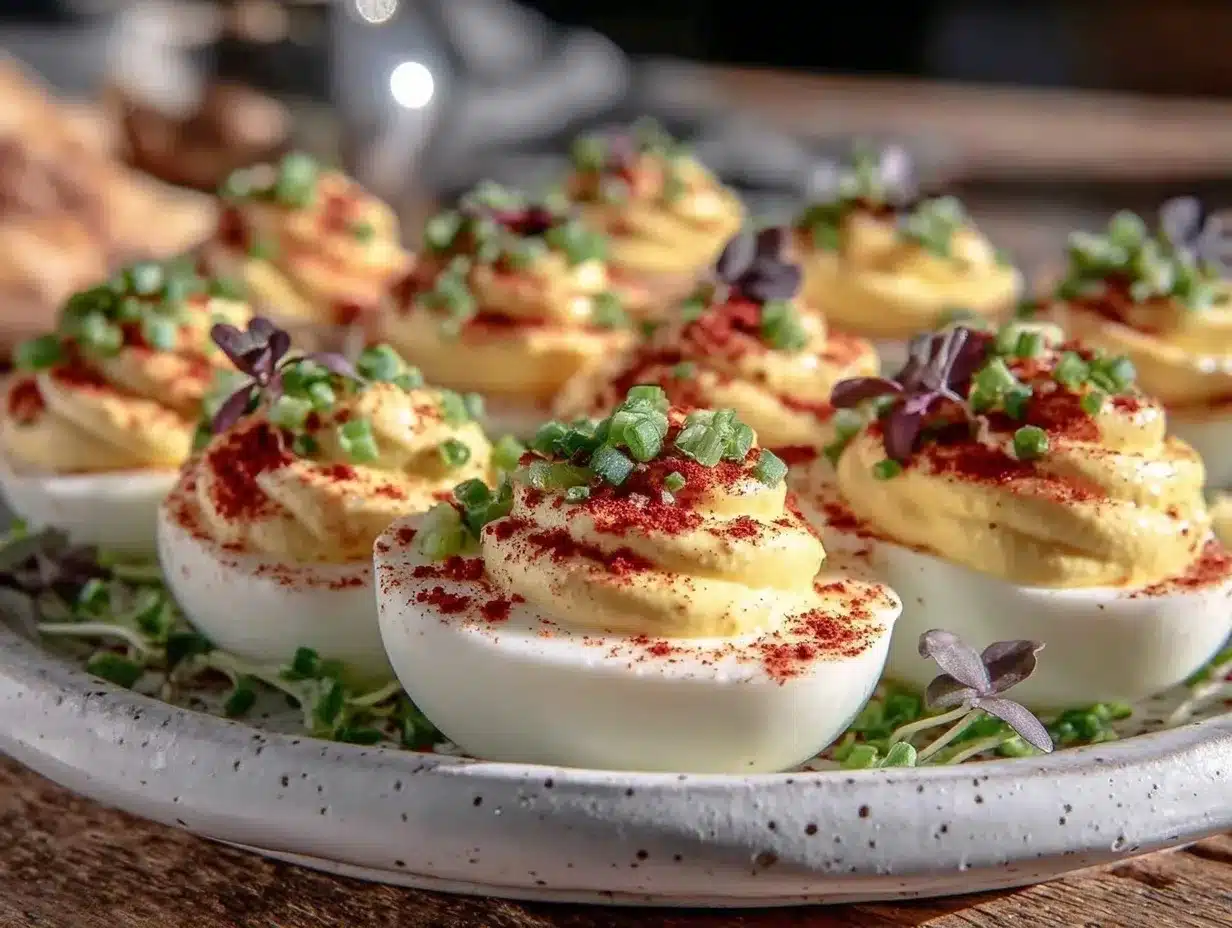
- Sprinkle with paprika and optional chives or dill for garnish.
- Chill for at least 15 minutes before serving to let flavors meld and filling firm up slightly.
Pro tip: If the filling feels too thick, add a teaspoon (5 ml) of milk or more mayo to loosen it up. And don’t rush peeling—patience here pays off big time.
Cooking Tips & Techniques
One trick I learned the hard way is that starting eggs in cold water and then bringing them to a boil helps prevent cracking. The vinegar in the water is a game-changer—it weakens the egg white’s bond to the shell, making peeling almost effortless.
When peeling, I always do it under running water, or better yet, submerged in a bowl of water. It’s like magic—the shells slide right off in big pieces. If your eggs are fresh, peeling can be trickier, so buying eggs that are a week old is actually better for hard boiling.
Another tip: use a sharp knife for halving eggs. I’ve ruined many a perfectly peeled egg with a dull blade that squished the whites. And when mixing the yolk filling, don’t overdo it. You want it creamy but not gluey.
Timing is everything here. While the eggs are chilling, prep your filling ingredients so you can move quickly once peeling is done. Multitasking like this keeps the kitchen flow smooth, especially when you’re making a crowd-sized batch.
Variations & Adaptations
If you want to mix things up, here are a few variations I’ve enjoyed:
- Spicy Deviled Eggs: Add a dash of hot sauce or a pinch of cayenne pepper to the yolk mixture for a kick.
- Herbed Variation: Fold in chopped fresh tarragon, parsley, or dill for a bright, fresh flavor.
- Avocado Deviled Eggs: Replace half the mayo with ripe avocado for a creamy, healthier twist.
- Smoky Bacon: Sprinkle crispy bacon bits on top for extra texture and flavor.
- Vegan Option: Use firm tofu blended with vegan mayo and mustard for a plant-based filling.
For cooking methods, I stick with boiling for perfect eggs, but if you’re feeling adventurous, try steaming the eggs for about 14 minutes. I find that steaming also yields easy peeling, though it takes a bit longer.
Once, I made a batch with horseradish instead of mustard after a friend’s suggestion—and honestly, it was surprisingly good! Don’t be afraid to experiment a little and find your perfect version.
Serving & Storage Suggestions
These deviled eggs are best served chilled or at room temperature. I like to arrange them on a pretty platter with a sprinkle of paprika and a few fresh herb sprigs for color. They pair wonderfully with crisp veggies, crusty bread, or even a light green salad.
For storage, keep the deviled eggs covered in an airtight container in the refrigerator. They stay fresh for up to 3 days, though honestly, they rarely last that long in my house. If you need to store peeled eggs before filling, keep them submerged in water in a covered container to prevent drying out.
Reheating? Just bring them to room temp before serving. The flavors mellow beautifully over time, making leftovers even tastier the next day.
Nutritional Information & Benefits
Each serving of these deviled eggs provides a good source of protein and essential nutrients like vitamin D, B12, and choline. Eggs are a nutrient-dense food that supports brain health and energy.
This recipe is naturally gluten-free and can be adapted for low-carb or keto diets by adjusting the mayo and mustard used. Just be mindful of allergens—eggs are a common one, so this dish isn’t suitable for those with egg allergies.
From a wellness perspective, I appreciate how this recipe balances indulgence with simplicity—satisfying cravings without complicated ingredients. It’s the kind of treat that fits nicely into an active lifestyle.
Conclusion
Honestly, once you nail the peeling technique and combine the right flavors, these deviled eggs become your kitchen MVP. They’re simple, reliable, and delicious every time. Feel free to tweak the filling to suit your taste buds or occasion—this recipe is a perfect starting point.
My favorite part? Seeing the surprised smiles when someone bites into a perfectly smooth, creamy deviled egg. It’s proof that sometimes the simplest recipes bring the biggest joy.
Give this foolproof deviled eggs recipe a try, and let me know how it turns out! I’d love to hear your variations or any tips you discover along the way.
Happy cooking and happy peeling!
FAQs
How do I make the eggs peel easily?
Start eggs in cold water with a splash of vinegar and salt, boil, then immediately chill in an ice bath. Peel under running water or submerged for best results.
Can I make deviled eggs ahead of time?
Yes! Prepare and fill eggs up to a day in advance, store covered in the fridge, and garnish just before serving.
What’s the best way to store leftover deviled eggs?
Keep them in an airtight container in the fridge for up to 3 days. Avoid freezing as it can change texture.
Can I use other types of mustard?
Absolutely! Yellow mustard works, but Dijon adds a smoother, more refined flavor. Feel free to experiment.
What if I don’t have a piping bag?
No problem—use a spoon to fill the egg whites or a resealable plastic bag with a small corner cut off to pipe the filling neatly.
Pin This Recipe!
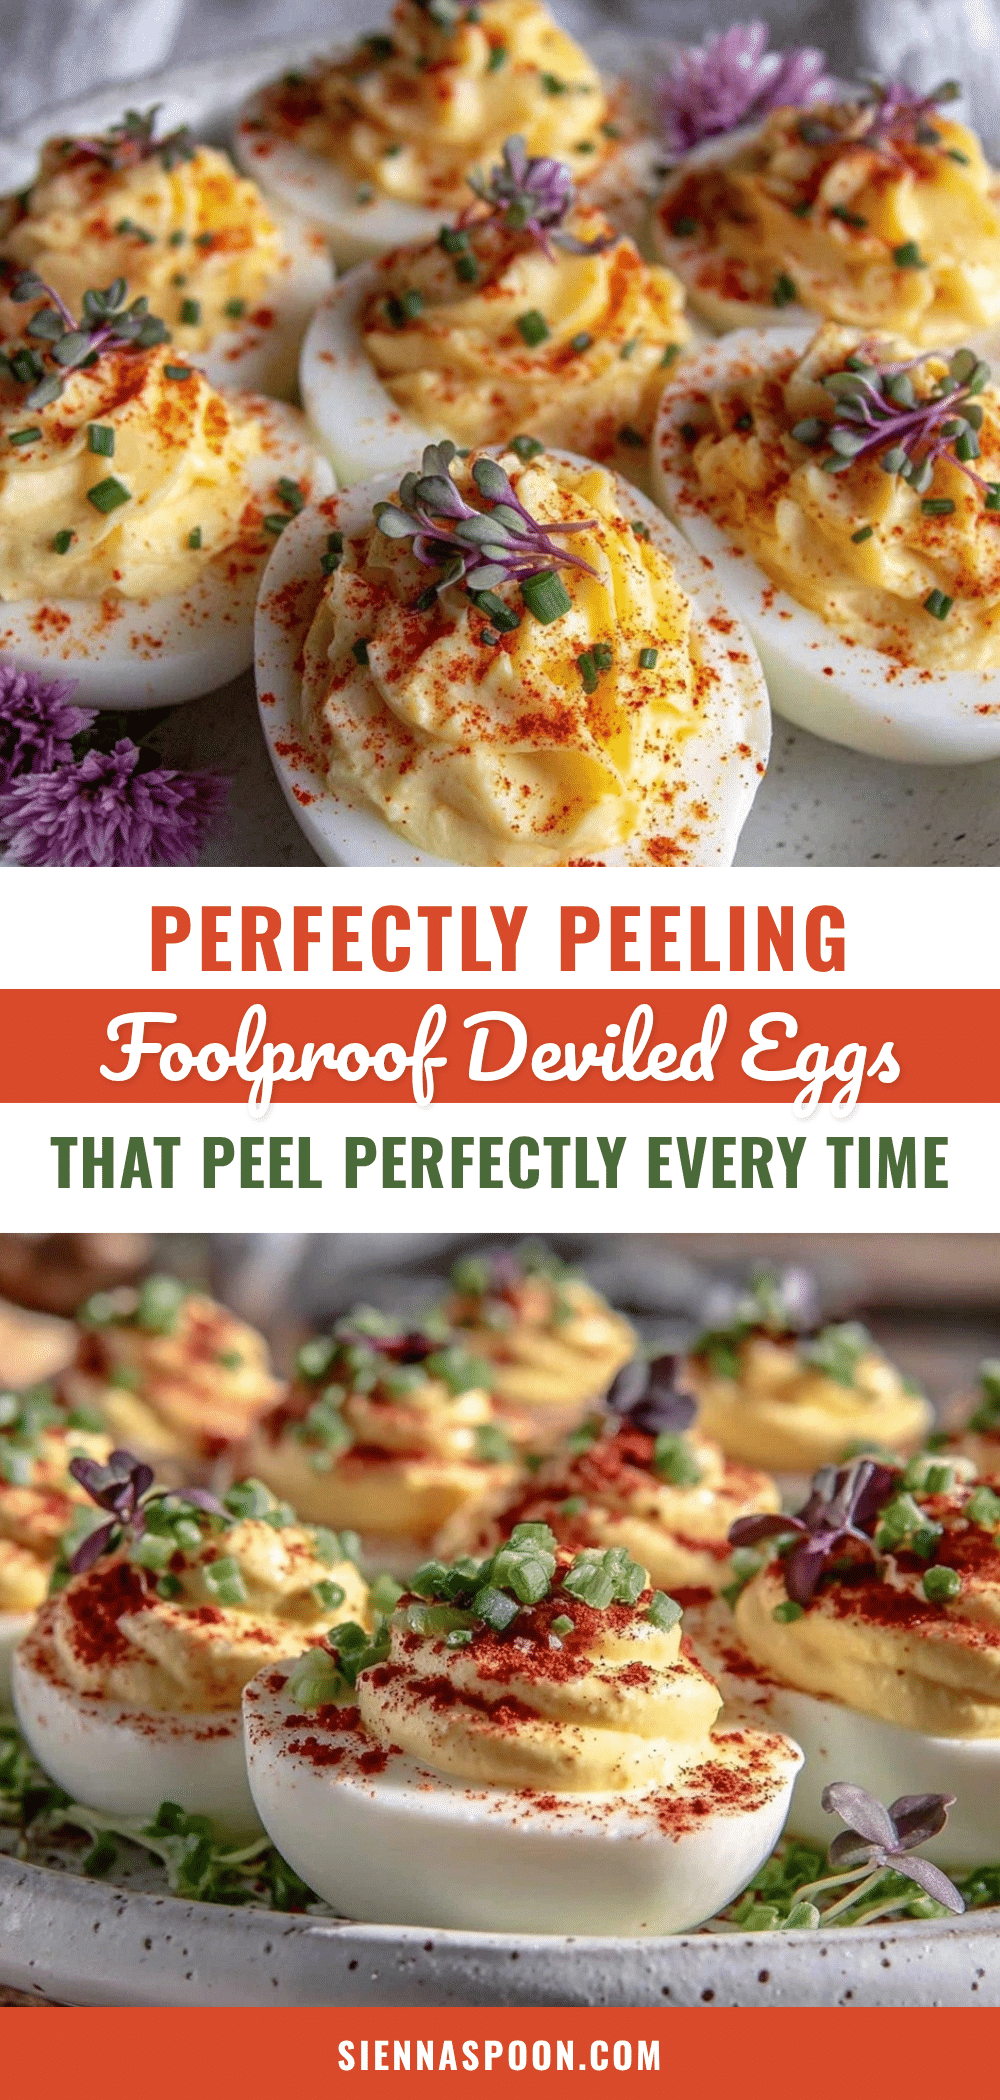
Foolproof Deviled Eggs Recipe Easy Perfect Peeling Every Time

A foolproof deviled eggs recipe that guarantees perfectly peeled eggs and a creamy, flavorful filling every time. Ideal for potlucks, family dinners, and snacks.
- Prep Time: 10 minutes
- Cook Time: 12 minutes
- Total Time: 30 minutes
- Yield: 12 deviled eggs (6 servings) 1x
- Category: Appetizer
- Cuisine: American
Ingredients
- 12 large eggs (preferably organic or free-range)
- 3 tablespoons mayonnaise (Hellmann’s recommended)
- 1 teaspoon Dijon mustard
- 1 tablespoon white vinegar
- 1 teaspoon salt (fine sea salt works well)
- Freshly ground black pepper, to taste
- Paprika, for garnish
- Optional garnish: finely chopped fresh chives or dill
Instructions
- Place eggs in a single layer in the bottom of a medium pot. Add cold water to cover the eggs by about an inch.
- Add 1 tablespoon (15 ml) of white vinegar and 1 teaspoon (5 ml) of salt to the water.
- Bring water to a rolling boil over medium-high heat. Once boiling, cover the pot with a lid and remove from heat.
- Let eggs sit, covered, for exactly 12 minutes (add 1-2 minutes for extra-large or jumbo eggs).
- Prepare an ice bath in a large bowl with cold water and plenty of ice cubes while the eggs cook.
- After 12 minutes, use a slotted spoon to transfer eggs to the ice bath. Let chill for at least 10 minutes.
- Gently tap each egg on a hard surface, then roll lightly to crack the shell all around.
- Peel eggs under running cool water or submerged in water to help release the shell smoothly.
- Slice eggs in half lengthwise with a sharp knife. Carefully scoop out the yolks and place in a mixing bowl.
- Mash yolks with a fork until smooth. Add mayonnaise, Dijon mustard, a pinch of salt, and black pepper.
- Mix thoroughly until creamy and well combined. Taste and adjust seasoning if needed.
- Fill egg whites by spooning or piping the yolk mixture evenly into each half.
- Sprinkle with paprika and optional chives or dill for garnish.
- Chill for at least 15 minutes before serving to let flavors meld and filling firm up slightly.
Notes
Start eggs in cold water with vinegar and salt to make peeling easier. Peel eggs under running water or submerged in water for best results. Use a sharp knife to halve eggs cleanly. If filling is too thick, add a teaspoon of milk or more mayo to loosen. Eggs that are about a week old peel more easily than very fresh eggs.
Nutrition
- Serving Size: 2 deviled egg halves
- Calories: 70
- Sodium: 150
- Fat: 6
- Saturated Fat: 1
- Carbohydrates: 1
- Protein: 3
Keywords: deviled eggs, easy deviled eggs, perfect peeling eggs, appetizer, party food, brunch recipe, classic deviled eggs