Love this? Save it for later!
Share the inspiration with your friends
Introduction
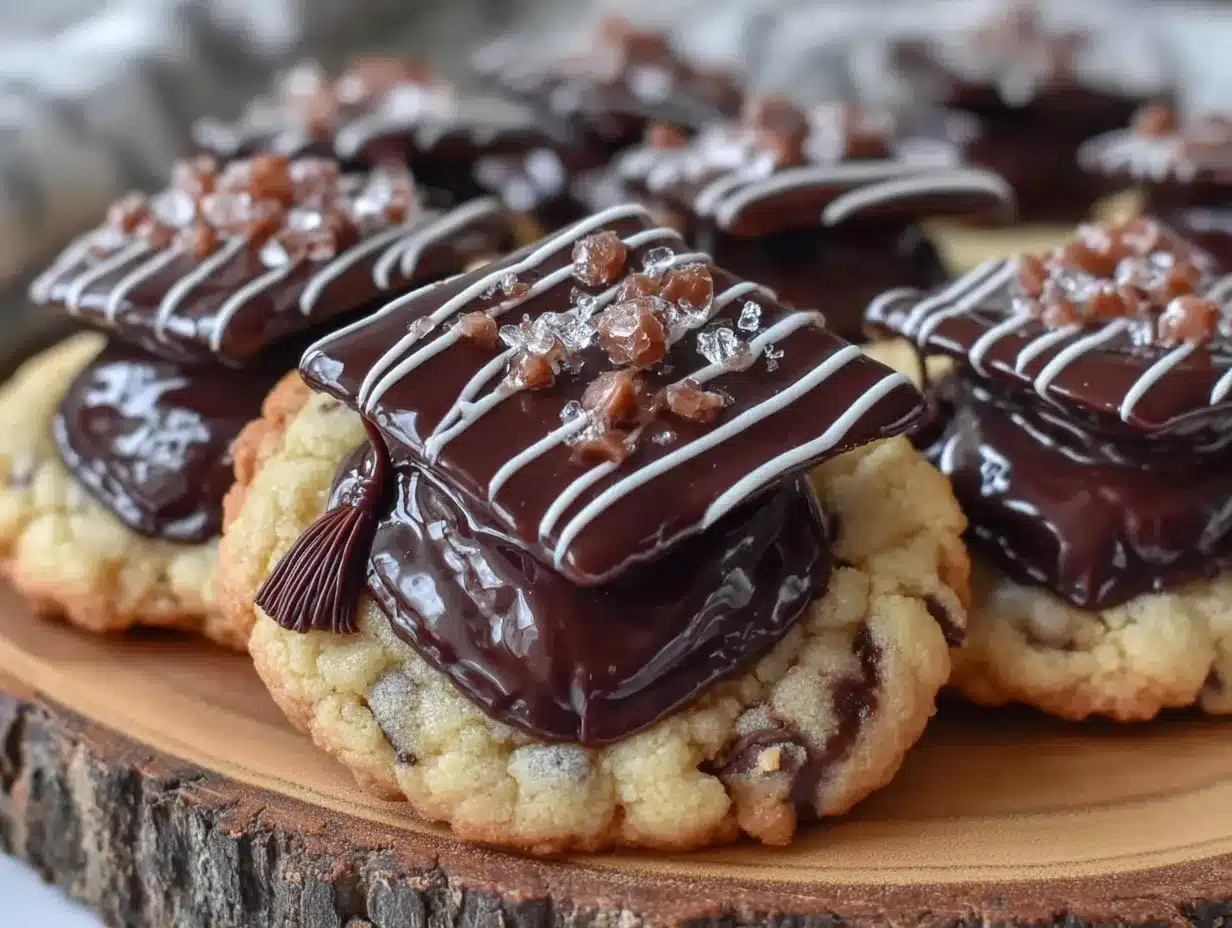
“I wasn’t expecting to become the official dessert maker for my niece’s graduation party,” I chuckled to myself that sunny Saturday morning. The invitation had come last minute—her mom called on a whim, panicked that the usual bakery treats might not arrive on time. So there I was, standing in my kitchen surrounded by flour and a slightly cracked mixing bowl, determined to whip up some graduation-themed cookies that would wow the crowd. Honestly, I was a little nervous at first—cookie decorating isn’t exactly my specialty. But as I shaped those little black caps and added the gold tassels, something clicked.
You know that feeling when a recipe surprises you? Like, you expect it to be a hassle, but it turns out so simple and satisfying that you end up making it over and over? That’s exactly what happened. These easy foolproof graduation cap cookies became the star of the celebration, and I keep getting asked to make them again every year. Maybe you’ve been there, needing a festive yet straightforward treat that looks impressive but won’t keep you up all night.
What I love most about this recipe is how it balances simplicity with charm. No fancy piping skills required. No rare ingredients lurking in the back of some specialty store. Just classic sugar cookie goodness elevated by a playful graduation cap design that anyone can pull off. Let me tell you, if you’ve ever felt intimidated by decorated cookies, this is your gentle entry point—and it’s perfect for any graduation party, from kindergarten to college.
Why You’ll Love This Recipe
This easy foolproof graduation cap cookies recipe isn’t just another cookie tutorial. It’s been tested, tweaked, and kid-approved through multiple celebrations. Here’s why it stands out:
- Quick & Easy: You can have these cookies baked and decorated in under two hours, making them perfect for last-minute party prep or casual weekend baking.
- Simple Ingredients: No need for specialty flours or fancy extracts. Most of these ingredients are pantry staples you probably already have on hand.
- Perfect for Celebrations: Whether it’s a graduation party, a congratulatory brunch, or even a classroom treat, these cookies bring the festive vibes without fuss.
- Crowd-Pleaser: From toddlers to grandparents, everyone loves the classic buttery cookie base with the fun cap design.
- Unbelievably Delicious: The texture is just right—crispy edges with a tender center that melts in your mouth. Plus, the icing adds a subtle sweetness and color pop.
What really sets this recipe apart is the foolproof nature of the cookie dough and the easy assembly process for the caps. I once tried a complicated royal icing method that had me sweating and stressing—this version skips all that drama. Instead, you get a smooth, spreadable icing that dries lovely but doesn’t require hours of piping practice. Honestly, it has saved me more than once when the clock was ticking down to party time.
So if you want a recipe that looks like you spent hours mastering cookie art but is actually a breeze, this one’s for you. It’s fun, festive, and just plain fun to make. You’ll feel like a pro, even if you’re baking your first batch.
What Ingredients You Will Need
This recipe uses simple, wholesome ingredients to deliver bold flavor and satisfying texture without the fuss. Most are pantry staples, and you can easily swap a few if needed. Here’s what you’ll need to make these easy foolproof graduation cap cookies:
- For the cookie dough:
- All-purpose flour – 2 ¾ cups (345 grams), sifted for a tender crumb
- Unsalted butter – 1 cup (226 grams), softened (I like using Land O’Lakes for consistent creaminess)
- Granulated sugar – 1 cup (200 grams)
- Large egg – 1, room temperature
- Pure vanilla extract – 1 teaspoon (adds warm depth)
- Baking powder – 1 teaspoon (helps them puff slightly)
- Salt – ½ teaspoon (balances sweetness)
- For the icing and decoration:
- Powdered sugar – 2 cups (240 grams), sifted for smooth icing
- Milk – 3 to 4 tablespoons (45-60 ml), adjust for consistency
- Light corn syrup – 1 tablespoon (optional, for shine and smoothness)
- Vanilla extract – ½ teaspoon
- Black gel food coloring – for the caps
- Yellow or gold gel food coloring – for the tassel
Ingredient tips: Look for firm butter for best creaming results. If you don’t have gel colors, you can use liquid ones but the colors might be less vibrant. For a dairy-free version, swap butter with vegan margarine and use plant-based milk.
Equipment Needed
To make these graduation cap cookies, you’ll need a few basic kitchen tools that most home cooks already have:
- Mixing bowls – one large for dough, one for icing
- Electric hand mixer or stand mixer – to cream butter and sugar smoothly
- Measuring cups and spoons – precise measurements matter here
- Rolling pin – crucial for even dough thickness
- Square cookie cutter (about 2 inches) – shapes the mortarboard caps (a small square biscuit cutter works great)
- Baking sheets lined with parchment paper or silicone mats – prevents sticking and easy clean-up
- Small offset spatula or butter knife – for spreading icing
- Toothpicks – perfect for drawing tassels and small details
If you don’t have a square cookie cutter, no worries! You can cut squares freehand with a sharp knife for a rustic charm. I’ve found that a silicone baking mat is worth the investment—it keeps the bottoms from getting too dark. Also, a small piping bag or a zip-top bag with a tiny corner snipped can help with tassel details if you want a bit more control than a toothpick.
Preparation Method
- Prepare the dough (15 minutes): In a large bowl, cream together the softened butter and granulated sugar using an electric mixer on medium speed until light and fluffy—about 3 to 4 minutes. This step is key for tender cookies.
- Add egg and vanilla (2 minutes): Beat in the egg and vanilla extract until fully combined. The mixture might look slightly curdled here; that’s normal.
- Mix dry ingredients (2 minutes): In a separate bowl, whisk together the sifted flour, baking powder, and salt.
- Combine wet and dry (3 minutes): Gradually add the dry ingredients to the butter mixture, mixing on low speed or folding with a spatula until just combined. Avoid overmixing to keep cookies tender.
- Chill the dough (at least 30 minutes): Shape the dough into a disk, wrap tightly in plastic wrap, and refrigerate. This step makes rolling easier and helps cookies keep their shape.
- Preheat oven & prep pans (5 minutes): Heat your oven to 350°F (175°C). Line baking sheets with parchment paper or silicone mats.
- Roll and cut (15 minutes): On a lightly floured surface, roll dough to about ¼-inch (6 mm) thickness. Use a 2-inch square cutter to cut out the cap shapes. Place cookies about 1 inch (2.5 cm) apart on the baking sheets.
- Bake (10-12 minutes): Bake until edges just start to turn golden. Keep an eye on them—overbaking can lead to crunchy cookies, and you want a tender bite.
- Cool completely (20 minutes): Transfer cookies to wire racks to cool before icing. This prevents melting the frosting.
- Make the icing (5 minutes): In a bowl, combine powdered sugar, milk, corn syrup (if using), and vanilla. Stir until smooth and spreadable. Divide the icing into two bowls. Tint one black for the caps and the other yellow or gold for tassels.
- Decorate the cookies (20-30 minutes): Spread black icing evenly over each cookie’s surface using an offset spatula or butter knife. Let this base set for about 10 minutes. Then, use a toothpick or small piping bag to add a tassel shape with the yellow icing. You can make a simple line with a small dot at the end for that classic tassel look.
- Let icing dry (at least 1 hour): Allow the decorated cookies to dry fully at room temperature before stacking or packaging.
Pro tip: If you notice the icing is too runny, add a bit more powdered sugar; too thick, add a splash of milk. The ideal icing spreads easily but doesn’t drip off the edges.
Cooking Tips & Techniques
When making these graduation cap cookies, a few tricks can make your experience smoother and your results more consistent:
- Chilling the dough: Don’t skip this step! It makes rolling out dough easier and prevents the cookies from spreading too much during baking. I once tried skipping this and ended up with sad, misshapen caps—lesson learned.
- Rolling thickness: Aim for ¼ inch thickness. Thinner cookies can crisp up too much, while thicker ones take longer to bake and may stay doughy inside.
- Use gel food coloring: Gel colors give the most vibrant and true black and gold shades without watering down the icing. Liquid colors tend to make icing too thin.
- Icing consistency: Getting the right spreadable consistency is key. It should glide smoothly but hold shape when piped. It’s okay to adjust with tiny milk or powdered sugar additions.
- Decorate on a flat, cool surface: I learned this the hard way when cookies slid all over the countertop during decorating. A flat table with good light makes the process easier and less frustrating.
- Multitasking tip: While cookies bake, start mixing the icing. It saves time and keeps you moving efficiently.
Variations & Adaptations
Want to switch things up? Here are some fun ideas to customize these graduation cap cookies:
- Dietary twist: Use almond or oat flour for a gluten-free take. The texture shifts slightly but stays delicious. Swap butter for coconut oil to make them dairy-free.
- Flavor add-ins: Add a teaspoon of almond extract to the dough for a subtle nutty note or lemon zest for a fresh, bright flavor.
- Color variations: Change the tassel color to match school colors—red, blue, green, whatever suits the graduate’s alma mater. You could even make multicolored caps for a playful look.
- Alternative shapes: If you want to mix it up, try round cookies with a small fondant graduation cap topper or use star-shaped cutters for a festive edge.
- Personalized message: Use edible markers or piped icing to add initials or graduation year on each cookie.
Personally, I once made these with a splash of espresso powder in the dough for a grown-up coffee flavor that was a hit at a college celebration. It’s a neat way to make them feel a little more sophisticated without losing their fun vibe.
Serving & Storage Suggestions
These graduation cap cookies are best served at room temperature, allowing the icing to show its glossy finish and the cookie to retain its tender texture. Arrange them on a festive platter or package them individually in clear bags tied with a ribbon for party favors.
They pair wonderfully with cold milk, coffee, or even sparkling lemonade for a refreshing contrast. For a full celebration spread, consider complementing these cookies with classic lemon bars or a batch of creamy chocolate mousse to satisfy different sweet tooth cravings.
For storage, place the cookies in an airtight container at room temperature for up to 5 days. If you want to keep them longer, freeze undecorated cookies in a single layer wrapped tightly in plastic wrap, then transfer to a freezer bag. Decorated cookies freeze best after the icing has fully dried; thaw at room temperature before serving.
When reheating, just let them come to room temp naturally—microwaving can soften the icing and make the cookies lose their crisp edges. Over time, flavors meld beautifully, so making them a day ahead actually deepens the taste.
Nutritional Information & Benefits
Each graduation cap cookie (about 2-inch square) contains approximately:
| Calories | 120 |
|---|---|
| Fat | 6g |
| Carbohydrates | 16g |
| Protein | 1g |
| Sugar | 9g |
While these cookies are definitely a treat, the ingredients include wholesome staples like real butter and eggs, providing some protein and richness. Using pure vanilla and fresh ingredients ensures the best flavor without artificial additives.
For those mindful of allergens, this recipe contains gluten, dairy, and eggs but can be adapted for gluten-free or dairy-free diets as mentioned earlier. Remember, baking at home gives you control over what goes into your food—a perk over store-bought options.
From my experience, these cookies balance indulgence with simplicity, making them a delightful way to celebrate achievements without guilt or complicated prep.
Conclusion
So there you have it—easy foolproof graduation cap cookies that bring charm and taste to any celebration. This recipe is the perfect blend of simplicity and festivity, letting you create memorable treats without the stress. I love how it turns a busy day into a joyful baking session, and how friends and family light up when they see those little caps lined up on the platter.
Feel free to add your own flair—maybe a splash of your graduate’s favorite color or a personal message on each cookie. Baking is as much about creativity as it is about tradition, and these cookies offer both in spades.
Give them a try, share your tweaks, and let me know how your celebration goes. I’m always excited to hear your stories and see your photos. Happy baking and congratulations to all the grads out there!
FAQs
How long do these graduation cap cookies keep fresh?
Stored in an airtight container at room temperature, they stay fresh for about 5 days. You can also freeze them for up to 3 months.
Can I make this dough ahead of time?
Absolutely! The dough can be refrigerated for up to 48 hours before rolling and baking. Just bring it to room temperature before rolling out.
What if I don’t have black gel food coloring?
You can mix blue, green, and red gel colors to approximate black, but the color might be less intense. Alternatively, try using ready-made black icing.
Is it necessary to chill the dough?
Chilling isn’t mandatory but highly recommended. It helps keep the cookie shapes sharp and makes rolling easier.
How do I fix runny icing?
Add small amounts of powdered sugar to thicken it or a few drops of milk to thin it out until you get the desired spreading consistency.
Pin This Recipe!
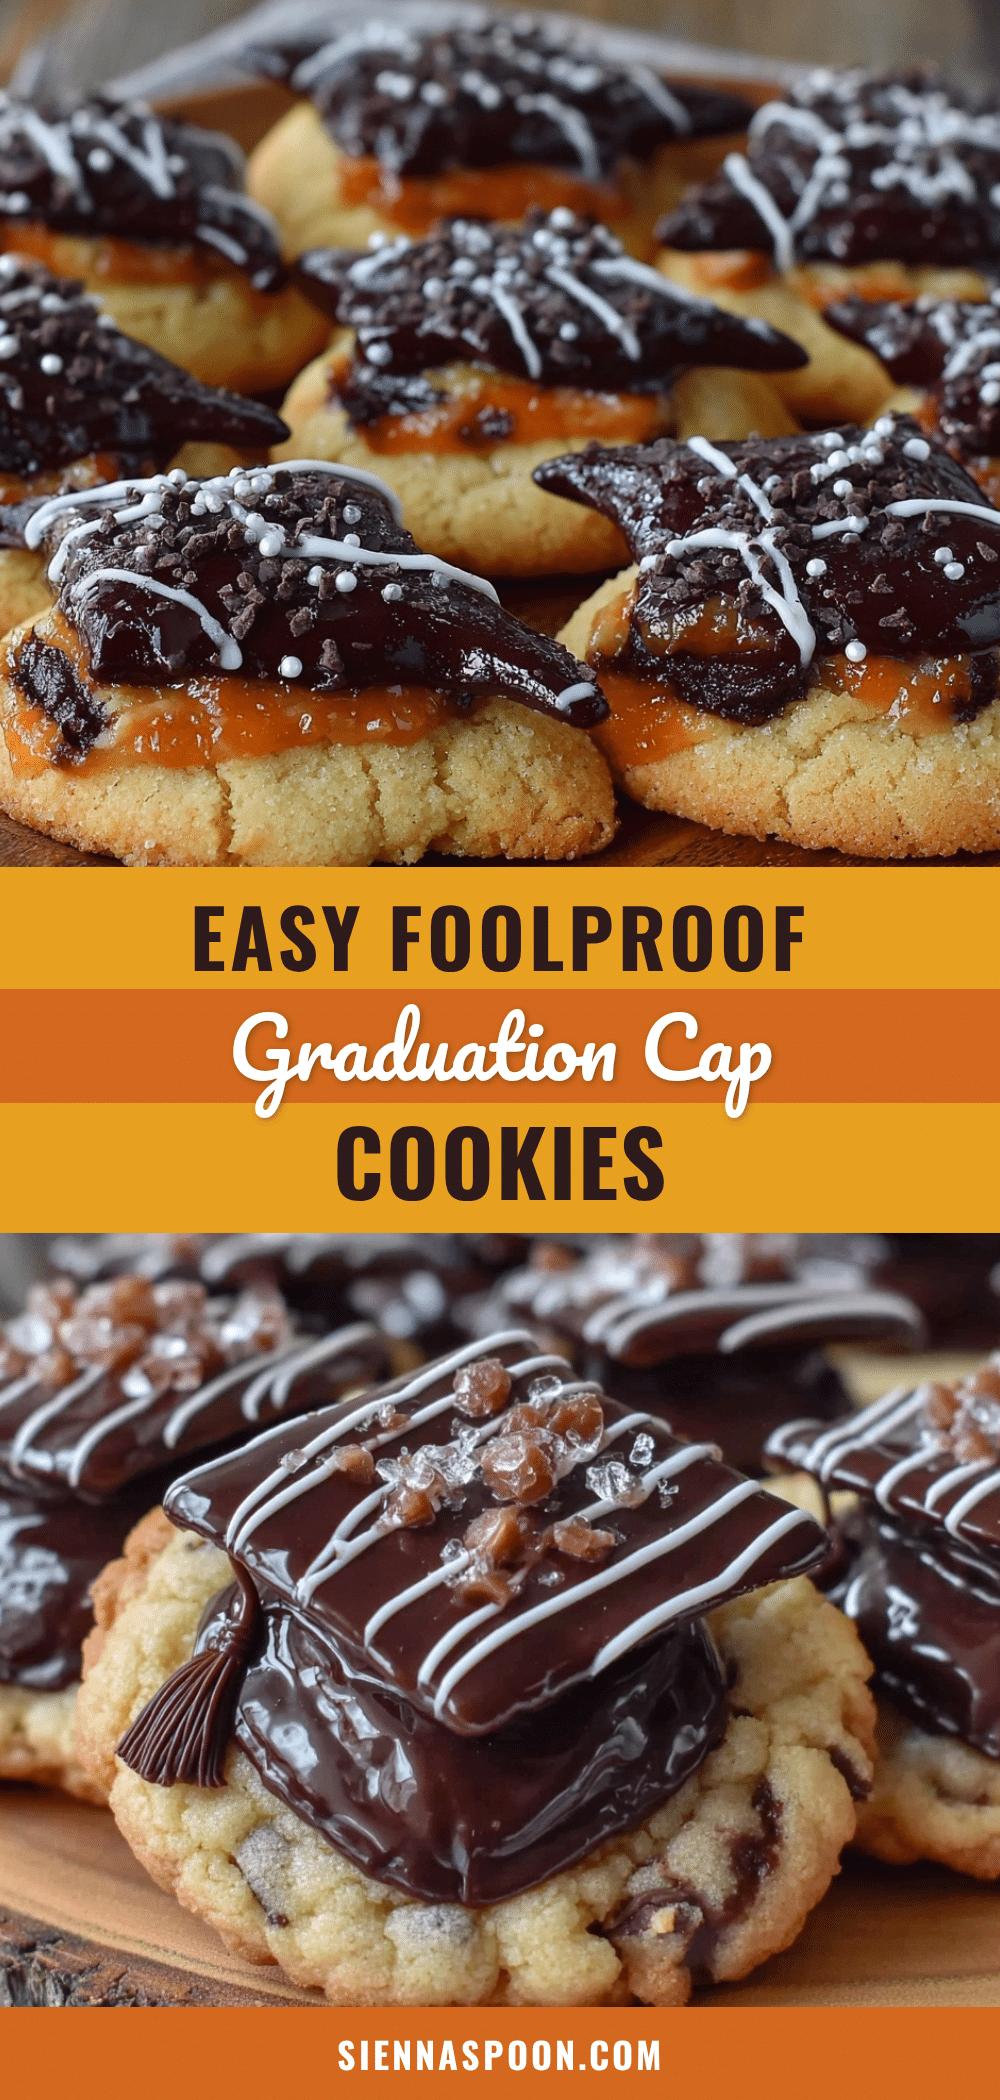
Easy Foolproof Graduation Cap Cookies Recipe for Perfect Celebration Treats
These easy foolproof graduation cap cookies are simple to make, festive, and perfect for any graduation party. They feature a classic buttery sugar cookie base decorated with playful graduation cap designs using smooth, spreadable icing.
- Prep Time: 30 minutes
- Cook Time: 10-12 minutes
- Total Time: 1 hour 45 minutes
- Yield: 24 cookies
- Category: Dessert
- Cuisine: American
Ingredients
- All-purpose flour – 2 ¾ cups (345 grams), sifted
- Unsalted butter – 1 cup (226 grams), softened
- Granulated sugar – 1 cup (200 grams)
- Large egg – 1, room temperature
- Pure vanilla extract – 1 teaspoon
- Baking powder – 1 teaspoon
- Salt – ½ teaspoon
- Powdered sugar – 2 cups (240 grams), sifted
- Milk – 3 to 4 tablespoons (45-60 ml)
- Light corn syrup – 1 tablespoon (optional)
- Vanilla extract – ½ teaspoon
- Black gel food coloring
- Yellow or gold gel food coloring
Instructions
- Prepare the dough (15 minutes): In a large bowl, cream together the softened butter and granulated sugar using an electric mixer on medium speed until light and fluffy—about 3 to 4 minutes.
- Add egg and vanilla (2 minutes): Beat in the egg and vanilla extract until fully combined.
- Mix dry ingredients (2 minutes): In a separate bowl, whisk together the sifted flour, baking powder, and salt.
- Combine wet and dry (3 minutes): Gradually add the dry ingredients to the butter mixture, mixing on low speed or folding with a spatula until just combined.
- Chill the dough (at least 30 minutes): Shape the dough into a disk, wrap tightly in plastic wrap, and refrigerate.
- Preheat oven & prep pans (5 minutes): Heat oven to 350°F (175°C). Line baking sheets with parchment paper or silicone mats.
- Roll and cut (15 minutes): Roll dough to about ¼-inch thickness on a lightly floured surface. Use a 2-inch square cutter to cut out cap shapes. Place cookies about 1 inch apart on baking sheets.
- Bake (10-12 minutes): Bake until edges just start to turn golden.
- Cool completely (20 minutes): Transfer cookies to wire racks to cool before icing.
- Make the icing (5 minutes): Combine powdered sugar, milk, corn syrup (if using), and vanilla until smooth and spreadable. Divide into two bowls and tint one black and the other yellow or gold.
- Decorate the cookies (20-30 minutes): Spread black icing evenly over each cookie. Let set for 10 minutes. Use a toothpick or small piping bag to add tassel shapes with yellow icing.
- Let icing dry (at least 1 hour): Allow decorated cookies to dry fully at room temperature before stacking or packaging.
Notes
Chill the dough for at least 30 minutes to prevent spreading and make rolling easier. Use gel food coloring for vibrant colors. Adjust icing consistency with powdered sugar or milk as needed. Decorate on a flat, cool surface to avoid sliding cookies.
Nutrition
- Serving Size: 1 cookie (2-inch squ
- Calories: 120
- Sugar: 9
- Fat: 6
- Carbohydrates: 16
- Protein: 1
Keywords: graduation cookies, sugar cookies, decorated cookies, easy cookie recipe, celebration treats, graduation party dessert