Love this? Save it for later!
Share the inspiration with your friends
This was supposed to be a batch of regular Rice Krispie treats—the kind you throw together for a bake sale because they’re reliable and nobody ever complains. I had the butter melting, the marshmallows ready to go, and then I realized I was completely out of vanilla extract. Not a single drop. And let me tell you, that was a problem because plain marshmallow-cereal bars without that little flavor boost? They’re just… sad.
I stood there staring at my pantry like it owed me something, and my eyes landed on a bag of candy corn I’d bought on impulse three weeks earlier. You know that feeling when you’re desperate and a weird idea pops into your head and you just go with it? That was me. I tossed in a handful of candy corn with the marshmallows, thinking maybe it would add some sweetness or at least make the failure more interesting. Honestly, I was already planning how to apologize to my neighbor who was expecting those treats.
What came out of that pan was nothing like the plan—and better. The candy corn melted into the marshmallow mixture, turning it this gorgeous pale orange color and adding this subtle, almost honey-like flavor that regular treats just don’t have. I cut them into triangles, stuck popsicle sticks in the bottom, and suddenly they looked like actual candy corn. My neighbor took one bite and asked if I’d bought them from a bakery. I didn’t tell her the truth until after she’d eaten three.
Now I make these every Halloween, and honestly, they’re the first thing to disappear at every party. Maybe you’ve been there—staring at a recipe fail that turned into something you actually love more than the original. That’s this recipe for me.
Why You’ll Love This Recipe
Let me be real with you—I’ve tested this recipe about a dozen times to get it just right. The first few batches were either too sticky or the candy corn flavor was barely there. But after some trial and error (and a few overly sweet mistakes), I landed on the perfect balance. These Easy Candy Corn Rice Krispie Treat Pops are the kind of dessert that makes people do a double-take because they look like actual candy corn but taste way better.
- Quick & Easy: You can make these in under 20 minutes. No baking, no complicated steps, and minimal cleanup. Perfect for when you remember the school Halloween party is tomorrow morning.
- Simple Ingredients: You probably already have butter, marshmallows, and Rice Krispies in your pantry. The candy corn is the only special ingredient, and you can find it at any grocery store this time of year.
- Perfect for Halloween: These are the ultimate Halloween party treat. They’re festive without being overly complicated, and kids absolutely love them because they look like candy but are actually a dessert.
- Crowd-Pleaser: I’ve brought these to potlucks, classroom parties, and family gatherings, and they always get rave reviews. Even people who say they don’t like candy corn end up loving these.
- Unbelievably Delicious: The texture is perfectly chewy with a slight crunch from the candy corn pieces that don’t fully melt. It’s like regular Rice Krispie treats but with a seasonal twist that makes them feel special.
What makes this recipe different from the dozens of other versions out there is the technique. I figured out that you need to add the candy corn in two stages—some melted into the marshmallow mixture for flavor and color, and some stirred in at the end for texture. It’s a small tweak, but it makes all the difference between a good treat and a great one.
This is the kind of dessert that makes you feel like a kitchen genius without actually having to do much work. It’s Halloween comfort food at its finest—nostalgic, fun, and impossible to resist.
What Ingredients You Will Need
This recipe uses simple, everyday ingredients to create something that looks impressive but requires almost no effort. Most of these are pantry staples, so you might already have everything you need.
- 3 tablespoons unsalted butter (salted butter works too, just skip the extra salt)
- 1 bag (10 ounces) marshmallows (regular size, not mini—they melt more evenly)
- 6 cups Rice Krispies cereal (or any crispy rice cereal, but I prefer the original brand for best texture)
- 1 cup candy corn (divided—½ cup melted in, ½ cup stirred in at the end)
- ¼ teaspoon salt (optional but recommended to balance the sweetness)
- Popsicle sticks or lollipop sticks (for making them into pops)
Ingredient Selection Tips:
When buying candy corn, look for fresh bags—stale candy corn is hard and doesn’t melt as well. I usually grab Brach’s because it’s widely available and melts consistently. If you’re feeling fancy, you can use the autumn-themed candy corn mix that has the little pumpkins and leaves, but regular candy corn works best for the color.
For the marshmallows, I recommend Jet-Puffed or store brand—both work fine. Just make sure they’re fresh and not dried out. Stale marshmallows won’t melt as smoothly and can leave you with lumpy treats.
Substitution Guidance:
If you want to make these gluten-free, use certified gluten-free Rice Krispies or a generic crispy rice cereal that’s labeled gluten-free. The rest of the ingredients are naturally gluten-free.
For a dairy-free version, swap the butter with vegan butter or coconut oil. I’ve tried both, and coconut oil gives them a slight coconut flavor that actually pairs nicely with the candy corn. Just use 2½ tablespoons instead of 3 because coconut oil is more liquid.
You can also experiment with different cereals. Fruity Pebbles make a fun variation, and Cocoa Pebbles give them a chocolatey twist. But for the classic candy corn look, stick with plain Rice Krispies.
Equipment Needed
You don’t need anything fancy for this recipe, which is part of the appeal. Here’s what you’ll need:
- Large pot or Dutch oven (at least 5-quart capacity—you need room to stir everything together)
- Wooden spoon or silicone spatula (metal spoons can scratch your pot)
- 9×13 inch baking dish (for shaping the treats)
- Parchment paper or wax paper (for lining the dish and pressing the mixture)
- Sharp knife (for cutting clean triangles)
- Popsicle sticks (available at craft stores or online)
- Measuring cups and spoons
Personal Experience: I’ve made these in a nonstick pot and a regular stainless steel pot, and honestly, the nonstick makes cleanup so much easier. If you’re using stainless steel, spray it with cooking spray before you start—the marshmallow mixture gets stubborn.
For the baking dish, glass works better than metal because it doesn’t conduct heat as much, so the treats cool more evenly. I learned this after cutting into a batch that was still warm in the middle because I used a metal pan.
Budget-Friendly Options: If you don’t have popsicle sticks, you can skip them and just cut the treats into regular squares. They’re still delicious—they just won’t be on sticks. And if you don’t have a 9×13 pan, a cookie sheet with raised edges works fine. Just spread the mixture to about ¾ inch thick.
Preparation Method
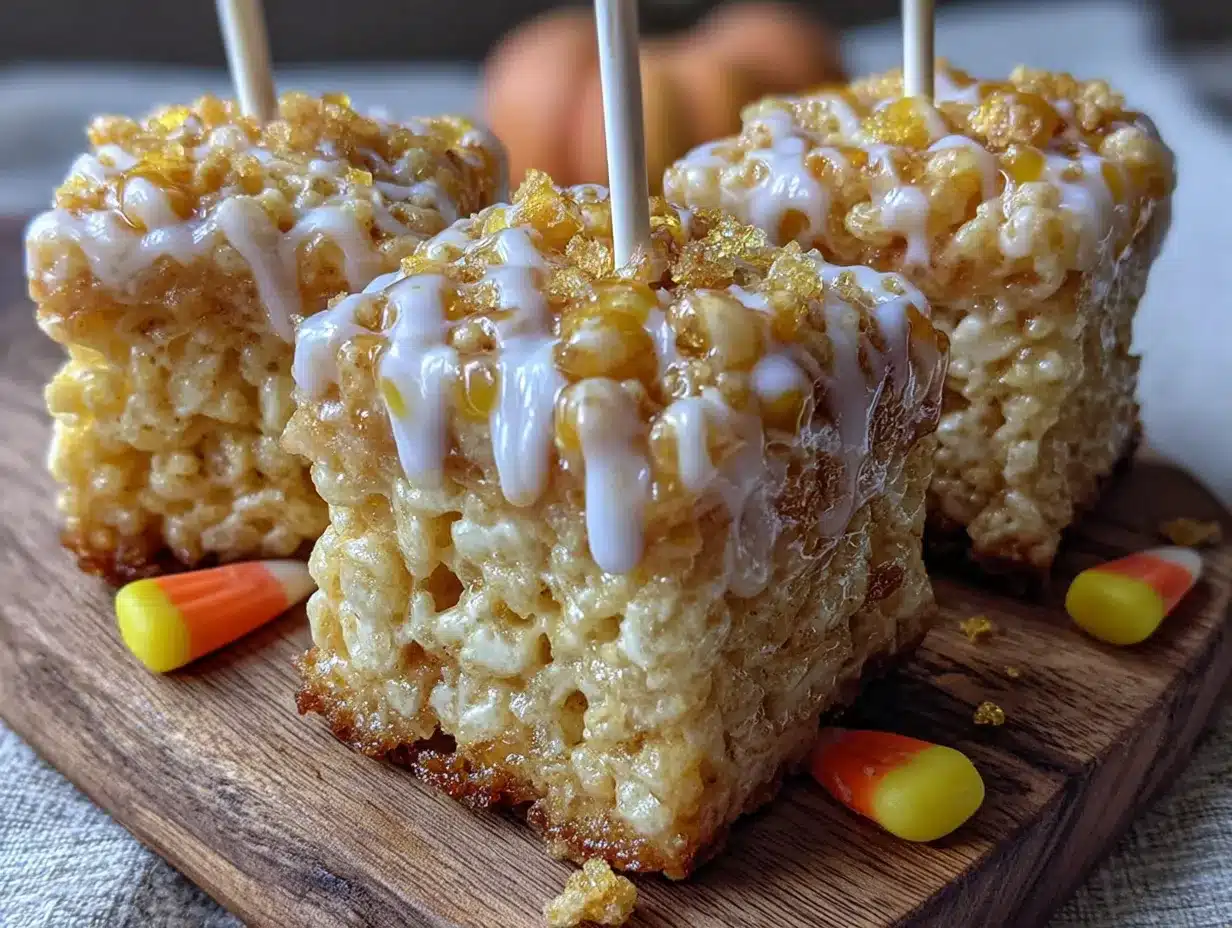
This recipe comes together fast, so I recommend having all your ingredients measured and ready before you start. Trust me on this—marshmallow mixture waits for no one.
- Line your baking dish. Cut a piece of parchment paper to fit the bottom and sides of your 9×13 inch dish, leaving some overhang so you can lift the treats out later. Spray the parchment lightly with cooking spray.
- Separate your candy corn. Measure out ½ cup of candy corn and set it aside. The other ½ cup will go into the pot with the marshmallows. This two-step method is the secret to getting that perfect texture with little pockets of chewy candy corn throughout.
- Melt the butter. In your large pot, melt the 3 tablespoons of butter over low heat. Don’t rush this—medium heat can burn the butter and give your treats a weird flavor. Swirl the pot occasionally until the butter is fully melted and just starting to bubble.
- Add the marshmallows. Pour in the entire bag of marshmallows and stir constantly with your wooden spoon. Keep the heat on low and be patient—it takes about 5-7 minutes for them to fully melt. Stir in a figure-eight motion to make sure nothing sticks to the bottom.
- Add the first half of candy corn. Once the marshmallows are smooth and fully melted, stir in the ½ cup of candy corn. Keep stirring until the candy corn is mostly dissolved—you’ll see the mixture turn a pale orange color. This usually takes about 2-3 minutes. If you see any lumps of unmelted candy corn, that’s fine—they’ll add texture later.
- Remove from heat and add salt. Take the pot off the burner and stir in the ¼ teaspoon of salt if you’re using it. This step is easy to forget, but it really helps balance all that sweetness.
- Add the cereal and remaining candy corn. Pour in the 6 cups of Rice Krispies and the remaining ½ cup of candy corn. Fold everything together gently but thoroughly. Use a folding motion—lift the mixture from the bottom and turn it over. You want every piece of cereal coated without crushing it.
- Transfer to the prepared dish. Scrape the mixture into your lined baking dish. Here’s where it gets sticky—literally. Spray your hands with cooking spray or rub them with a little butter, then press the mixture evenly into the pan. Don’t press too hard or the treats will be dense and hard. You want them firm but still light and airy.
- Let them cool completely. Set the dish aside at room temperature for about 30 minutes. Don’t put them in the fridge—that can make them too firm and hard to cut cleanly. You want them cool but still slightly soft.
- Cut into triangles. Lift the treats out using the parchment overhang. Use a sharp knife to cut the rectangle in half lengthwise, then cut each half into triangles by making diagonal cuts about 2 inches apart. You should get about 16-20 triangles depending on how you cut them.
- Insert the sticks. Gently push a popsicle stick into the bottom of each triangle (the wide end). Push about halfway in—not all the way through. If the treats are too firm, let them sit at room temperature for a few minutes to soften slightly.
Sensory Cues: When the marshmallows are fully melted, they should be smooth and glossy, like thick honey. When you add the candy corn, you’ll see it start to dissolve and the color will change from white to a warm peachy orange. The mixture should smell sweet and buttery, with a hint of vanilla from the marshmallows. When you press the treats into the pan, they should feel springy—not rock hard or mushy.
Troubleshooting: If your mixture is too dry and crumbly, you probably overcooked the marshmallows or used stale cereal. Next time, take the pot off the heat as soon as the marshmallows are melted. If the mixture is too sticky to handle, spray your hands with more cooking spray—it’s almost impossible to overdo it.
Cooking Tips & Techniques
After making these about twenty times (yes, I counted), I’ve picked up some tricks that make the process smoother and the results more consistent.
The Low and Slow Rule: I cannot stress this enough—keep the heat on low when melting the marshmallows. The first time I made these, I thought I was being efficient by cranking up the heat, and I ended up with burnt marshmallow bits that tasted like regret. Low heat gives you more control and prevents that scorched flavor.
The Wet Hands Technique: This is a game-changer. Before you press the mixture into the pan, wet your hands with cold water or spray them with cooking spray. The mixture won’t stick to your hands, and you can press it evenly without it turning into a sticky mess. I learned this from my grandmother, who made Rice Krispie treats for every holiday.
Don’t Overmix: Once you add the cereal, fold it just until everything is coated. Overmixing crushes the cereal and gives you dense, hard treats. You want them light and airy, with visible cereal pieces. A few unmixed spots are better than a compacted mess.
Cutting Clean Triangles: Use a sharp knife and wipe it clean between cuts. The marshmallow mixture is sticky, and residue on the knife will drag through your clean cuts. I keep a paper towel damp with water nearby and wipe the blade after every two or three cuts.
Timing Strategy: These treats are best made the day you serve them, but you can prep everything ahead. Measure your cereal and candy corn into separate bowls, cut your parchment paper, and have your dish ready. Then the actual cooking takes less than 15 minutes.
My Biggest Failure: Once I tried to double the recipe in the same pot. Big mistake. The mixture overflowed, stuck to everything, and I spent an hour scrubbing my stovetop. If you need a larger batch, make them in two separate batches or use a much bigger pot.
Variations & Adaptations
One of the best things about this recipe is how easy it is to customize. Here are some variations I’ve tried and loved:
Chocolate Drizzle Version: After the treats have cooled, melt ½ cup of chocolate chips with 1 teaspoon of coconut oil and drizzle it over the triangles. The chocolate pairs beautifully with the candy corn flavor, and it makes them look even more festive. I did this for a Halloween party last year, and they were gone in ten minutes.
Spooky Sprinkle Version: Before the marshmallow mixture sets, sprinkle Halloween-themed sprinkles or orange and black nonpareils on top. Press them in gently with your hands. This is perfect if you’re making these with kids—they love the decorating part.
Peanut Butter Twist: Add ¼ cup of creamy peanut butter to the marshmallow mixture when you add the candy corn. Stir until smooth. The peanut butter adds a savory note that balances the sweetness and gives the treats a Reese’s-like flavor. My husband says this is his favorite version.
Vegan Adaptation: Use vegan marshmallows (Dandies brand works great), vegan butter or coconut oil, and certified vegan candy corn. Not all candy corn is vegan—some brands use gelatin—so check the label. The texture will be slightly different, but still delicious.
Air Fryer Method: I haven’t tried this yet, but a reader told me she makes mini versions in her air fryer. She presses the mixture into a silicone mold, inserts sticks, and air fries at 300°F for 3-4 minutes to warm them through. I’m planning to test this soon.
Less Sweet Version: If you find candy corn too sweet, reduce the candy corn to ¾ cup total and add ¼ cup of toasted coconut flakes instead. The coconut adds texture and a natural sweetness that isn’t cloying.
Serving & Storage Suggestions
These treats are best served at room temperature. The texture is perfectly chewy, and the candy corn pieces that didn’t fully melt add little bursts of sweetness. Arrange them on a platter with the triangle points facing up so they look like actual candy corn—it’s a fun visual that always gets compliments.
Presentation Ideas: For Halloween parties, I like to stick them in a mason jar filled with orange and black tissue paper. The sticks keep them upright, and it makes a cute centerpiece. You can also wrap each pop individually in clear cellophane bags tied with orange ribbon—perfect for party favors or classroom treats.
Complementary Dishes: These pair well with warm apple cider or hot chocolate. The sweetness of the treats balances the tartness of the cider. For a full Halloween spread, serve them alongside spooky pumpkin dip with apple slices or ghost-shaped cookies.
Storage Instructions: Store the treats in an airtight container at room temperature for up to 3 days. Layer them with parchment paper between each layer so they don’t stick together. Do not refrigerate—the cold makes them hard and ruins the texture.
Freezing Tips: You can freeze these for up to 2 months. Wrap each pop individually in plastic wrap, then place them in a freezer-safe bag. To serve, let them thaw at room temperature for about 30 minutes. Don’t microwave them to thaw—it makes the marshmallow mixture gummy.
Flavor Development: Honestly, these are best on the first day. The cereal stays crunchier, and the candy corn pieces that didn’t melt are still chewy. By day two, the treats are a bit softer, but still delicious. I’ve never had any last past day three in my house.
Nutritional Information & Benefits
Let’s be real—these are a treat, not a health food. But here’s the estimated nutritional breakdown per pop (based on 18 servings):
| Nutrient | Amount per Serving |
|---|---|
| Calories | 185 |
| Total Fat | 4g |
| Saturated Fat | 2.5g |
| Carbohydrates | 37g |
| Sugar | 22g |
| Protein | 1.5g |
| Sodium | 135mg |
Health Highlights: The butter provides a small amount of vitamin A, and the cereal is fortified with iron and B vitamins. The candy corn is mostly sugar, but hey—it’s Halloween. Everything in moderation, right?
Dietary Considerations: This recipe is nut-free (if you use the basic version), egg-free, and can be made gluten-free and vegan with simple substitutions. It does contain dairy from the butter, but that’s easy to swap.
Allergen Note: Always check your candy corn label—some brands are processed in facilities that handle peanuts and tree nuts. If you’re serving these at a school or party with allergy concerns, use certified allergen-free candy corn.
From a wellness perspective, I think it’s important to enjoy treats like this without guilt. Halloween comes once a year, and these pops bring so much joy to kids and adults alike. One pop is perfectly reasonable—the whole batch, maybe not so much.
Conclusion
These Easy Candy Corn Rice Krispie Treat Pops are proof that sometimes the best recipes come from happy accidents. What started as a pantry failure turned into my most-requested Halloween dessert, and I honestly can’t imagine October without them now.
I love how versatile this recipe is—you can keep it simple or dress it up with chocolate and sprinkles. It’s forgiving enough for beginner cooks but impressive enough to bring to any party. And honestly, there’s something magical about watching people’s faces light up when they realize the treats look like candy corn but taste so much better.
I’d love to hear how yours turn out! Did you try any variations? Did your kids help make them? Drop a comment below and let me know—I read every single one and I’m always looking for new ideas to test in my kitchen.
Until next time, happy Halloween baking! And remember—if something goes wrong in the kitchen, it might just be the beginning of your new favorite recipe.
Frequently Asked Questions
Can I use mini marshmallows instead of regular ones?
Yes, you can, but mini marshmallows melt faster, so watch them carefully. Use about 4 cups of mini marshmallows instead of the 10-ounce bag of regular ones. They might melt a bit unevenly, so stir constantly.
Why did my treats turn out hard instead of chewy?
This usually happens when the marshmallows are overcooked or the mixture is pressed too firmly into the pan. Keep the heat on low, remove the pot from the burner as soon as the marshmallows are melted, and press gently—just enough to even out the surface.
Can I use off-brand candy corn?
Absolutely. Store brand candy corn works just as well. The only thing to watch for is freshness—stale candy corn is hard and won’t melt properly. Give the bag a squeeze in the store; if it feels hard, grab a different one.
How do I keep the pops from falling off the sticks?
Make sure you insert the stick about halfway into the treat, and push it in gently but firmly. If the treats are too cold, the stick might slide out. Let them sit at room temperature for a few minutes to soften slightly before inserting the sticks.
Can I make these ahead of time for a party?
Yes! You can make them up to 2 days in advance. Store them in an airtight container at room temperature. If you’re making them more than a day ahead, I recommend waiting to insert the sticks until right before serving so they stay secure.
Pin This Recipe!

Easy Candy Corn Rice Krispie Treat Pops: Best Halloween Dessert

These Easy Candy Corn Rice Krispie Treat Pops are the ultimate Halloween dessert—quick, festive, and delicious. Made with simple ingredients, they look like candy corn but taste even better.
- Prep Time: 10 minutes
- Cook Time: 10 minutes
- Total Time: 20 minutes
- Yield: 18 servings 1x
- Category: Dessert
- Cuisine: American
Ingredients
- 3 tablespoons unsalted butter
- 1 bag (10 ounces) marshmallows (regular size)
- 6 cups Rice Krispies cereal
- 1 cup candy corn (divided—½ cup melted in, ½ cup stirred in at the end)
- ¼ teaspoon salt (optional)
- Popsicle sticks or lollipop sticks
Instructions
- Line your 9×13 inch baking dish with parchment paper, leaving overhang, and spray lightly with cooking spray.
- Separate ½ cup of candy corn and set aside; the other ½ cup will go into the pot.
- In a large pot, melt 3 tablespoons of butter over low heat until fully melted and just starting to bubble.
- Add the entire bag of marshmallows and stir constantly over low heat until smooth and fully melted (about 5-7 minutes).
- Stir in the ½ cup of candy corn until mostly dissolved and the mixture turns pale orange (about 2-3 minutes).
- Remove from heat and stir in ¼ teaspoon salt (if using).
- Pour in 6 cups of Rice Krispies and the remaining ½ cup of candy corn. Fold gently until everything is coated.
- Transfer the mixture to the prepared dish. Spray your hands with cooking spray and press evenly into the pan without pressing too hard.
- Let cool completely at room temperature for about 30 minutes.
- Lift the treats out using the parchment overhang. Cut the rectangle in half lengthwise, then cut each half into triangles (about 2 inches apart) to get 16-20 triangles.
- Gently push a popsicle stick into the bottom (wide end) of each triangle about halfway in.
Notes
Add candy corn in two stages: some melted into the marshmallow mixture for flavor and color, and some stirred in at the end for texture. Keep heat on low to avoid burning. Use wet hands or cooking spray to press the mixture. Store in an airtight container at room temperature for up to 3 days. Do not refrigerate.
Nutrition
- Serving Size: 1 pop
- Calories: 185
- Sugar: 22
- Sodium: 135
- Fat: 4
- Saturated Fat: 2.5
- Carbohydrates: 37
- Protein: 1.5
Keywords: candy corn, Rice Krispie treats, Halloween dessert, easy dessert, no-bake, pops


