Love this? Save it for later!
Share the inspiration with your friends
Introduction
“I wasn’t expecting to create something so comforting from what looked like a sad pile of veggie odds and ends,” my friend Mark said last week as we stood in his cramped kitchen surrounded by onion skins, carrot tops, and celery leaves. It was one of those rainy Sunday afternoons, and he’d just pulled together a batch of homemade vegetable stock from scraps he’d been saving in a bag on the fridge door. Honestly, I was skeptical at first—leftover vegetable bits? Really? But the aroma that filled the room as it simmered was nothing short of magical.
The truth is, I’ve always been a bit of a kitchen hoarder when it comes to vegetable scraps. You know that feeling when you hesitate to toss out those carrot peels or mushroom stems because maybe, just maybe, they could be useful? Well, this recipe proves they absolutely are. It’s a simple, no-waste approach that turns what might otherwise be trash into a rich, flavorful broth that elevates everything from soups to risottos.
Mark’s kitchen was a little chaotic that day (he’d forgotten to buy fresh stock and was already halfway through prepping dinner), but this vegetable stock recipe saved the day. The best part? It’s so easy, budget-friendly, and genuinely comforting. Maybe you’ve been there too—staring at your fridge scraps and wondering if they could be more than compost. Let me tell you, this is the recipe that stuck with me after that afternoon. It’s my go-to whenever I want something wholesome, homemade, and packed with flavor, all while being kind to the planet.
Why You’ll Love This Recipe
After testing countless stock recipes in my kitchen, this wholesome vegetable stock from scraps stands out for many reasons. It’s the kind of recipe that feels like a secret weapon for anyone who loves cooking but hates waste. Here’s why you’ll want to keep this one in your repertoire:
- Quick & Easy: Comes together with minimal effort in about 45 minutes, perfect for busy cooks who need a flavorful base fast.
- Simple Ingredients: No need to buy fancy veggies—just use what you have on hand, making it super economical and sustainable.
- Perfect for Every Occasion: Whether you’re simmering up a cozy soup for chilly nights or making a bright vegetable risotto, this stock adds depth without overpowering.
- Crowd-Pleaser: It’s mild and versatile enough that both kids and adults will enjoy meals made with it, even picky eaters.
- Unbelievably Delicious: The slow simmer unlocks layers of flavor from simple scraps, creating a broth that tastes far richer than its humble ingredients.
This recipe isn’t just another vegetable stock—it’s the one I’ve refined after a few “meh” batches, tweaking the balance of aromatics and timing to get broth that’s silky and full-bodied. Honestly, the trick of saving scraps over a week and freezing them before simmering really concentrates the flavor without extra work. Once you have this in your kitchen arsenal, you’ll wonder how you ever bought store-bought broth again.
What Ingredients You Will Need
This recipe uses simple, wholesome ingredients to deliver bold flavor and satisfying texture without the fuss. It’s perfect for using up those veggie bits you’d normally toss—and you probably already have most of these in your fridge or freezer.
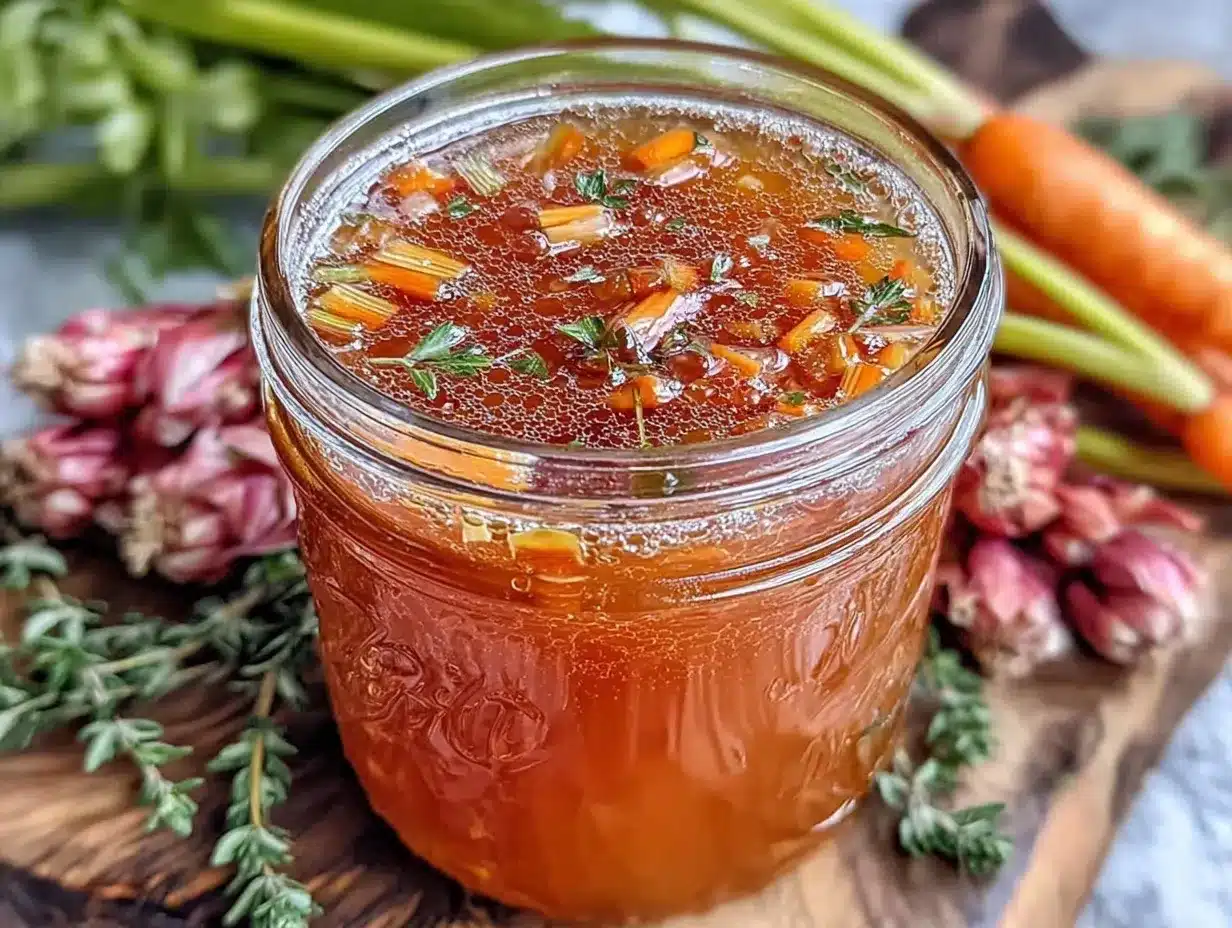
- Vegetable Scraps Mix: Onion skins and ends, carrot peels and tops, celery leaves and ends, mushroom stems, garlic skins and cloves (unpeeled for flavor), leek greens, parsley stems, and any herb stems you have (thyme, rosemary, bay leaves).
- Water: 8 cups (about 2 liters) of cold filtered water to cover the scraps adequately.
- Optional Flavor Boosters:
- 1 teaspoon whole black peppercorns (adds warmth)
- 1 bay leaf (classic depth)
- 1-2 dried shiitake mushrooms (for umami, optional)
- Salt: Generally added at the end to taste, but you can skip or reduce if using in low-sodium recipes.
Tip: I recommend using organic scraps when possible, especially for onion skins and garlic, to avoid any unwanted pesticides. Also, if you don’t have all the listed scraps, don’t worry—just mix and match what you do have. For instance, in summer, fresh basil or tomato stems add a lovely twist. I like to keep a zip-top bag in my freezer labeled “stock scraps” to collect these over a week.
Equipment Needed
- Large Stockpot: A 6-quart (5.7 L) or bigger pot is ideal to hold all the scraps and water comfortably.
- Fine Mesh Strainer or Cheesecloth: To strain the stock and get a clear broth. I’ve used both; cheesecloth gives a cleaner result but takes a bit longer to drain.
- Ladle: For scooping out the stock easily.
- Storage Containers: Glass jars, ice cube trays, or freezer-safe bags for storing your finished stock.
If you don’t have a large stockpot, a Dutch oven works wonderfully too. For a budget-friendly option, thrift stores often have excellent sturdy pots. Also, a reusable nut milk bag is a handy alternative to cheesecloth that I personally love for straining.
Preparation Method
- Gather Your Scraps: Collect your vegetable scraps over several days in a sealed bag or container stored in the refrigerator or freezer. Aim for about 4 cups (roughly 300-400g) of scraps total. This mix should include a variety of onion skins, carrot peels, celery leaves, mushroom stems, and herb stalks.
- Prepare the Pot: Place the vegetable scraps into your large stockpot. Add the optional peppercorns, bay leaf, and dried shiitake mushrooms if using.
- Add Water: Pour in 8 cups (2 liters) of cold filtered water, covering the scraps by about an inch. Starting with cold water helps slowly extract flavors as it heats.
- Bring to a Simmer: Slowly bring the pot to a gentle simmer over medium heat. Avoid boiling, which can make the stock cloudy and bitter. This should take about 15-20 minutes.
- Simmer Gently: Reduce heat to low and let the stock simmer gently for 40-45 minutes. During this time, you’ll notice a warm, earthy aroma developing. Resist the urge to stir or boil vigorously.
- Strain the Stock: Remove the pot from heat. Use a fine mesh strainer lined with cheesecloth or a nut milk bag to strain the broth into a large bowl or another pot. Press down lightly on the scraps to extract as much liquid as possible.
- Cool and Store: Let the stock cool to room temperature before transferring to storage containers. You can refrigerate for up to 5 days or freeze for up to 3 months.
Note: If your stock tastes a bit flat, you can simmer it a little longer next time or add more aromatic scraps like garlic skins or herb stems. I once forgot to add peppercorns and the stock was still good but lacked that subtle warmth, so don’t skip those if you have them.
Cooking Tips & Techniques
Making vegetable stock from scraps is all about patience and balance. Here are some tips I’ve learned the hard way:
- Don’t Overboil: Boiling the stock can make it cloudy and bitter. Keep it at a bare simmer for the best flavor and clarity.
- Save Scraps Smartly: Avoid using scraps from cruciferous vegetables like broccoli or cabbage, which can add off-putting bitterness. Also, skip any spoiled or slimy bits.
- Layer Flavors: Mixing a variety of scraps—from sweet carrot tops to savory onion skins—gives a richer broth. I learned to add a handful of parsley stems late in the simmer for a fresh note.
- Freeze in Portions: Storing stock in ice cube trays or small containers makes it easy to use just what you need, avoiding waste and keeping flavor fresh.
- Time Management: While simmering, prep other parts of your meal. I often make this stock early in the day and then use it for dinner recipes like my creamy mushroom risotto later.
Variations & Adaptations
This vegetable stock recipe is wonderfully flexible. Here are a few ways to tailor it:
- Seasonal Twists: In autumn, add roasted butternut squash skins or sweet potato peels for a deeper, sweeter broth.
- Herbal Infusions: Experiment with different herbs—try dill stems or cilantro stalks for a fresh, bright flavor in lighter soups.
- Low-Sodium Version: Skip adding salt during preparation and season your finished dish instead. This makes the stock versatile for all diets.
- Pressure Cooker Shortcut: Use a pressure cooker to reduce simmer time to about 20 minutes without losing depth of flavor, perfect for busy days.
- Personal Favorite: I love adding a splash of soy sauce or miso paste after straining for an umami boost when using the stock in Asian-inspired dishes.
Serving & Storage Suggestions
This vegetable stock is best used within 5 days if refrigerated and up to 3 months if frozen. For storage:
- Refrigerate: Store in airtight containers or mason jars. Leave some space at the top as the liquid expands when freezing.
- Freeze: Freeze in ice cube trays, then transfer cubes to freezer bags. This way, you can easily pop out small amounts for sauces or soups.
- Reheating: Warm gently over low heat, avoiding boiling to preserve delicate flavors. If the stock tastes flat after reheating, a pinch of salt or a squeeze of lemon can brighten it.
Serve the stock as a base for soups, stews, risottos, or even as a flavorful cooking liquid for grains. Over time, the flavors meld beautifully, so making a big batch and freezing some saves time and adds richness to your meals.
Nutritional Information & Benefits
Vegetable stock is naturally low in calories, fat-free, and packed with micronutrients extracted from the veggies. It’s a great hydrating base full of vitamins like A and C from carrot and celery scraps, plus antioxidants from onion and garlic skins. Since it’s homemade, you control the sodium level, making it a heart-friendly choice compared to many store-bought broths.
For those with dietary restrictions, this stock is naturally gluten-free and vegan. It’s a clean, nourishing foundation for countless recipes, and honestly, the satisfaction of making something wholesome from scraps contributes to mindful eating habits I personally value.
Conclusion
Making wholesome vegetable stock from scraps isn’t just about saving money or reducing waste—it’s about creating a rich, flavorful base that adds heart and soul to your cooking. This recipe has stuck with me because it’s so forgiving, simple, and honest, turning kitchen leftovers into liquid gold.
Feel free to customize it with your favorite scraps and herbs. I love hearing how folks make this their own, so don’t hesitate to share your tweaks or questions below. Give it a try—you might be surprised how much life a humble vegetable stock can bring to your meals. Happy simmering!
Frequently Asked Questions
Can I use any vegetable scraps for this stock?
Most vegetable scraps work beautifully, but avoid strong-flavored or bitter veggies like broccoli stalks, cabbage, or Brussels sprouts, which can overpower the broth.
How long can I store homemade vegetable stock?
In the refrigerator, it keeps well for up to 5 days. For longer storage, freeze it in portions for up to 3 months.
Do I need to peel vegetables before saving scraps?
Peeling isn’t necessary. In fact, many skins like onion and garlic add great color and flavor. Just be sure the scraps are clean and fresh.
Can I make vegetable stock without a pot this big?
Yes! A smaller pot or slow cooker works fine; just reduce the quantity of water and scraps accordingly.
Is it okay to add salt during cooking?
It’s best to add salt after the stock is finished or in the final dish to control sodium levels better.
Pin This Recipe!

Wholesome Vegetable Stock from Scraps

A simple, no-waste homemade vegetable stock recipe using leftover vegetable scraps to create a rich, flavorful broth perfect for soups, risottos, and more.
- Prep Time: 10 minutes
- Cook Time: 45 minutes
- Total Time: 55 minutes
- Yield: About 6 cups (1.5 quarts) of vegetable stock 1x
- Category: Broth / Stock
- Cuisine: Universal
Ingredients
- Onion skins and ends
- Carrot peels and tops
- Celery leaves and ends
- Mushroom stems
- Garlic skins and cloves (unpeeled)
- Leek greens
- Parsley stems
- Herb stems (thyme, rosemary, bay leaves)
- 8 cups (about 2 liters) cold filtered water
- Optional: 1 teaspoon whole black peppercorns
- Optional: 1 bay leaf
- Optional: 1-2 dried shiitake mushrooms
- Salt to taste (added at the end)
Instructions
- Collect vegetable scraps over several days in a sealed bag or container stored in the refrigerator or freezer, aiming for about 4 cups (300-400g) of scraps.
- Place the vegetable scraps into a large stockpot. Add optional peppercorns, bay leaf, and dried shiitake mushrooms if using.
- Pour in 8 cups (2 liters) of cold filtered water, covering the scraps by about an inch.
- Slowly bring the pot to a gentle simmer over medium heat, avoiding boiling. This should take about 15-20 minutes.
- Reduce heat to low and let the stock simmer gently for 40-45 minutes without stirring or boiling vigorously.
- Remove the pot from heat and strain the broth through a fine mesh strainer lined with cheesecloth or a nut milk bag into a large bowl or pot. Press down lightly on the scraps to extract as much liquid as possible.
- Let the stock cool to room temperature before transferring to storage containers. Refrigerate for up to 5 days or freeze for up to 3 months.
Notes
Avoid using scraps from cruciferous vegetables like broccoli or cabbage to prevent bitterness. Do not boil vigorously to keep broth clear and flavorful. Freeze in portions for easy use. Salt is best added after cooking or in the final dish to control sodium.
Nutrition
- Serving Size: 1 cup (240 ml)
- Calories: 15
- Sugar: 1
- Sodium: 10
- Carbohydrates: 3
- Fiber: 1
- Protein: 1
Keywords: vegetable stock, homemade broth, vegetable scraps, no waste cooking, easy vegetable broth, vegan stock, gluten-free broth