Love this? Save it for later!
Share the inspiration with your friends
I was standing in the dairy aisle of our local grocery store last Tuesday, staring at a carton of eggnog like it held the secret to time travel. The carton was cold in my hands, and that familiar smell—nutmeg and cream and something almost like melted vanilla ice cream—hit me. And suddenly I was seven years old at my Aunt June’s kitchen table on Christmas Eve, watching her pour eggnog into a measuring cup while humming along to the oldies station on the radio.
Aunt June wasn’t much of a baker, honestly. She was the kind of cook who used “a pinch of this” and “a splash of that” and somehow everything turned out perfect. But her eggnog cheesecake bars? Those were legendary in our family. She passed away three years ago, and I realized I’d never actually written down her recipe. I’d just eaten them, year after year, letting the creamy, spiced squares melt on my tongue while she waved off my compliments with a flour-dusted hand.
So I spent the next three days trying to recreate them. The first batch was too dense. The second was too sweet. The third? I closed my eyes after that first bite, and for a split second, I could hear Aunt June humming in the next room. Maybe you’ve been there—chasing a taste from your past, hoping you can get it just right.
These cozy eggnog cheesecake bars with nutmeg are my best attempt at bottling that holiday feeling. They’re rich without being heavy, creamy without being fussy, and that warm nutmeg kick hits you in the best possible way. I keep making them because they remind me that some things—like a perfect bite of cheesecake on a cold December night—are worth getting right.
Why You’ll Love This Recipe
Let me tell you why these eggnog cheesecake bars have become my go-to holiday dessert, and why they’ll probably become yours too. I’ve tested this recipe seven times (my neighbors have been very happy taste-testers), and I can honestly say this version is the one.
- Quick & Easy : Comes together in under 30 minutes of active prep time. The oven does the rest. Perfect for those busy holiday weeks when you’re juggling a million things.
- Simple Ingredients : No fancy grocery trips needed. You probably have most of this in your kitchen already—especially if you’re the type who stocks up on eggnog the minute it hits shelves.
- Perfect for Holiday Gatherings : Great for Christmas parties, cookie exchanges, or just a quiet night by the fire. These bars travel well, too, which is a huge bonus.
- Crowd-Pleaser : I’ve served these to everyone from picky kids to my food-snob cousin who judges all desserts. Every single person asked for the recipe.
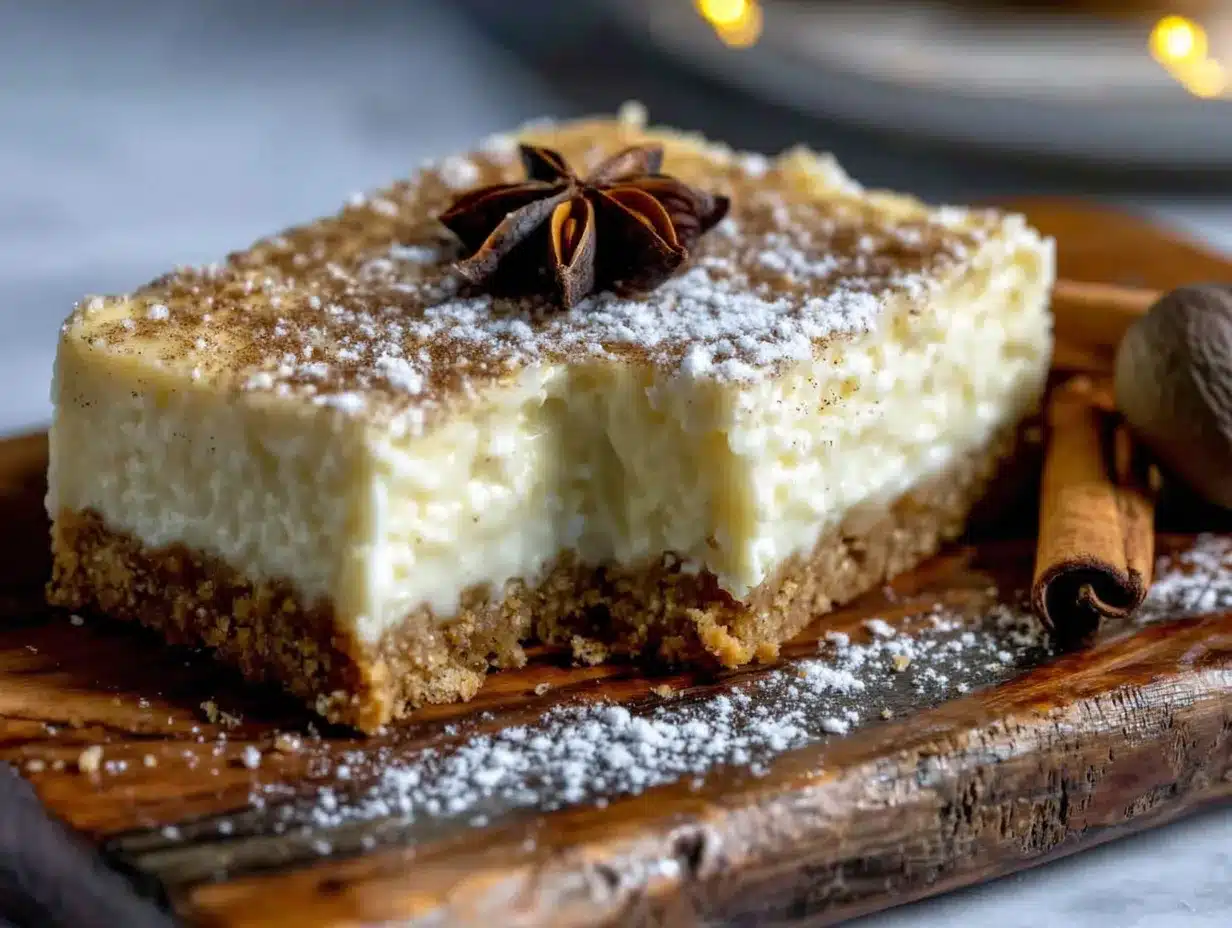
- Unbelievably Delicious : The texture is what gets me every time. That creamy, almost mousse-like filling on top of a buttery graham cracker crust with just the right amount of nutmeg warmth.
What makes these different from every other eggnog dessert out there? It’s the technique. I blend the cream cheese and eggnog together at room temperature—sounds simple, but it makes a world of difference in the final texture. No lumps, no graininess, just pure creamy smoothness. And I use freshly grated nutmeg on top, not pre-ground. Trust me on this one.
This recipe isn’t just good—it’s the kind that makes you close your eyes after the first bite. It’s comfort food reimagined for the holidays. Perfect for impressing guests without stress, or turning a simple Tuesday night into something memorable.
What Ingredients You Will Need
This recipe uses simple, wholesome ingredients to deliver that rich, holiday flavor without the fuss. Most of these are pantry staples during the holiday season, which makes these bars dangerously easy to whip up on a whim.
For the Crust
- 1 ½ cups graham cracker crumbs (about 12 full sheets, crushed fine—I use a food processor for consistency)
- ¼ cup granulated sugar
- 6 tablespoons unsalted butter, melted (use salted butter and reduce the added salt if that’s all you have)
- Pinch of salt (skip this if using salted butter)
For the Cheesecake Filling
- 16 ounces cream cheese, softened to room temperature (I recommend Philadelphia for the creamiest texture—trust me, I’ve tested cheaper brands and it’s not the same)
- ½ cup granulated sugar
- 2 large eggs, room temperature
- 1 cup eggnog (use full-fat for the richest flavor; low-fat works but the texture is slightly less creamy)
- 1 teaspoon vanilla extract
- 1 tablespoon all-purpose flour (helps stabilize the filling and prevents cracking)
- 1 teaspoon freshly grated nutmeg (plus extra for garnish—this is non-negotiable for that cozy flavor)
- ¼ teaspoon ground cinnamon
- Pinch of ground cloves (optional, but adds that classic holiday warmth)
For the Topping (Optional but Recommended)
- ½ cup heavy cream, cold
- 1 tablespoon powdered sugar
- Freshly grated nutmeg for garnish
I personally prefer using organic valley eggnog for its thick, creamy consistency. If you’re looking for a dairy-free option, there are some good plant-based eggnogs out there—just make sure to let them come to room temperature before mixing. And for the nutmeg, please please please buy whole nutmeg and grate it fresh. The pre-ground stuff loses its punch so quickly, and that fresh nutmeg aroma is what makes these bars truly special.
Equipment Needed
You don’t need a professional bakery setup for these bars, which is one of the reasons I love this recipe. Here’s what you’ll need:
- 9×9-inch baking pan (an 8×8 works too, but your bars will be slightly thicker and may need a few extra minutes in the oven)
- Parchment paper (for easy lifting—cut two long strips that cross in the pan like a sling)
- Food processor or zip-top bag and rolling pin (for crushing graham crackers)
- Electric hand mixer or stand mixer (a whisk and strong arm works too, but the mixer gives you that silky smooth texture)
- Large mixing bowls (one for crust, one for filling)
- Rubber spatula (for scraping every last bit of filling—don’t waste a drop!)
- Microplane or fine grater (for fresh nutmeg—this is worth the investment)
- Measuring cups and spoons
If you don’t have a food processor, just put the graham crackers in a zip-top bag and go to town with a rolling pin. It’s actually kind of therapeutic after a long day. And if you don’t have a microplane, the fine side of a box grater works fine for the nutmeg—just be careful with your knuckles.
Preparation Method
Alright, let’s get to the good part. Here’s how to make these cozy eggnog cheesecake bars with nutmeg, step by step.
- Preheat your oven to 325°F (163°C). Line your 9×9-inch baking pan with parchment paper, leaving some overhang on two opposite sides. This makes lifting the bars out so much easier later.
- Make the crust. In a medium bowl, combine the graham cracker crumbs, ¼ cup sugar, and a pinch of salt. Pour in the melted butter and stir until every crumb is moistened—it should look like wet sand. Press this mixture firmly into the bottom of your prepared pan. I use the bottom of a measuring cup to really pack it down. Bake for 10 minutes, then set aside to cool slightly while you make the filling.
- Beat the cream cheese. In a large bowl, beat the softened cream cheese with an electric mixer on medium speed until smooth and creamy—about 2 minutes. Scrape down the sides of the bowl with your spatula. This is important because nobody wants lumpy cheesecake.
- Add the sugar and flour. Add the ½ cup sugar and the flour to the cream cheese and beat until combined, about 1 minute. Scrape the bowl again.
- Add the eggs one at a time. Beat in the first egg on low speed until just combined. Then add the second egg and beat until smooth. Don’t overmix here—overbeating incorporates too much air and can cause cracks later.
- Mix in the eggnog and spices. With the mixer on low, slowly pour in the eggnog, vanilla extract, 1 teaspoon freshly grated nutmeg, cinnamon, and cloves (if using). Mix until everything is smooth and uniform. The batter will be thinner than regular cheesecake—that’s totally normal.
- Pour the filling over the crust. Gently pour the cheesecake mixture over the pre-baked crust. Use your spatula to spread it evenly. Tap the pan gently on the counter a few times to release any air bubbles.
- Bake. Place the pan in the preheated oven and bake for 35-40 minutes. The edges should be set and slightly puffed, but the center should still jiggle slightly when you gently shake the pan. That jiggle is your friend—it means the bars will be creamy, not dry.
- Cool completely. Remove the pan from the oven and place it on a wire rack. Let the bars cool at room temperature for about 1 hour. Then transfer to the refrigerator and chill for at least 4 hours, preferably overnight. I know the waiting is the hardest part, but this step is crucial for clean slices.
- Make the whipped cream topping (optional). When you’re ready to serve, pour the cold heavy cream and powdered sugar into a chilled bowl. Beat with a hand mixer on medium-high until soft peaks form—about 2-3 minutes. Don’t overbeat or you’ll end up with butter.
- Slice and serve. Use the parchment paper sling to lift the bars out of the pan. Place on a cutting board and slice into 16 squares (4 rows by 4 rows). For clean cuts, wipe your knife between each slice. Top each bar with a dollop of whipped cream and a generous sprinkle of freshly grated nutmeg.
One thing I learned the hard way: don’t rush the cooling process. I tried putting warm bars directly in the fridge once, and the condensation made the top soggy. Let them cool on the counter first, then chill. Patience pays off here.
Cooking Tips & Techniques
After those first few failed batches, I learned a few things that make this recipe foolproof. Here are my best tips:
Room temperature ingredients are non-negotiable. I cannot stress this enough. Cold cream cheese creates lumps that no amount of mixing will fix. Take your cream cheese, eggs, and eggnog out of the fridge at least 30 minutes before you start. If you’re in a rush, cut the cream cheese into small cubes and let them sit for 15 minutes—it helps.
Don’t overmix the batter. This is probably the most common mistake I see. Once you add the eggs, mix on low speed and stop as soon as everything is combined. Overmixing incorporates too much air, which causes the cheesecake to puff up in the oven and then sink, creating cracks on the surface.
Use a water bath if you’re nervous about cracking. I don’t always use one for these bars because the shallow pan helps them bake evenly, but if you want extra insurance, place your baking pan inside a larger roasting pan and pour hot water halfway up the sides. Just make sure your baking pan is wrapped tightly in foil first so water doesn’t seep in.
Fresh nutmeg makes a world of difference. I know I keep saying this, but it’s because I learned the hard way. The first time I made these with pre-ground nutmeg, the flavor was flat and almost dusty. Freshly grated nutmeg has this warm, aromatic quality that just can’t be replicated. A whole nutmeg costs about a dollar and lasts forever in your spice drawer.
Let the bars chill overnight for the best texture. Four hours is the minimum, but overnight is where the magic happens. The flavors meld together, the texture sets perfectly, and those clean slices become so much easier. I’ve made these the day before a party more times than I can count.
Variations & Adaptations
One of the best things about this recipe is how adaptable it is. Here are some variations I’ve tried and loved:
Gluten-Free Version: Use gluten-free graham crackers or crushed gluten-free cookies for the crust. I’ve used gluten-free vanilla wafers with great results. The filling is naturally gluten-free (just double-check your flour if you’re using a substitute).
Bourbon-Spiked Eggnog Bars: Add 1-2 tablespoons of bourbon or dark rum to the cheesecake filling along with the eggnog. The alcohol cooks off during baking, leaving behind a warm, complex flavor that’s perfect for adult holiday gatherings. I tried this for a friends’ Christmas party and it was gone in 20 minutes.
Gingerbread Crust Variation: Swap the graham crackers for crushed ginger snaps. The spicy, molasses flavor of the gingerbread pairs beautifully with the creamy eggnog filling. Reduce the sugar in the crust to 2 tablespoons since ginger snaps are already sweet.
Vegan Adaptation: Use vegan cream cheese (I like Miyoko’s), a plant-based eggnog, and replace the eggs with 2 tablespoons of cornstarch mixed with 6 tablespoons of water. The texture is slightly less creamy but still delicious. I’ve made this for my dairy-free sister-in-law and she couldn’t tell the difference.
Mini Bar Version: Press the crust into a mini muffin tin and fill with the cheesecake mixture for bite-sized treats. Bake for 12-15 minutes instead of 35-40. These are perfect for cookie swaps or holiday parties where people want to sample multiple desserts.
Serving & Storage Suggestions
These eggnog cheesecake bars are best served cold, straight from the refrigerator. The chilled texture is what makes them so satisfying—creamy and dense but somehow light at the same time.
For presentation, I like to arrange the bars on a white platter with a dusting of fresh nutmeg on top and a few cranberries scattered around for color. A sprig of rosemary adds a nice festive touch too. If you’re serving these at a holiday party, they look beautiful on a dessert table next to other holiday treats like gingerbread cookies or peppermint bark.
As for what to serve with them? A cup of hot coffee or spiced chai is my go-to pairing. The bitterness of the coffee balances the sweetness of the bars perfectly. For an extra-special treat, drizzle a little caramel sauce over the top before serving.
Storage: These bars keep beautifully in the refrigerator for up to 5 days. Store them in an airtight container with a layer of parchment paper between the bars to prevent sticking. The flavors actually deepen and improve after a day or two in the fridge.
Freezing: These freeze wonderfully! Wrap individual bars tightly in plastic wrap, then place them in a freezer-safe bag or container. They’ll keep for up to 3 months. When you’re ready to enjoy one, just let it thaw in the refrigerator overnight. I always keep a stash in my freezer for unexpected holiday guests.
Reheating: Honestly, I prefer these cold. But if you want a warm dessert experience, microwave an individual bar for about 10-15 seconds. The crust stays firm while the filling gets slightly soft and melty. Top with whipped cream and you’ve got a whole new dessert experience.
Nutritional Information & Benefits
I’m not going to pretend these are health food—they’re a holiday treat, and they’re meant to be enjoyed. But here’s a rough breakdown per bar (based on 16 servings):
Per serving: Approximately 280 calories, 18g fat, 26g carbohydrates, 5g protein, 18g sugar. These numbers will vary depending on the specific brands you use and whether you add the whipped cream topping.
That said, there are some redeeming qualities. Eggnog is a good source of calcium and vitamin D, thanks to the milk and eggs. The nutmeg contains compounds that have been linked to improved digestion and even mild mood enhancement—which might explain why these bars make everyone so happy. And the cream cheese provides a decent amount of protein and calcium.
For those watching their sugar intake, you can reduce the sugar in the filling to ⅓ cup without affecting the texture too much. The bars will be less sweet but still delicious, especially with that nutmeg warmth shining through.
Potential allergens: This recipe contains dairy, eggs, and gluten. See the variations section for adaptations to accommodate dietary restrictions.
FAQs
Can I make these eggnog cheesecake bars ahead of time?
Absolutely! In fact, I recommend it. These bars need at least 4 hours to chill, but making them a day ahead is ideal. The flavors meld together and the texture sets perfectly. Just keep them covered in the refrigerator until you’re ready to serve.
Why did my cheesecake bars crack on top?
Cracks usually happen from overmixing the batter or overbaking. Make sure you mix on low speed once the eggs are added, and pull the bars out of the oven when the center still has a slight jiggle. If cracks do appear, don’t worry—the whipped cream topping covers them beautifully!
Can I use low-fat or non-fat cream cheese?
You can, but I wouldn’t recommend it. The texture will be less creamy and the bars won’t set as firmly. If you’re looking to reduce calories, use a lower-fat eggnog instead. The cream cheese really is the star here and deserves the full-fat treatment.
How do I get clean, neat slices?
This is all about patience. Make sure the bars are fully chilled (overnight is best). Use a sharp knife and wipe it clean with a damp paper towel between each slice. For the absolute cleanest cuts, run the knife under hot water and dry it before slicing.
Can I double this recipe?
Yes! Double all the ingredients and bake in a 9×13-inch pan. You’ll need to increase the baking time to about 45-50 minutes. Keep an eye on it—the center should still jiggle slightly when done. This is perfect for larger holiday gatherings.
Conclusion
These cozy eggnog cheesecake bars with nutmeg have become my most-requested holiday dessert, and I think they’ll become yours too. They’re everything you want in a holiday treat—creamy, spiced, comforting, and just special enough to feel like an occasion.
What I love most about this recipe is how forgiving it is. You don’t need to be a pastry chef to pull these off. The ingredients are simple, the steps are straightforward, and the result is always impressive. Whether you’re bringing them to a holiday party, serving them at a family dinner, or just treating yourself on a cold December night, these bars deliver.
I’d love to hear how yours turn out! Did you try any of the variations? Did you add a splash of bourbon or swap the crust for ginger snaps? Drop a comment below and let me know. And if you share a photo on Pinterest, tag me—I love seeing your creations.
Go ahead, preheat that oven, and make some memories. Aunt June would approve.
Pin This Recipe!
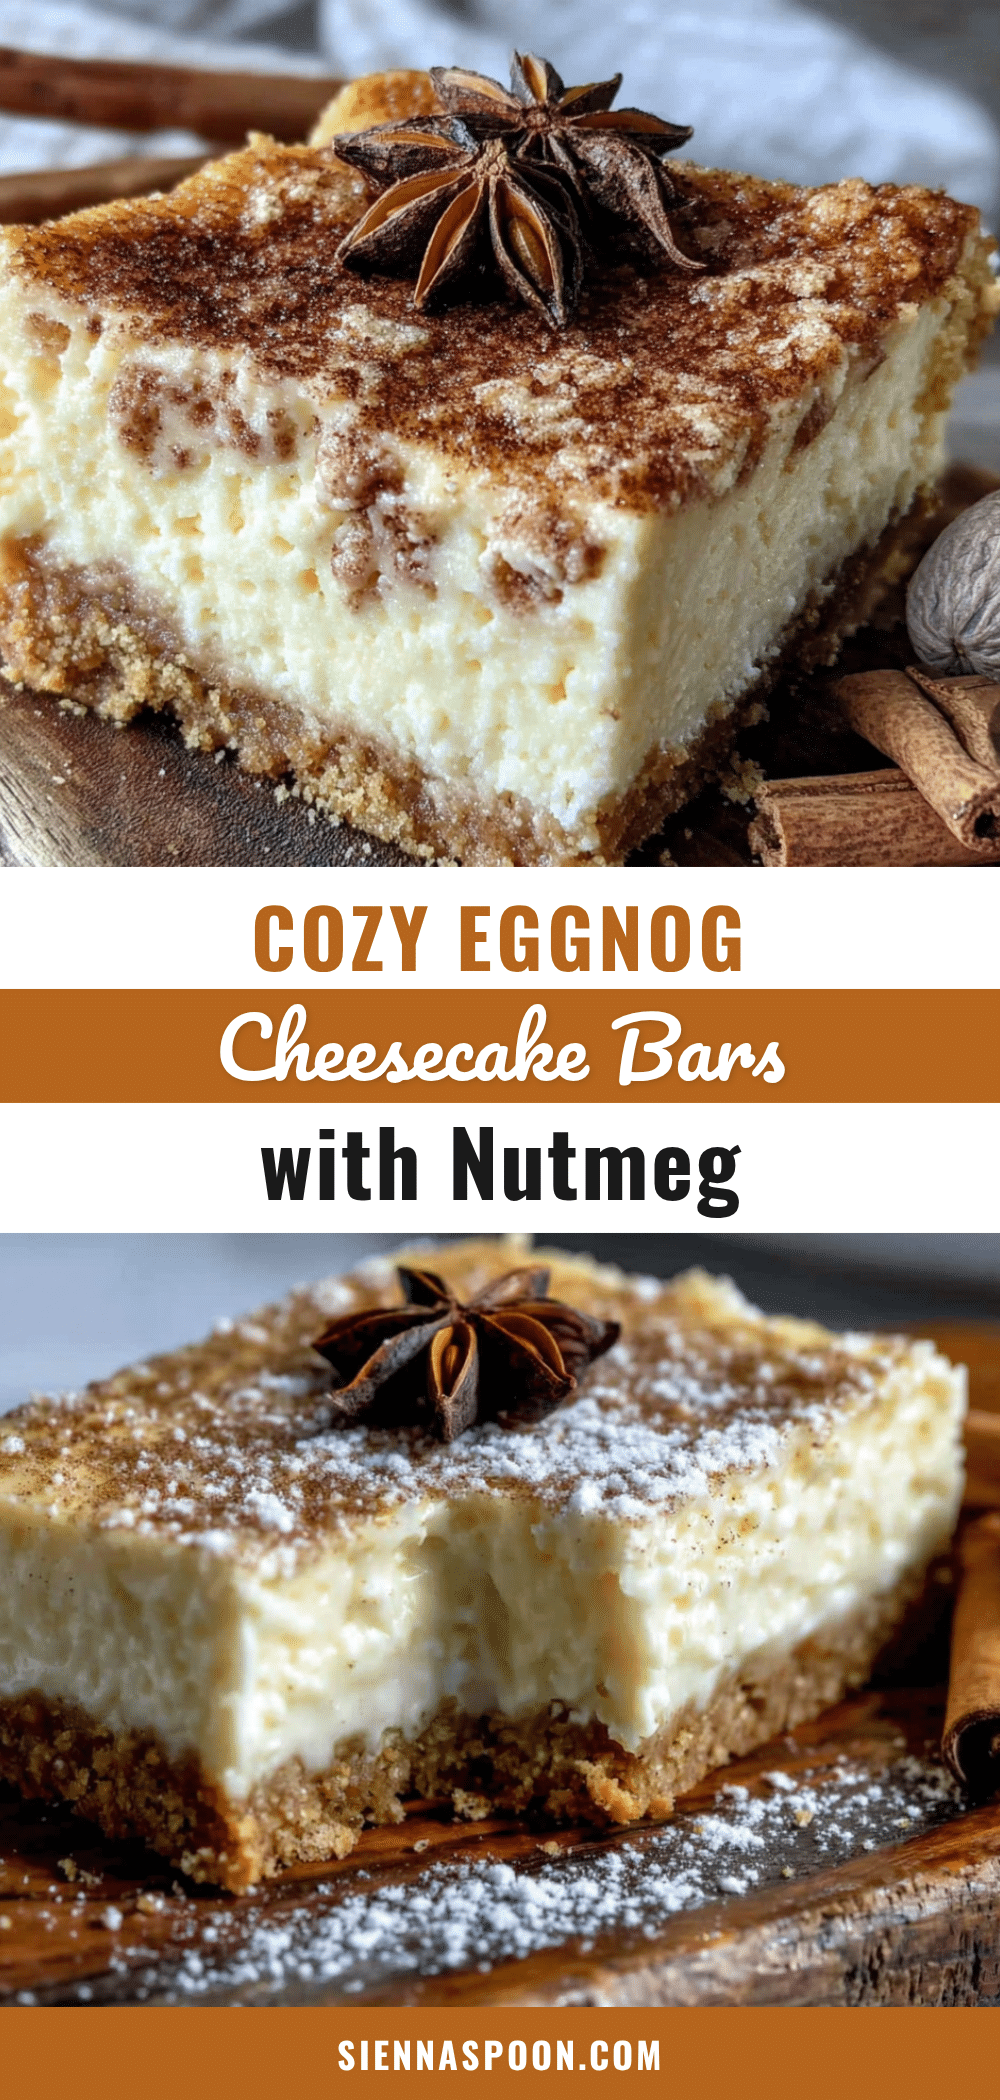
Cozy Eggnog Cheesecake Bars with Nutmeg
These creamy, spiced eggnog cheesecake bars with a buttery graham cracker crust and fresh nutmeg are the perfect holiday dessert. Rich without being heavy, they’re a nostalgic crowd-pleaser that comes together in under 30 minutes of active prep.
- Prep Time: 30 minutes
- Cook Time: 40 minutes
- Total Time: 5 hours 10 minutes (includes chilling)
- Yield: 16 servings 1x
- Category: Dessert
- Cuisine: American
Ingredients
- 1 ½ cups graham cracker crumbs (about 12 full sheets)
- ¼ cup granulated sugar
- 6 tablespoons unsalted butter, melted
- Pinch of salt
- 16 ounces cream cheese, softened to room temperature
- ½ cup granulated sugar
- 2 large eggs, room temperature
- 1 cup eggnog (full-fat recommended)
- 1 teaspoon vanilla extract
- 1 tablespoon all-purpose flour
- 1 teaspoon freshly grated nutmeg
- ¼ teaspoon ground cinnamon
- Pinch of ground cloves (optional)
- ½ cup heavy cream, cold (for topping)
- 1 tablespoon powdered sugar (for topping)
- Freshly grated nutmeg for garnish (for topping)
Instructions
- Preheat your oven to 325°F (163°C). Line a 9×9-inch baking pan with parchment paper, leaving overhang on two opposite sides.
- Make the crust: In a medium bowl, combine graham cracker crumbs, ¼ cup sugar, and a pinch of salt. Pour in melted butter and stir until moistened. Press firmly into the bottom of the prepared pan. Bake for 10 minutes, then set aside to cool slightly.
- Beat the cream cheese: In a large bowl, beat softened cream cheese with an electric mixer on medium speed until smooth and creamy, about 2 minutes. Scrape down the sides.
- Add the sugar and flour: Add ½ cup sugar and flour to the cream cheese and beat until combined, about 1 minute. Scrape the bowl again.
- Add the eggs one at a time: Beat in the first egg on low speed until just combined. Add the second egg and beat until smooth. Do not overmix.
- Mix in the eggnog and spices: With the mixer on low, slowly pour in eggnog, vanilla extract, 1 teaspoon freshly grated nutmeg, cinnamon, and cloves (if using). Mix until smooth and uniform.
- Pour the filling over the crust: Gently pour the cheesecake mixture over the pre-baked crust. Spread evenly and tap the pan gently on the counter to release air bubbles.
- Bake: Place the pan in the preheated oven and bake for 35-40 minutes. The edges should be set and slightly puffed, but the center should still jiggle slightly.
- Cool completely: Remove from oven and cool at room temperature for about 1 hour. Then refrigerate for at least 4 hours, preferably overnight.
- Make the whipped cream topping (optional): When ready to serve, beat cold heavy cream and powdered sugar in a chilled bowl with a hand mixer on medium-high until soft peaks form, about 2-3 minutes.
- Slice and serve: Use the parchment paper sling to lift bars out of the pan. Slice into 16 squares. Top each bar with a dollop of whipped cream and a generous sprinkle of freshly grated nutmeg.
Notes
Room temperature ingredients are crucial for a smooth texture. Do not overmix the batter to prevent cracks. For best results, chill overnight. Freshly grated nutmeg is highly recommended over pre-ground. If using a water bath, wrap the pan tightly in foil to prevent water seepage.
Nutrition
- Serving Size: 1 bar
- Calories: 280
- Sugar: 18
- Sodium: 200
- Fat: 18
- Saturated Fat: 10
- Carbohydrates: 26
- Protein: 5
Keywords: eggnog cheesecake bars, holiday dessert, Christmas dessert, cheesecake bars, nutmeg, eggnog recipe, easy holiday dessert