Love this? Save it for later!
Share the inspiration with your friends
My niece Maya asked why I couldn’t just use a fork to make the turkey feathers on the cookies. I started to explain why that wouldn’t work—that you need a piping bag for precision, that the peanut butter dough would stick, that real bakers don’t do things that way. Then I stopped. She was eight, holding a fork in one hand and a glob of dough in the other, looking at me like I was missing something obvious. Honestly, she was right. I let her try, and the fork made these perfect little indentations that looked exactly like feather textures. Better than anything I’d ever piped. I stood there, butter knife in hand, feeling like the student instead of the teacher. That’s how these turkey-shaped peanut butter cookies came to be—not from a recipe book or a professional tip, but from a kid who didn’t know she wasn’t supposed to do it that way.
Let me tell you, there’s something about Thanksgiving that makes us all want to create something cute. Maybe it’s the pressure of the big meal, or maybe we just need a project that doesn’t involve brining a turkey. These cookies are that project. They’re the thing you make on a Wednesday afternoon when the house smells like cinnamon and you’ve already watched the Macy’s parade preview twice. I made a batch last November and ended up with peanut butter smeared on my sweater, which I didn’t notice until after my sister took a photo. That’s the kind of energy these cookies need—relaxed, messy, and full of laughter.
The best part? They taste like the peanut butter cookies your grandma used to make, but they look like they took hours. They didn’t. Maya’s fork trick saved me at least twenty minutes per batch, and now I can’t make them any other way. You know that feeling when a recipe finally clicks and you wonder why you ever overcomplicated it? That’s this cookie. So whether you’re making these for a classroom party, a Friendsgiving spread, or just because Thanksgiving is your favorite holiday and you want an excuse to eat cookie dough, these little turkeys are about to become your new tradition.
Why You’ll Love This Recipe
I’ve tested this recipe at least seven times now, tweaking the flour ratio and the chill time until everything felt right. My neighbor Linda, who runs a small bakery out of her home, tried a batch and said the texture was spot-on—crispy edges with a soft, almost melt-in-your-mouth center. That meant a lot coming from her, since she once told me my pie crust needed “more patience.” She’s not wrong about much, but she was right about these cookies.
- Quick & Easy: From start to finish, you’re looking at about 35 minutes. The dough comes together in one bowl, no electric mixer required if your arm is up for some stirring.
- Simple Ingredients: You probably have everything already. Peanut butter, sugar, egg, flour—that’s it. No weird extracts or specialty flours to hunt down.
- Perfect for Thanksgiving: These are the cutest thing on any dessert table. Kids go wild for them, and adults pretend to be impressed while sneaking a second one.
- Crowd-Pleaser: I brought these to my son’s preschool Thanksgiving feast, and three parents asked for the recipe. One dad ate four before the turkey even came out.
- Unbelievably Delicious: There’s something about the salty-sweet combo of peanut butter with the candy corn feathers that hits different. It’s nostalgic but somehow better than you remember.
What makes these different from every other peanut butter cookie out there is the texture trick. I use a slightly higher ratio of brown sugar to white sugar, which keeps the cookies softer even after they cool. Plus, the fork method for the feathers? That’s not just cute—it creates little crevices that hold the candy corn in place so nothing slides off when you’re transporting them. Trust me, I learned that lesson after a pan of sliding candy corn at my sister-in-law’s house. Never again.
This recipe isn’t just good—it’s the kind that makes you pause after the first bite and remember why you love baking in the first place. It’s comfort food reimagined as a craft project, with the same soul-soothing satisfaction of a classic peanut butter cookie but with a holiday twist that feels special. Perfect for impressing guests without stress, or turning a simple afternoon into something memorable with the kids.
What Ingredients You Will Need
This recipe uses simple, pantry-friendly ingredients to create cookies that are both adorable and delicious. Most of these are things you probably already have in your kitchen, especially if you’re a regular baker. Here’s what you’ll need and why each one matters.
- 1 cup creamy peanut butter (I prefer Skippy or Jif for consistency—natural peanut butter that separates can make the dough too oily and hard to shape. If you only have natural, stir it really well and expect a slightly greasier dough.)
- 1/2 cup unsalted butter, softened (Salted butter works too, just cut the added salt to 1/4 teaspoon. Let it sit out for about 30 minutes before starting.)
- 1/2 cup granulated sugar (Adds sweetness and helps with spreading during baking.)
- 1/2 cup packed brown sugar (Light or dark both work. Dark brown sugar gives a deeper molasses flavor that pairs beautifully with peanut butter.)
- 1 large egg, room temperature (Cold eggs can seize the butter mixture. If you forgot to take it out, place the egg in a bowl of warm water for 5 minutes.)
- 1 teaspoon vanilla extract (Pure vanilla is best, but imitation works fine here since the peanut butter flavor is strong.)
- 1 1/2 cups all-purpose flour (Spoon and level your flour—don’t scoop directly from the bag or you’ll end up with dry cookies.)
- 1 teaspoon baking soda (Make sure it’s fresh. Test by dropping a bit in vinegar—if it fizzes, you’re good.)
- 1/2 teaspoon salt (Skip this if using salted butter.)
- Candy corn for feathers (About 30-40 pieces per batch. You’ll need 5-6 per cookie for the tail feathers.)
- Candy eyes or mini chocolate chips for eyes (Candy eyes are easier and cuter, but mini chocolate chips work in a pinch. Just press them in pointy-side first.)
- Orange candy melts or a small piece of orange fruit leather for the beak (I’ve used both—fruit leather is easier to shape and doesn’t harden as fast.)
- Red candy melts or red fruit leather for the wattle (That little red dangly bit under the beak. Yes, it matters for cuteness.)
For the candy corn, I recommend buying a bag specifically for this recipe. Don’t use leftover Halloween candy corn that’s been sitting in the pantry since October—it gets hard and loses that chewy texture. Fresh candy corn is softer and easier to press into the dough without cracking.
Equipment Needed
You don’t need anything fancy for these cookies, which is part of the charm. Here’s what I use and what you can substitute if needed.
- Large mixing bowl (Any bowl works, but a wider one makes mixing easier. I use a ceramic one my mom gave me that’s seen better days.)
- Electric mixer or wooden spoon (I prefer a hand mixer for creaming the butter and sugars, but a sturdy wooden spoon and some elbow grease work fine. My grandmother never owned a mixer, and her cookies were legendary.)
- Baking sheets (Two standard 13×18 inch sheets work well. Line them with parchment paper or silicone baking mats—parchment is cheaper and disposable, but silicone mats give a slightly more even bake.)
- Fork (This is for Maya’s feather technique. A standard dinner fork works perfectly. Don’t use a salad fork—the tines are too close together.)
- Spatula (For transferring cookies to a cooling rack. A thin metal spatula works best.)
- Cooling rack (Wire racks let air circulate so cookies don’t get soggy bottoms. If you don’t have one, a clean dish towel laid flat works in a pinch.)
- Small knife or toothpick (For placing the eyes and beaks. Toothpicks give you more control for tiny details.)
If you’re making these with kids, I recommend having extra candy corn on hand for snacking. Trust me, you’ll lose at least a handful to little fingers, and that’s fine. It’s part of the experience.
Preparation Method
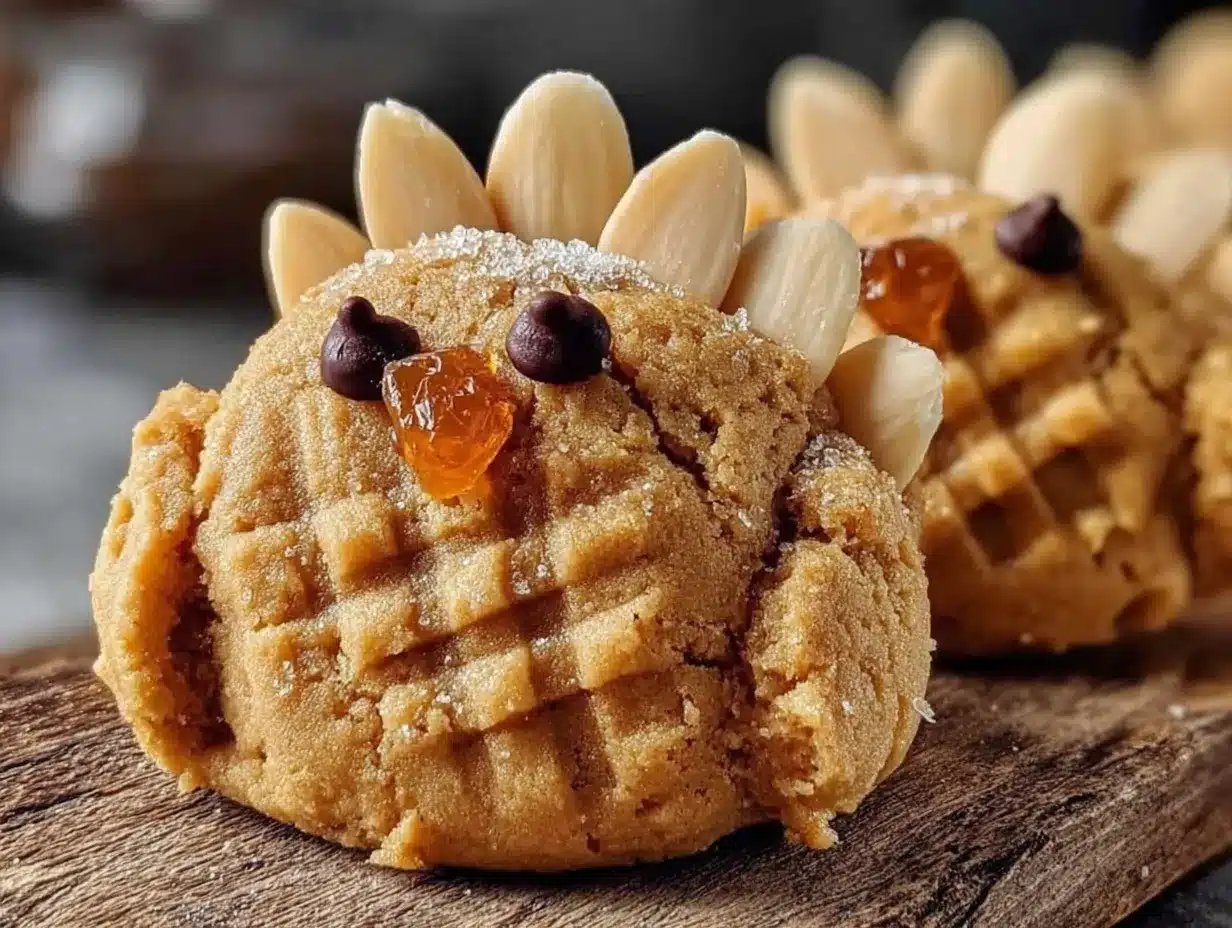
Let’s get to it. This recipe makes about 18-20 cookies, depending on how generous you are with the dough balls. I usually get 18 because I like them slightly bigger.
- Preheat your oven to 350°F (175°C). Line two baking sheets with parchment paper or silicone mats. While the oven heats, take your butter out if you haven’t already—it should be soft enough to leave a fingerprint when pressed gently.
- Cream the butter and sugars together. In a large mixing bowl, beat the softened butter, granulated sugar, and brown sugar until light and fluffy. This takes about 2-3 minutes with an electric mixer on medium speed. If you’re using a wooden spoon, go for about 4 minutes—you’ll feel it getting lighter as you go. Scrape down the sides of the bowl halfway through.
- Add the peanut butter, egg, and vanilla. Mix until everything is well combined. The dough will look a little shiny at this point, which is normal. Don’t overmix—just until you can’t see any streaks of egg or vanilla.
- Whisk the dry ingredients separately. In a small bowl, whisk together the flour, baking soda, and salt. This ensures the baking soda is evenly distributed so your cookies rise uniformly. I learned this the hard way after biting into a cookie that tasted like a salt lick.
- Gradually add the dry ingredients to the wet mixture. Add the flour mixture in two additions, mixing on low speed or stirring gently after each. Stop as soon as the flour disappears. The dough will be soft and slightly sticky—that’s what you want. If it feels too sticky to handle, chill it for 15 minutes in the fridge.
- Shape the cookies. Scoop about 1.5 tablespoons of dough (roughly the size of a golf ball) and roll it into a smooth ball. Place on the prepared baking sheet, leaving about 2 inches between each cookie. You should fit 9-10 per sheet.
- Flatten slightly and create the feather texture. Here’s where Maya’s trick comes in. Take a fork and dip the tines in a little granulated sugar (this prevents sticking). Gently press the fork into the top of each dough ball, creating a crisscross pattern. But here’s the twist—instead of the classic crisscross, press the fork in a fan shape starting from the top center of the cookie and working outward. This creates the look of turkey tail feathers. Press firmly enough to leave an impression but not so hard that the cookie flattens completely.
- Bake for 10-12 minutes. The cookies should be lightly golden around the edges but still soft in the center. They’ll continue to set as they cool, so don’t overbake. I usually pull them out at the 11-minute mark when the kitchen smells like toasted peanut butter.
- Cool on the baking sheet for 5 minutes. This is crucial. The cookies are too fragile to move immediately. After 5 minutes, transfer them to a wire rack to cool completely. Don’t skip this step—I once tried to move a cookie too early and ended up with a crumbly mess that I had to eat with a spoon. Not my finest moment.
- Decorate the cookies. Once the cookies are completely cool, it’s time to make them into turkeys. For each cookie, arrange 5-6 candy corn pieces in a fan pattern at the top to create the tail feathers. Press them in gently so they stick. For the face, place two candy eyes or mini chocolate chips near the center. Use a small piece of orange candy melt or fruit leather for the beak, and a tiny red piece for the wattle. A toothpick helps with placement—dab a tiny bit of frosting or melted candy melt on the back of each piece to help them adhere if needed.
A quick note about timing: the decorating goes faster if you set up an assembly line. Arrange all your candy pieces on a plate, have your toothpick ready, and work through the cookies one at a time. I usually decorate while watching a Thanksgiving episode of Friends. It takes about 15 minutes for a full batch.
Cooking Tips & Techniques
I’ve made these cookies enough times to know where things can go wrong. Here’s what I’ve learned, often through trial and error.
Don’t skip chilling if the dough is sticky. I made that mistake once when I was in a hurry. The cookies spread too much, and my turkeys looked more like flat pancakes with candy corn stuck to them. If your dough feels sticky after mixing, pop it in the fridge for 15-20 minutes. It firms up the butter and makes shaping much easier.
The fork technique takes practice. Maya made it look effortless, but my first few attempts were uneven. The key is to press gently and rotate the fork slightly as you work outward from the center. Think of it like drawing a fan with the fork tines. If the dough sticks to the fork, dip the tines in sugar between each cookie. I keep a small bowl of sugar next to my baking sheet just for this.
Bake one sheet at a time. I know it’s tempting to put both sheets in at once, but the heat distribution isn’t as even. The cookies on the lower rack might brown faster on the bottom. Bake one sheet on the center rack, then swap and bake the second. It adds 12 minutes but gives you more consistent results.
Let cookies cool completely before decorating. I cannot stress this enough. Warm cookies melt candy corn. I learned this when my first batch of turkeys ended up with melted orange blobs instead of feathers. Wait until the cookies are at room temperature—about 20 minutes on a wire rack. If you’re in a hurry, pop them in the fridge for 10 minutes.
Use a light hand with the candy corn. Push them in just enough to stick. If you press too hard, the candy corn can crack or sink into the cookie. A gentle press with your fingertip is all it takes. If they don’t stay, a tiny dab of frosting or melted white chocolate on the back works wonders.
Variations & Adaptations
One of the best things about this recipe is how flexible it is. Here are some variations I’ve tried and loved.
Chocolate Peanut Butter Turkeys: Swap 1/4 cup of the flour for unsweetened cocoa powder. The chocolate-peanut butter combo is incredible, and the darker color makes the candy corn pop even more. My nephew declared these “the best cookies ever,” which is high praise from a kid who usually only eats cheese pizza.
Gluten-Free Version: Use a 1:1 gluten-free flour blend instead of all-purpose flour. I’ve tested this with King Arthur’s Measure for Measure blend, and it works perfectly. The cookies are slightly more crumbly, but the taste is almost identical. Just handle them gently when decorating.
Nut-Free Option: Substitute sunflower seed butter for the peanut butter. The color will be a bit darker, and the flavor is different, but it’s still delicious. Just make sure to use a brand that doesn’t separate too much—I like SunButter Natural Creamy. Note that the dough may be slightly drier, so add an extra tablespoon of butter if needed.
Vegan Adaptation: Use vegan butter (I like Earth Balance) and a flax egg (1 tablespoon ground flaxseed mixed with 3 tablespoons water, let sit for 5 minutes). The cookies won’t spread as much, so flatten them slightly more with the fork. They’re still tasty, just a little denser.
Spiced Thanksgiving Version: Add 1 teaspoon of pumpkin pie spice to the dry ingredients. The cinnamon, nutmeg, and ginger flavors pair surprisingly well with peanut butter. I made these for a Friendsgiving party and they were gone before the pumpkin pie even made an appearance.
I once tried a version with almond butter instead of peanut butter. It was fine, but the cookies were oilier and didn’t hold their shape as well. Stick with peanut butter or sunflower seed butter for the best texture.
Serving & Storage Suggestions
These cookies are best served at room temperature, ideally within a few hours of decorating. The candy corn stays chewy, and the cookies have that perfect soft-yet-firm texture. Arrange them on a platter with the turkey faces facing outward for maximum cuteness. I like to serve them alongside a glass of cold milk or a warm cup of spiced apple cider.
For storage, place the decorated cookies in a single layer in an airtight container. Separate layers with wax paper or parchment paper to prevent the candy corn from sticking to the cookies above. They’ll stay fresh at room temperature for up to 5 days, though the candy corn will get slightly harder after day 2.
You can freeze the undecorated cookies for up to 3 months. Bake and cool them completely, then place in a freezer-safe bag or container with parchment between layers. When you’re ready to serve, thaw at room temperature for about 30 minutes, then decorate. I do this every year—bake a double batch in early November, freeze half, and decorate them the day before Thanksgiving. It saves so much stress.
Don’t refrigerate decorated cookies. The moisture in the fridge can make the candy corn sticky and the cookies slightly soggy. Room temperature is your friend here. If you’re making them ahead, store the undecorated cookies and add the candy details the day you plan to serve them.
The flavors actually develop over time. Day-old cookies taste even better—the peanut butter flavor deepens, and the texture softens slightly. My family always fights over the leftovers, which is why I’ve started hiding a few in the back of the pantry. Don’t judge me.
Nutritional Information & Benefits
Let’s be real—these are cookies, not health food. But they do have some redeeming qualities. Each cookie (based on a batch of 18) contains approximately 185 calories, 10 grams of fat, 22 grams of carbohydrates, and 5 grams of protein. The peanut butter provides healthy monounsaturated fats and a decent amount of protein, which helps keep you full longer than a typical sugar cookie.
Peanut butter is also a good source of vitamin E, magnesium, and potassium. The brown sugar adds a small amount of calcium and iron, though honestly, you’re eating these for the joy, not the nutrients. If you’re looking for a slightly healthier option, use natural peanut butter with no added sugar and reduce the granulated sugar by 2 tablespoons. The cookies won’t be as sweet, but they’ll still be delicious.
These cookies are not gluten-free, vegan, or dairy-free in their standard form, but as I mentioned in the variations section, adaptations are easy. They do contain peanuts and wheat, so keep that in mind for allergies. The candy corn is typically gluten-free, but always check the package if you’re serving someone with celiac disease.
From a wellness perspective, I believe in balance. These cookies are a treat, and treats are meant to be enjoyed without guilt. One cookie with your afternoon coffee or as a post-dinner dessert is perfectly fine. The real benefit is the joy of making them—the time spent with family, the laughter over lopsided turkey faces, the pride when someone says “you made those?” That’s the kind of nutrition that feeds the soul.
Conclusion
These turkey-shaped peanut butter cookies are everything I want in a Thanksgiving recipe—cute enough to impress, simple enough to make with kids, and delicious enough to disappear in minutes. They’re the kind of recipe that becomes a tradition, the one your family requests year after year. And honestly, they’re easy enough that you can make them on a Tuesday night without losing your mind.
I love that these cookies have a story behind them. Every time I make them, I think of Maya standing on a step stool, fork in hand, proving that sometimes the best ideas come from the people we least expect. That’s what cooking should be—a little messy, a little surprising, and full of moments that make you smile. So go ahead, give these a try. Use the fork trick. Let the kids help. Eat a few pieces of candy corn while you’re at it. Thanksgiving is about gratitude, and I’m grateful for cookies that make people happy.
I’d love to hear how yours turn out! Drop a comment below with your turkey cookie photos, your own variations, or just a note about who helped you make them. Share this recipe with a friend who needs a little Thanksgiving cheer, and save it for next year when you’ll want to make them again. Happy baking, and happy Thanksgiving!
Frequently Asked Questions
Can I use crunchy peanut butter instead of creamy?
Yes, but the texture will be different. The peanut pieces can make it harder to create clean fork impressions, and the cookies might be slightly more crumbly. If you only have crunchy, try pulsing it in a food processor for a few seconds to break down the chunks, or just embrace the texture and call them “rustic turkeys.”
How do I keep the candy corn from falling off?
Press the candy corn in gently while the cookies are still slightly warm—not hot, but just out of the 5-minute cooling period. The residual warmth softens the candy corn slightly, helping it adhere. If that doesn’t work, use a tiny dab of store-bought frosting or melted white chocolate as glue. A toothpick helps apply just the right amount.
Can I make the dough ahead of time?
Absolutely. The dough can be refrigerated for up to 3 days in an airtight container. Let it sit at room temperature for about 10 minutes before shaping, as it will be quite firm straight from the fridge. You can also freeze the dough balls for up to 2 months—just scoop them onto a baking sheet, freeze until solid, then transfer to a freezer bag. Bake from frozen, adding 2-3 minutes to the baking time.
My cookies spread too much. What went wrong?
This usually happens for one of three reasons: the butter was too soft or melted, the dough wasn’t chilled, or you used too much sugar. Next time, make sure your butter is softened but not greasy, chill the dough for 15-20 minutes if it feels sticky, and measure your flour correctly by spooning it into the measuring cup and leveling it off. If the cookies still spread, add an extra 2 tablespoons of flour to the dough.
Can I use a different candy for the feathers?
Sure! Candy corn is traditional, but you can use candy melts in fall colors, small pretzel sticks for a savory-sweet twist, or even sliced almonds arranged in a fan pattern. For a healthier option, try dried cranberries or thin apple slices. Just keep in mind that different candies have different weights and moisture levels, so they may not stick as easily or hold up as well during storage.
Pin This Recipe!
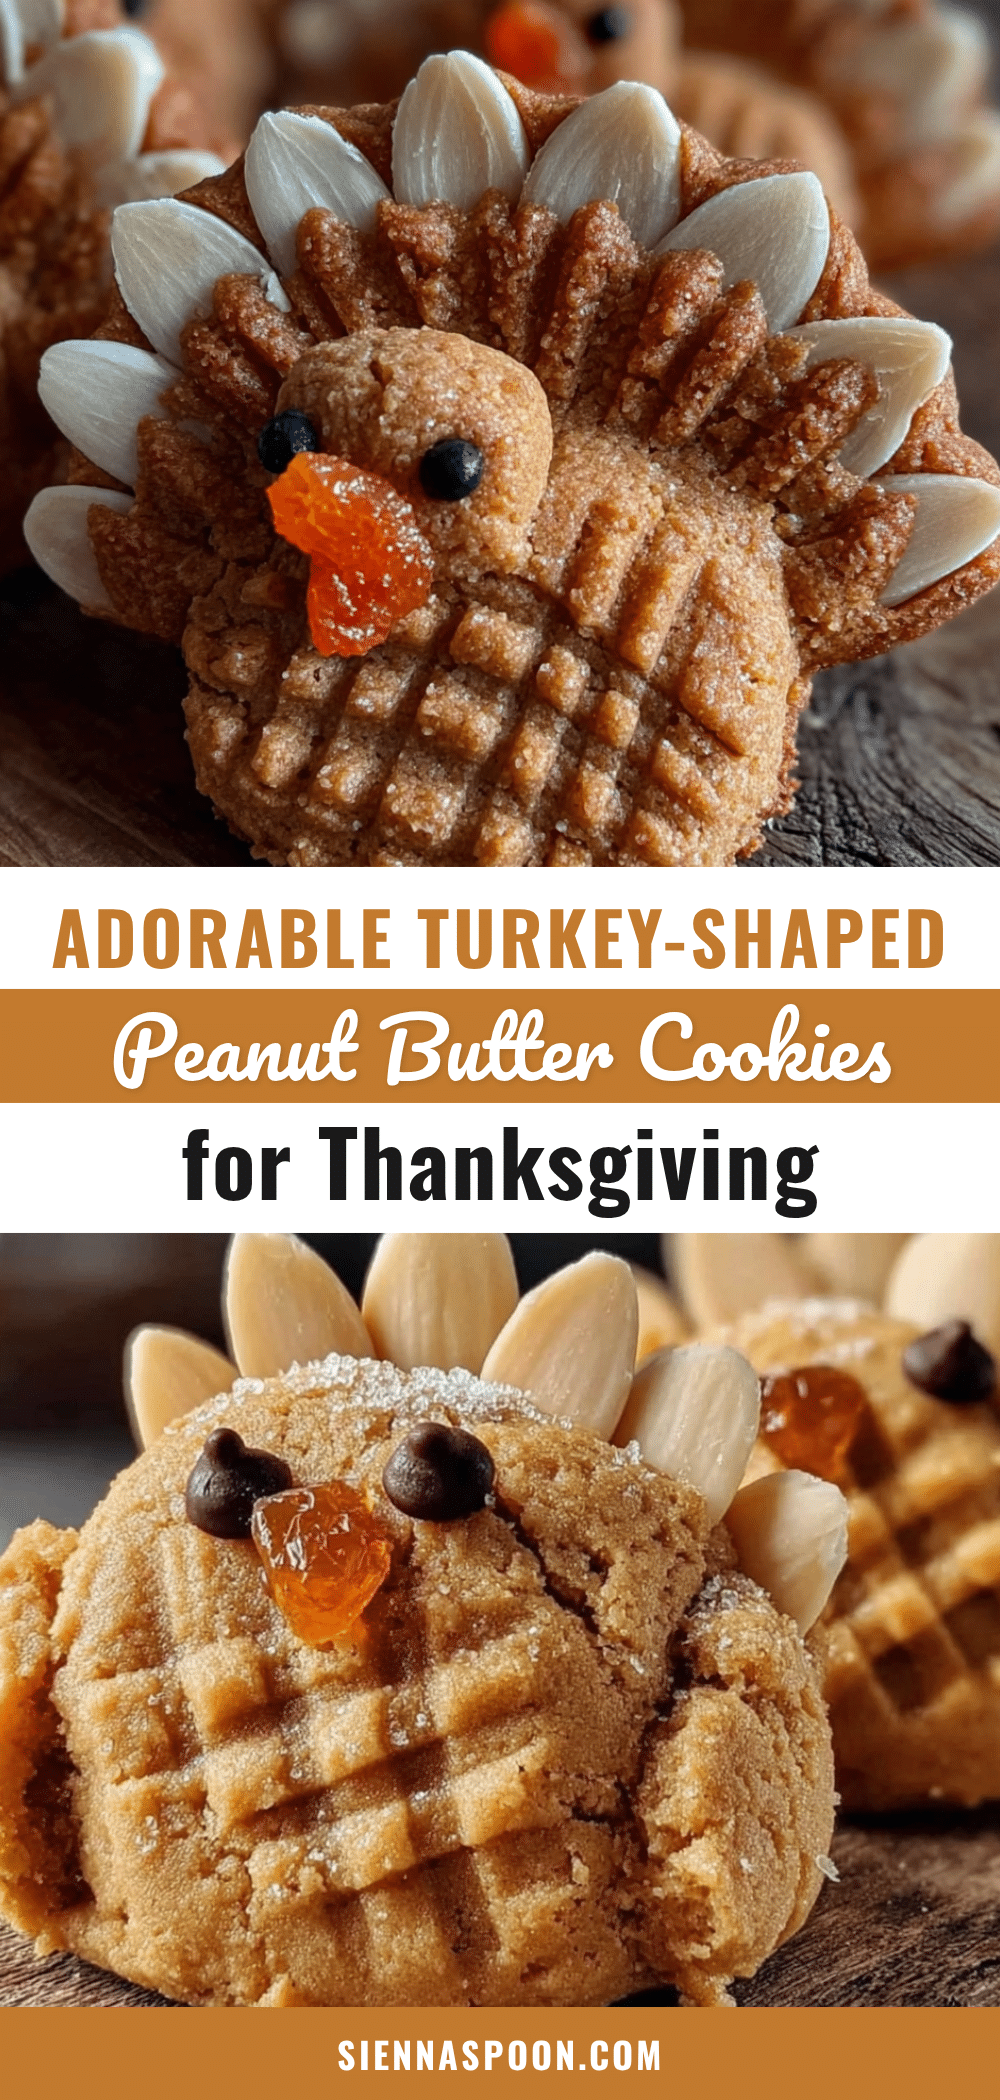
Best Easy Turkey Peanut Butter Cookies for Thanksgiving
These adorable turkey-shaped peanut butter cookies are simple to make with a clever fork trick for feather textures. Perfect for Thanksgiving, they combine a soft, melt-in-your-mouth peanut butter cookie with candy corn feathers and candy eyes.
- Prep Time: 15 minutes
- Cook Time: 12 minutes
- Total Time: 35 minutes
- Yield: 18-20 cookies 1x
- Category: Dessert
- Cuisine: American
Ingredients
- 1 cup creamy peanut butter (preferably Skippy or Jif)
- 1/2 cup unsalted butter, softened
- 1/2 cup granulated sugar
- 1/2 cup packed brown sugar (light or dark)
- 1 large egg, room temperature
- 1 teaspoon vanilla extract
- 1 1/2 cups all-purpose flour
- 1 teaspoon baking soda
- 1/2 teaspoon salt (omit if using salted butter)
- Candy corn for feathers (about 30-40 pieces per batch)
- Candy eyes or mini chocolate chips for eyes
- Orange candy melts or small piece of orange fruit leather for beak
- Red candy melts or red fruit leather for wattle
Instructions
- Preheat oven to 350°F (175°C). Line two baking sheets with parchment paper or silicone mats.
- In a large mixing bowl, cream together softened butter, granulated sugar, and brown sugar until light and fluffy (2-3 minutes with electric mixer, 4 minutes with wooden spoon).
- Add peanut butter, egg, and vanilla; mix until well combined.
- In a small bowl, whisk together flour, baking soda, and salt.
- Gradually add dry ingredients to wet mixture in two additions, mixing until just combined. Dough will be soft and slightly sticky.
- Scoop about 1.5 tablespoons of dough (golf ball size) and roll into smooth balls. Place on prepared baking sheets, 2 inches apart (9-10 per sheet).
- Dip fork tines in granulated sugar. Gently press fork into top of each dough ball in a fan shape starting from center outward to create turkey feather texture.
- Bake for 10-12 minutes until edges are lightly golden but centers are still soft.
- Cool on baking sheet for 5 minutes, then transfer to wire rack to cool completely.
- Once completely cool, decorate: arrange 5-6 candy corn pieces in fan pattern at top for tail feathers. Place two candy eyes or mini chocolate chips near center. Add orange piece for beak and red piece for wattle. Use toothpick for placement; dab with frosting or melted candy if needed.
Notes
For best results, use creamy peanut butter like Skippy or Jif. If dough is sticky, chill for 15-20 minutes. Bake one sheet at a time for even results. Let cookies cool completely before decorating to prevent candy corn from melting. Store undecorated cookies in freezer for up to 3 months.
Nutrition
- Serving Size: 1 cookie
- Calories: 185
- Sugar: 14
- Sodium: 150
- Fat: 10
- Saturated Fat: 3.5
- Carbohydrates: 22
- Fiber: 1
- Protein: 5
Keywords: turkey cookies, peanut butter cookies, Thanksgiving cookies, easy cookies, kid-friendly, holiday baking


